
1966 Nova...LS1 Install...Pictures Inside.
 05-27-2009, 02:37 PM
#1
Been busy installing an LS1 in my Nova. Pretty far along, wanted to have something to show instead of a few pictures at a time. Thanks to the members here that answered my seemingly endless questions.
I have since switched sides with the air cleaner, as I was a little leery at first to cut into a $50 dollar 90 degree fitting. It was hitting the fans, but once I took an inch off, it fits much better. Got those parts from intake hoses.com. The inline fitting for the steam line is billet aluminum, and came from Jegs, part number 555-51155.The upper and lower hoses had to be pieced together from three hoses, two for the top, and one for the bottom.
I reused the crossmember I already had from a previous swap to a 700R4, just redrilled the hole, and trimmed the rear of the member and done. As for fuel, I used the vette filter/regulator and plumbed it accordingly. Rails are on the way from Nasty Nate. Headers from S&P.....
I fabricated a power steering bypass pulley, using a Dorman AC delete pulley. The bracket that came with it would not fit, so I made one. I need to do more work on it to beef it up, but it is just mocked up at this point. It does line up, and works fine. Dorman part number is 34196 at O' Reilley's.
Wiring harness should arrive today, so have to get that installed, wire up fan relays, mains for car power, add some fuse links etc..will update more as it gets done....
The patient......

The teardown....

The new implant

Heidt's clip being installed


Motor bolted in place


Rick's Hot Rod's tank...nice piece....

Throttle linkage at firewall


Oil sending unit location, tapped and threaded

Upper and lower radiator hoses installed

My answer to the steam bypass connection issue


Power steering bypass pulley, gotta clean this up and beef this up some

Air Cleaner, tubing solution.

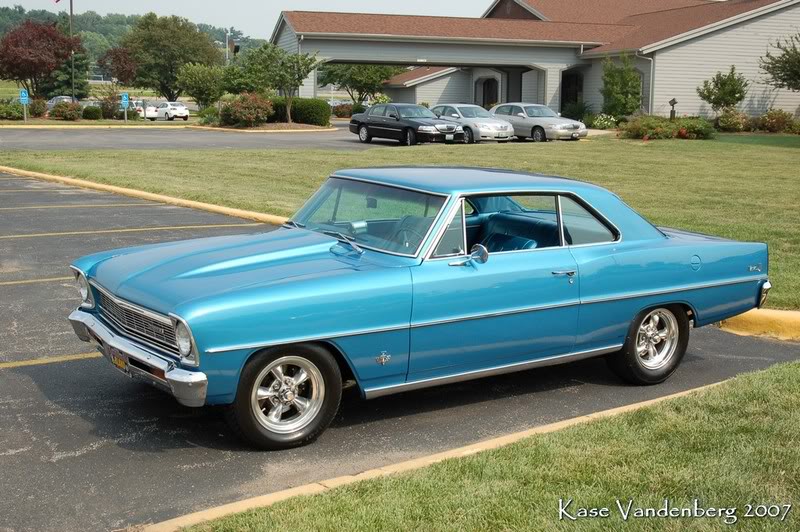
Starting to look like a car again

I have since switched sides with the air cleaner, as I was a little leery at first to cut into a $50 dollar 90 degree fitting. It was hitting the fans, but once I took an inch off, it fits much better. Got those parts from intake hoses.com. The inline fitting for the steam line is billet aluminum, and came from Jegs, part number 555-51155.The upper and lower hoses had to be pieced together from three hoses, two for the top, and one for the bottom.
I reused the crossmember I already had from a previous swap to a 700R4, just redrilled the hole, and trimmed the rear of the member and done. As for fuel, I used the vette filter/regulator and plumbed it accordingly. Rails are on the way from Nasty Nate. Headers from S&P.....
I fabricated a power steering bypass pulley, using a Dorman AC delete pulley. The bracket that came with it would not fit, so I made one. I need to do more work on it to beef it up, but it is just mocked up at this point. It does line up, and works fine. Dorman part number is 34196 at O' Reilley's.
Wiring harness should arrive today, so have to get that installed, wire up fan relays, mains for car power, add some fuse links etc..will update more as it gets done....
The patient......
The teardown....
The new implant
Heidt's clip being installed
Motor bolted in place
Rick's Hot Rod's tank...nice piece....
Throttle linkage at firewall
Oil sending unit location, tapped and threaded
Upper and lower radiator hoses installed
My answer to the steam bypass connection issue
Power steering bypass pulley, gotta clean this up and beef this up some
Air Cleaner, tubing solution.
Starting to look like a car again


 05-27-2009, 05:58 PM
#5
I friend had one of those 67 SS back in the day, same color!.. We used to curise and rip the hell out of it. great fun car.. You have done a great job, kept it going.. With that front clip, the swap must have just slid in.. ?.. who's clip is it ?
I would recommend you move the air intake the other way.. you have it like the radiator hose is wrapped around the air tube and heating up the intake air.. just a recommendation..
I would recommend you move the air intake the other way.. you have it like the radiator hose is wrapped around the air tube and heating up the intake air.. just a recommendation..
05-27-2009, 08:25 PM
#6
I friend had one of those 67 SS back in the day, same color!.. We used to curise and rip the hell out of it. great fun car.. You have done a great job, kept it going.. With that front clip, the swap must have just slid in.. ?.. who's clip is it ?
I would recommend you move the air intake the other way.. you have it like the radiator hose is wrapped around the air tube and heating up the intake air.. just a recommendation..
I would recommend you move the air intake the other way.. you have it like the radiator hose is wrapped around the air tube and heating up the intake air.. just a recommendation..
T,
05-28-2009, 05:41 PM
#7
Launching!
Join Date: Oct 2007
Location: the great us of a
Posts: 207
Likes: 0
Received 0 Likes
on
0 Posts

you know you keep this up and your going to beat me on finishing... thats some bull. but iam trying to finish. going to work on the wiring tonight some more. ordering some more part friday.
Trending Topics
05-28-2009, 06:01 PM
#8

I like your taste in Cars......................LOL
Best E.T. 10.92 @ 126
Ken
Best E.T. 10.92 @ 126
Ken
05-28-2009, 08:15 PM
#9

Sweet, like the color for sure.........always looks clean....very nice car, great job on it...
T,
05-28-2009, 09:40 PM
#10
On The Tree
iTrader: (4)

Join Date: Aug 2006
Location: Central Iowa
Posts: 190
Likes: 0
Received 0 Likes
on
0 Posts
Which oil pan are you using? What's the distance between the bottom of the pan (if you're using the truck pan) and/or pan rail (on the block) to the crossmember?
05-28-2009, 11:10 PM
#12
Launching!
Join Date: Oct 2007
Location: the great us of a
Posts: 207
Likes: 0
Received 0 Likes
on
0 Posts
[QUOTE=TomM;11670225]Got my harness in, gotta mount the ECM in the car and hook up a few wires. It would suffice to say that if you aren't running by next weekend....I gotcha...
yeah, your going to beat me. looking for my dash tonight and everyone is out of stock on them. going to make a few calls to make sure. yeah you got me
yeah, your going to beat me. looking for my dash tonight and everyone is out of stock on them. going to make a few calls to make sure. yeah you got me
05-29-2009, 06:50 AM
#13
[QUOTE=ACONLP;11671224]
Got my harness in, gotta mount the ECM in the car and hook up a few wires. It would suffice to say that if you aren't running by next weekend....I gotcha...
yeah, your going to beat me. looking for my dash tonight and everyone is out of stock on them. going to make a few calls to make sure. yeah you got me
yeah, your going to beat me. looking for my dash tonight and everyone is out of stock on them. going to make a few calls to make sure. yeah you got me
http://store.summitracing.com/partde...5&autoview=sku


 06-04-2009, 04:13 PM
#16
Launching!
iTrader: (12)
Join Date: Apr 2006
Location: Thornton, PA
Posts: 223
Likes: 0
Received 0 Likes
on
0 Posts
Looks great Tom! Wow, you really got that together rather quickly! Keep us posted on any updates....you've probably been cruising her by now.
Andrew
(Notscared from Steve's site)
Andrew
(Notscared from Steve's site)
06-04-2009, 09:31 PM
#17
Got the fuel system finished, re-routed some lines....Headers came in, fit like a glove, plugs wires on. Got all the wiring done with the exception of the lockup, have the switch mounted, just need to terminate the wires.
Looks like Saturday is the big day, gonna fuel it up, test for leaks and see if she fires off...
T,


Looks like Saturday is the big day, gonna fuel it up, test for leaks and see if she fires off...
T,
Last edited by TomM; 06-05-2009 at 06:22 AM.
