1997 Jeep Cherokee LS1 conversion

 07-26-2009, 12:39 PM
#42
On The Tree
Join Date: Dec 2008
Location: West Mich
Posts: 165
Likes: 0
Received 0 Likes
on
0 Posts
I think I'm in love.............
I met a guy yesterday that took his LS XJ on the Ultimate Adventure a couple weeks ago. Very nice set up. He said he used truck manifolds that were modified on the outlet end. Used the stock short/wide XJ rad too surprisingly and it stay's cool.
I met a guy yesterday that took his LS XJ on the Ultimate Adventure a couple weeks ago. Very nice set up. He said he used truck manifolds that were modified on the outlet end. Used the stock short/wide XJ rad too surprisingly and it stay's cool.
07-27-2009, 12:14 AM
#44
On The Tree
Thread Starter

Join Date: Jun 2009
Location: colorado Springs
Posts: 194
Likes: 0
Received 0 Likes
on
0 Posts
No pics tonight folks but I did get some more work done. The tranny is in and the tranny mount is actually about an inch or so forward of the crossmember. Not sure how this development will affect the crossmember and the transfercase location.
Another development that I wasn't counting on was the transfer case itself. I procured an NP231C out of a S-10 and assumed that the mounting would be the same as my current NP231J. Simply put...It Ain't! The "C" has 5 mounting holes and the "J" has 6. It looks like the "J case bolt pattern matches the 4l60e tailcone. At this point I'm not sure if the "C" input is 27 spline or if the diameter is correct to mate with the tranny. More research is required, though I thought I had this covered already.
Just to muddy the water a bit more, my 4L60E tranny does in fact have a 6 hole pattern, not the 5 bolt pattern that is commonly found on the 700r4 (or 4l60E tranny that was used in the S-10).
 08-02-2009, 10:13 PM
#49
On The Tree
Thread Starter
Join Date: Jun 2009
Location: colorado Springs
Posts: 194
Likes: 0
Received 0 Likes
on
0 Posts
#1) Lost a cam lobe on Crane Cam 10 miles north of moab on our way back to Colorado Springs.
Rebuilt with new Crower Cam and Cam Saver Lifters
#2) Broken Valve Spring on top of a trail Called Iron Chest at approx. 13K ft in Elevation. Didn't find out what it was till we got the top end torn apart. This is what the valve looked like.

#3) Got back to Moab this spring and started hearing a knock on Day#1. I recently tore the bottom end apart and found some bad bearings, possibly caused by #2 above.
I spent way you much time and hardearned money on that motor. I'm sure I could put the rebuilt motor back in again again run it for years....but sometimes you've just got to walk away from something like that.
Rebuilt with new Crower Cam and Cam Saver Lifters
#2) Broken Valve Spring on top of a trail Called Iron Chest at approx. 13K ft in Elevation. Didn't find out what it was till we got the top end torn apart. This is what the valve looked like.
#3) Got back to Moab this spring and started hearing a knock on Day#1. I recently tore the bottom end apart and found some bad bearings, possibly caused by #2 above.
I spent way you much time and hardearned money on that motor. I'm sure I could put the rebuilt motor back in again again run it for years....but sometimes you've just got to walk away from something like that.
08-08-2009, 10:07 PM
#51
On The Tree
Thread Starter
Join Date: Jun 2009
Location: colorado Springs
Posts: 194
Likes: 0
Received 0 Likes
on
0 Posts
Just got my front output shaft in the mail yesterday for my wide chain mod (T-case), need to finish the clocking ring too.
Wire harness fabrication/mods started today. Limited progress since i stoppedto help my son build some tube doors for his XJ.
Novak Headers should be here in the next 4-5 days.
Wire harness fabrication/mods started today. Limited progress since i stoppedto help my son build some tube doors for his XJ.
Novak Headers should be here in the next 4-5 days.
08-15-2009, 09:19 PM
#52
On The Tree
Thread Starter
Join Date: Jun 2009
Location: colorado Springs
Posts: 194
Likes: 0
Received 0 Likes
on
0 Posts
So after giving up on re-inventing the wheel I finally got my t-case reassembled. Here's what I finally ended up with:
The case is the original NP231J from my heep.
Front output is from an Dodge NP231D t-case.
The main shaft is from a mid 90's NP231C
I used the chevy input since it's a 27 spline and matches the tranny. I also robbed the wide main gear, reluctor ring, VSS, and tail cone from the chevy t-case.
The clocking ring is all home build stuff using a 8" O.D x 5" I.D. x3/8" thick steel donut.
While I had the case apart I also cut about 3/8" off the tail end of the rear output shaft to get to the softer steel. I then drilled it and will tap it in the next day or so. I'll be installing a flanged SYE and then I can deal with the driveshaft.
Made a lot of progess on the wiring as well today. Hopefully I can get the PCM mounted tomorrow and start shortening some of the wires for it too. Buying a harness would most certainly have been easier, but going this route I'm becoming intimately familiar with the Chevy harness. Yes, thats a good thing.
Did a little research and measuring at the parts house a few days back and found that a GM fuel pump (from the same model and year as the donor rig for my engine) will fit in my stock fuel tank. The upper ring will need to be widened by either plastic welding another ring onto it or sandwiching between two pieces of stainless steel. I'm thinking that the SS option is the better of the two.
Batteries in the camera are dead, so no pics till I get some more, not that there's anything really interesting to see at this point.
08-16-2009, 08:43 PM
#53
On The Tree
Thread Starter
Join Date: Jun 2009
Location: colorado Springs
Posts: 194
Likes: 0
Received 0 Likes
on
0 Posts
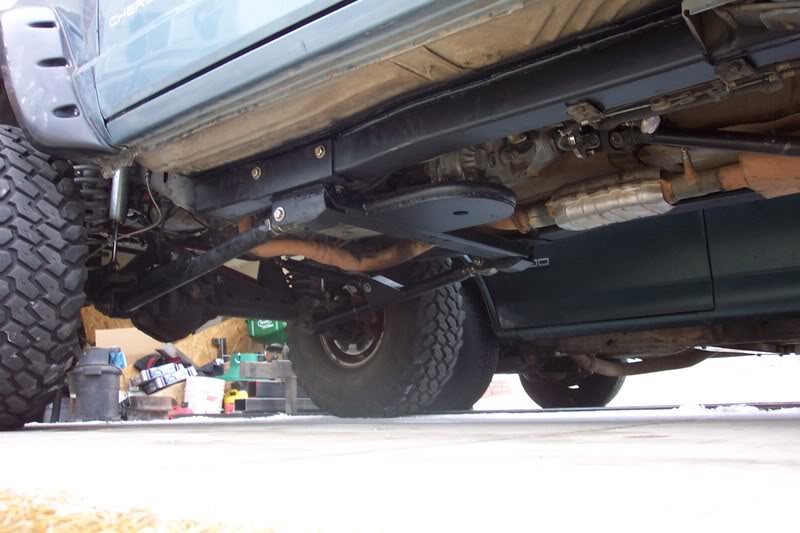
A little more done today. Cross member modified to accept Chevy transmission mount, transfer case linkage rebuilt to clear new tranny.
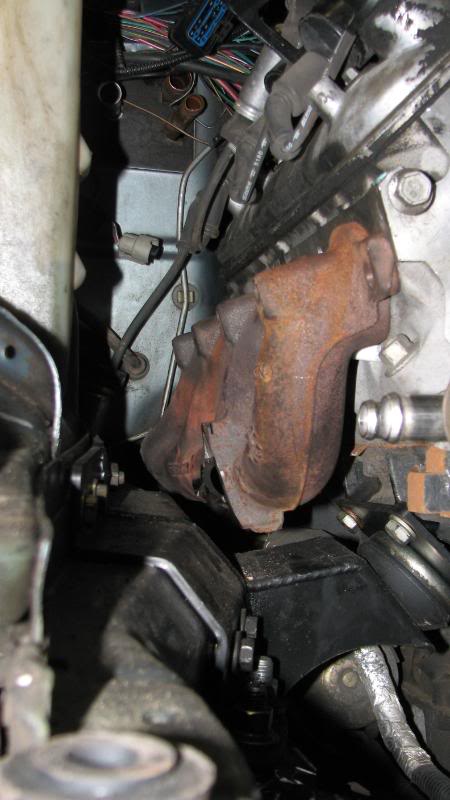
Played around with stock exhaust manifolds as well. A little cutting here, and little grinding there.....I think I can make 'em work!!!!! Been doing copious amounts of reading on cutting and welding the cast manifolds and so far it looks perfectly do-able.
Still to come, Learning how to re-flash a PCM and what to delete/change in the EEPROM for better off-road performance.
08-27-2009, 10:55 PM
#56
On The Tree
Thread Starter
Join Date: Jun 2009
Location: colorado Springs
Posts: 194
Likes: 0
Received 0 Likes
on
0 Posts
Decided to modify the OEM manifolds till i can get the Novak headers. Started by removing the heat shield and cutting off the portion of the casting for the EGR tube (no EGR on my 03 engine). I also cut off the flange and a 1.25" section of pipe between the flange and aft exhaust tube.
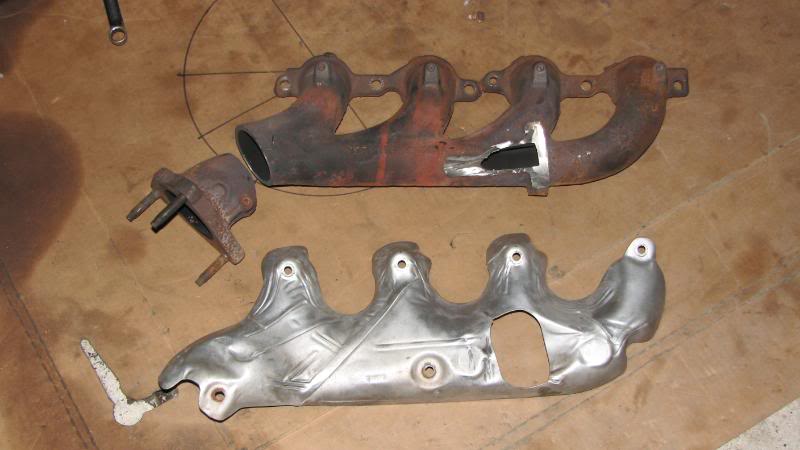
With the additional casting material removed the manifold fits.
I'll have to cut out the old upper control arm mount from the frame rail to gain a little for clearance for the down pipes.
I'll weld the manifold back together with a different flange angle and then start on the Y-pipe. I spoke with Eric at Colorado Welding Supply at length about welding it and he provided some excellant advice. Thanks Eric!!
I decided that although piggy-backing 2 PCM's can be done, at some point the OEM XJ PCM was going to come out anyway so I decided to stretch out the schedule and go ahead with a single PCM. The main obstacle to overcome was instrumentation. Adding a full set of quality aftermarket gauges simply isn't in the budget, so I had to go a different direction. I picked up a gauge cluster for an 03 Tahoe and am in the process of getting it mounted. Once it's its installed and connected I'll have no need for the XJ PCM and gauge cluster. (Check out my ad in the classified section)
The XJ cluster is on top and obviously a bit smaller that the GM cluster.
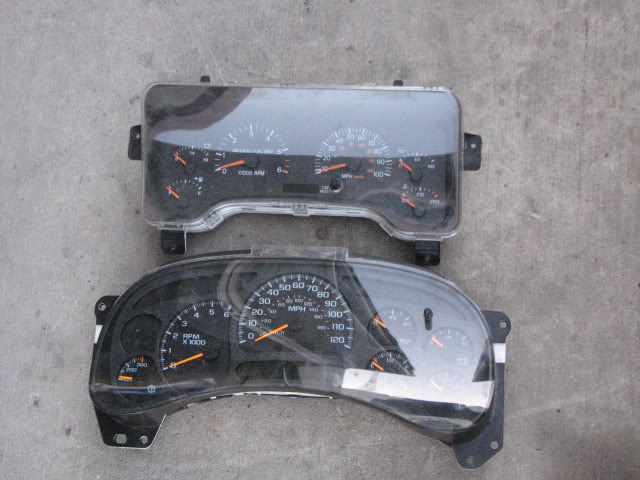
In this pic you might be able to see the other major difference between the two. The XJ cluster is wider (from the front of the cluster to the rear) at the top portion, while the GM cluster is skiny on top and fat on the bottom.
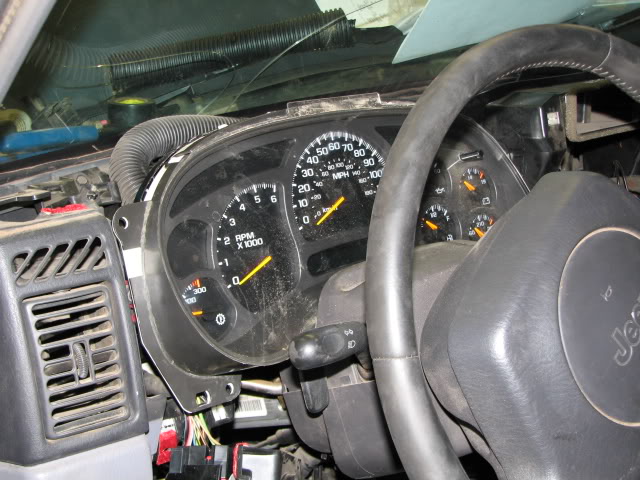
This pic shows the wider GM cluster a little better. The problem is that with the thicker/wider lower portion on the GM cluster, the steering column cannot be raised to a comfortable position. Even with the OEM cluster mounting bracket removed the new cluster still sticks out too far along the bottom.
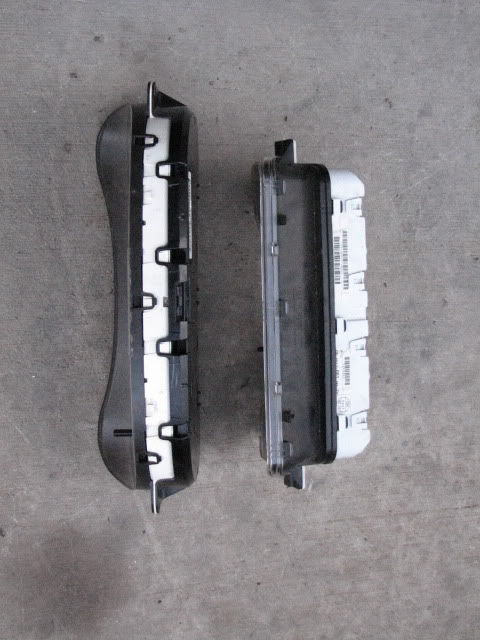
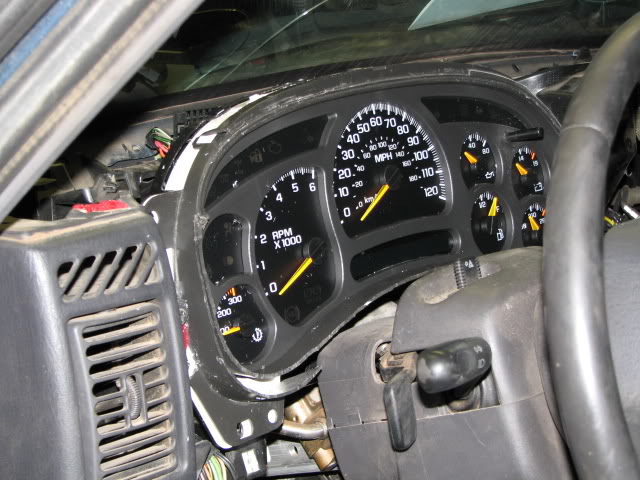
In order to get the new cluster a bit farther into the dash I trimmed off approx. 1.25" of the plastic housing along the bottom and then removed most of the remaining curve from the sides with my Dremel.. A little more trimming was requires on the mounting flats inorder to get it past the ducts on either side. Although not in it's final position, the follow pic should illustrate the difference after trimming the new cluster.
The plastic support/mounting bracket behind the OEM cluster was also removed and a new headlight/dimmer switch location will have to be addressed too.
I tried to remove the clear plastic lens from the cluster so I could reuse it after cleaning up the edges of the housing. That S.O.B. wasn't coming off in one piece no matter what I tried. No worries, Lowes sells thin Lexan.
With the additional casting material removed the manifold fits.
I'll have to cut out the old upper control arm mount from the frame rail to gain a little for clearance for the down pipes.
I'll weld the manifold back together with a different flange angle and then start on the Y-pipe. I spoke with Eric at Colorado Welding Supply at length about welding it and he provided some excellant advice. Thanks Eric!!
I decided that although piggy-backing 2 PCM's can be done, at some point the OEM XJ PCM was going to come out anyway so I decided to stretch out the schedule and go ahead with a single PCM. The main obstacle to overcome was instrumentation. Adding a full set of quality aftermarket gauges simply isn't in the budget, so I had to go a different direction. I picked up a gauge cluster for an 03 Tahoe and am in the process of getting it mounted. Once it's its installed and connected I'll have no need for the XJ PCM and gauge cluster. (Check out my ad in the classified section)
The XJ cluster is on top and obviously a bit smaller that the GM cluster.
In this pic you might be able to see the other major difference between the two. The XJ cluster is wider (from the front of the cluster to the rear) at the top portion, while the GM cluster is skiny on top and fat on the bottom.
This pic shows the wider GM cluster a little better. The problem is that with the thicker/wider lower portion on the GM cluster, the steering column cannot be raised to a comfortable position. Even with the OEM cluster mounting bracket removed the new cluster still sticks out too far along the bottom.
In order to get the new cluster a bit farther into the dash I trimmed off approx. 1.25" of the plastic housing along the bottom and then removed most of the remaining curve from the sides with my Dremel.. A little more trimming was requires on the mounting flats inorder to get it past the ducts on either side. Although not in it's final position, the follow pic should illustrate the difference after trimming the new cluster.
The plastic support/mounting bracket behind the OEM cluster was also removed and a new headlight/dimmer switch location will have to be addressed too.
I tried to remove the clear plastic lens from the cluster so I could reuse it after cleaning up the edges of the housing. That S.O.B. wasn't coming off in one piece no matter what I tried. No worries, Lowes sells thin Lexan.
08-28-2009, 07:30 AM
#57
On The Tree
Thread Starter
Join Date: Jun 2009
Location: colorado Springs
Posts: 194
Likes: 0
Received 0 Likes
on
0 Posts
Seems I didn't update this thread with the t-case info.
It's installed
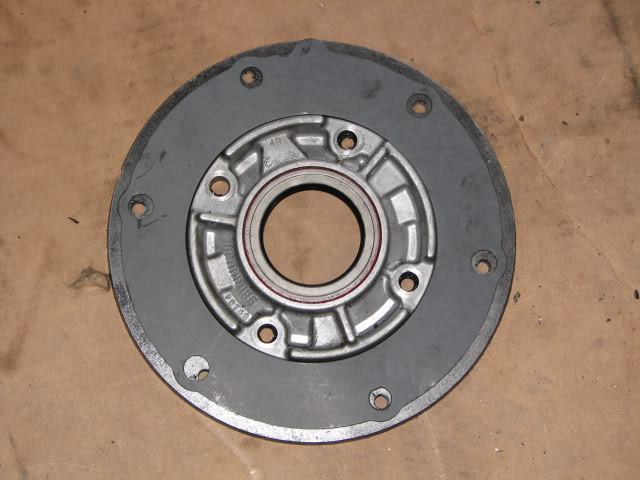
The t-case has a front output from a 231D with a wide chain gear
The mainshaft, wide gear. wide chain, reluctor ring, VSS, input shaft (32 spline) and 4 planetary low range came from a 94-ish 231C.
The case is my original NP231J.
The t-case is clocked approx. 20-25Deg using a homemade clocking ring.
Linkage for the t-case has been shortened and the OEM XJ shifter works fine.
Still need to order a flange adapter for it.
The 6 bolt pattern for the t-case is not equally spaced at 60Deg between each hole so my first attempt at a clocking ring was a dismal failure. I ended up getting a Chevy gasket and used it as a template. This took some time since the gasket will only fit in one position.
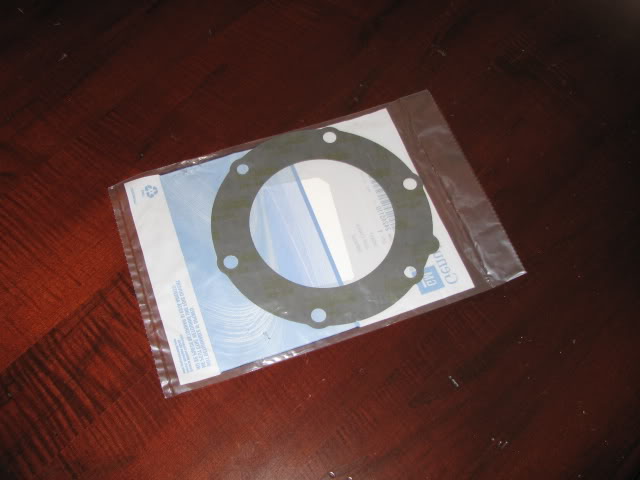
I also used the gasket as template for a second gasket. there's one on both sides of the clocking ring.
The stock GM power steering pulley had to be replaced since it comes extremely close to the power steering gear box. This was compounded by the fact that my gearbox is a wider Durango box that is also spaced inboard an additional 1/4" as compared to a stock XJ spacer. I picked up a smaller pulley (-3/4" in diameter) from a mid 90's Ford E-150 van at a local boneyard.
It's installed
The t-case has a front output from a 231D with a wide chain gear
The mainshaft, wide gear. wide chain, reluctor ring, VSS, input shaft (32 spline) and 4 planetary low range came from a 94-ish 231C.
The case is my original NP231J.
The t-case is clocked approx. 20-25Deg using a homemade clocking ring.
Linkage for the t-case has been shortened and the OEM XJ shifter works fine.
Still need to order a flange adapter for it.
The 6 bolt pattern for the t-case is not equally spaced at 60Deg between each hole so my first attempt at a clocking ring was a dismal failure. I ended up getting a Chevy gasket and used it as a template. This took some time since the gasket will only fit in one position.
I also used the gasket as template for a second gasket. there's one on both sides of the clocking ring.
The stock GM power steering pulley had to be replaced since it comes extremely close to the power steering gear box. This was compounded by the fact that my gearbox is a wider Durango box that is also spaced inboard an additional 1/4" as compared to a stock XJ spacer. I picked up a smaller pulley (-3/4" in diameter) from a mid 90's Ford E-150 van at a local boneyard.