

 05-18-2016, 06:11 PM
Last edit by: IB Advertising
See related guides and technical advice from our community experts:
Browse all: Engine Guides
- Camaro and Firebird: Guide for Budget Engine Swap
Important information to help you understand your Camaro or Firebird
Browse all: Engine Guides

1997 Thunderbird Gen III Budget Engine Swap
12-06-2009, 01:08 AM
#1

I thought I should share my story of my oddball budget Gen III engine swap for the members of the board. I haven’t heard of anyone doing this and I took a few pictures to document my progress along the way. Sit back, buckle in and enjoy! 
The madness started when I bought a stock fairly clean 1997 MN12 Thunderbird V6 a nearly two years ago. Since I always wanted one, was able to help a friend in need and it was available for super cheap I couldn’t resist.
The beginning.

With the first drive around the block I rediscovered why I hadn’t purchased one earlier – it was terribly under powered. Many hours of previous research had pointed me in the direction of the Gen III small block for power, reliability, size, cost and flexibility. Being a Chevy guy at heart didn’t hurt my decision.
After being outrun by a girl in a Cavalier a plan was created for the project:
Around 300 HP
Inexpensive (under $2500)
Quick build
Daily driver reliable
No race or high octane gas
Common wear parts (water pump, belt, etc)
Stealth (quiet exhaust, everything fits under the hood, etc.)
Leave the car looking completely stock inside and out
Working factory gauges, lights, AC, diagnostic connection, etc.
Stock appearing wheels
Brakes big enough to stop the car
Easy to repair
Motivation came easy as I was reminded on a daily basis that this was the slowest car I had ever owned. A few phone calls and a touch of internet searching led me to the holy grail of used engines in my area. I told them what I was looking for and the reply was “how many do you want and what mileage?” A look in their warehouse told me why he was able to say this. Imagine an entire warehouse with nothing but used engines and transmissions 4 and 5 rows high. I was in heaven.
From left: Corvette 5.7, my 5.3, another random 5.3 - background unknown diff center and transfer case.

Hard earned money exchanged hands and my new baby (2000 5.3 with 103K) was loaded in the truck (ironically a 2000 with a 5.3 and 275K) for a trip to it’s new home.

A bit more coin was traded and a transmission was snared in my net.

My list of assets was pretty strong for one day’s hunting:
The madness started when I bought a stock fairly clean 1997 MN12 Thunderbird V6 a nearly two years ago. Since I always wanted one, was able to help a friend in need and it was available for super cheap I couldn’t resist.
The beginning.
With the first drive around the block I rediscovered why I hadn’t purchased one earlier – it was terribly under powered. Many hours of previous research had pointed me in the direction of the Gen III small block for power, reliability, size, cost and flexibility. Being a Chevy guy at heart didn’t hurt my decision.
After being outrun by a girl in a Cavalier a plan was created for the project:
Around 300 HP
Inexpensive (under $2500)
Quick build
Daily driver reliable
No race or high octane gas
Common wear parts (water pump, belt, etc)
Stealth (quiet exhaust, everything fits under the hood, etc.)
Leave the car looking completely stock inside and out
Working factory gauges, lights, AC, diagnostic connection, etc.
Stock appearing wheels
Brakes big enough to stop the car
Easy to repair
Motivation came easy as I was reminded on a daily basis that this was the slowest car I had ever owned. A few phone calls and a touch of internet searching led me to the holy grail of used engines in my area. I told them what I was looking for and the reply was “how many do you want and what mileage?” A look in their warehouse told me why he was able to say this. Imagine an entire warehouse with nothing but used engines and transmissions 4 and 5 rows high. I was in heaven.
From left: Corvette 5.7, my 5.3, another random 5.3 - background unknown diff center and transfer case.
Hard earned money exchanged hands and my new baby (2000 5.3 with 103K) was loaded in the truck (ironically a 2000 with a 5.3 and 275K) for a trip to it’s new home.
A bit more coin was traded and a transmission was snared in my net.
My list of assets was pretty strong for one day’s hunting:

 12-06-2009, 01:32 AM
#3
I soon discovered what I always thought would be a problem. The truck intake wasn’t going to work so I acquired a corvette LS1 intake, steam tubes and exhaust. This dropped the overall height by 5 inches!
Intake comparison.

The next series of discoveries came with the LS intake mocked up. The fuel rail and injectors won’t work so I sourced a set of used fuel rails and injectors from a Camaro. Of course the new injectors have different plugs for the harness so a trip to the local ****** and pay yard was in order. Finally the idler pulley was in the way of the throttle body and the alternator sat higher than the Space Needle which meant different brackets for it, the offending idler and the P/S pump. No problem but more time and $. Time we have but money, not so much. My local GMPP dealer wanted $700 for a Vette, F-Body or CTS-V drive system which was as much as I had already spent on an engine and transmission and thus NOT in the budget. Add that I wasn’t exactly sure I had the width to make either system work I kept to my original plan of fabricating my own brackets.
More parts hunting and I acquired the requisite spacer from my all too friendly GMPP dealer, it’s required bolts and torque converter bolts. Of course somehow there was a mixup and I was initially supplied with Gen I / II bolts which won't work. All Gen III bolts are metric and the engine even looks at you funny if you walk by it with standard tools.
The spacer I always talk about...

Replacement Gen III flex plates aren't cheap yet as I discovered on this trip to the parts store. My inner Chi told me to politely excuse myself and hit the yard. Besides they had to order the thing which means it wouldn't be here for a while since it wasn't stocked at their warehouse. I'm not drag racing and I don't plan on making "real" power with this engine so I am not going for something SFI approved. The stock replacement jobs weren't too much less than the racing part (from a perspective angle) but it isn't necessary for my build and thus is money wasted. I really can't argue since that is the only thing my engine didn't come with. Calling the yard I sourced the engine from scored me a flex plate for under $30 - easy enough. Searching the local ****** and pay yards landed various misc bits of wiring harness, plugs, bolts and other goodies I needed. While I was away from the shop I slid by my all too friendly GMPP dealer and walked away with a Muscle Car Oil Pan Kit.
A quick peek at the internals of the engine and all looked well, and hardly used.

Did anyone mention a 1997 truck transmission fill tube won’t work with a Gen III block? Ask me how I know this… Looking back I don’t even know what made me think this would work for my setup. The firewall of the bird is very tight to the block and even if it would have fit I wouldn’t have been able to run heater hoses or add oil. Of course I didn’t figure this out until AFTER I painted it. The original plan called for painting everything to contrast the car but wisdom told me otherwise. I’m glad I skipped that step, I would still be fixing stuff I painted and messed up or taping off things I wanted to spray… no good for quick. …as for my transmission fill tube solution, Lokar to the rescue!
Mismatch.

Intake comparison.
The next series of discoveries came with the LS intake mocked up. The fuel rail and injectors won’t work so I sourced a set of used fuel rails and injectors from a Camaro. Of course the new injectors have different plugs for the harness so a trip to the local ****** and pay yard was in order. Finally the idler pulley was in the way of the throttle body and the alternator sat higher than the Space Needle which meant different brackets for it, the offending idler and the P/S pump. No problem but more time and $. Time we have but money, not so much. My local GMPP dealer wanted $700 for a Vette, F-Body or CTS-V drive system which was as much as I had already spent on an engine and transmission and thus NOT in the budget. Add that I wasn’t exactly sure I had the width to make either system work I kept to my original plan of fabricating my own brackets.
More parts hunting and I acquired the requisite spacer from my all too friendly GMPP dealer, it’s required bolts and torque converter bolts. Of course somehow there was a mixup and I was initially supplied with Gen I / II bolts which won't work. All Gen III bolts are metric and the engine even looks at you funny if you walk by it with standard tools.
The spacer I always talk about...
Replacement Gen III flex plates aren't cheap yet as I discovered on this trip to the parts store. My inner Chi told me to politely excuse myself and hit the yard. Besides they had to order the thing which means it wouldn't be here for a while since it wasn't stocked at their warehouse. I'm not drag racing and I don't plan on making "real" power with this engine so I am not going for something SFI approved. The stock replacement jobs weren't too much less than the racing part (from a perspective angle) but it isn't necessary for my build and thus is money wasted. I really can't argue since that is the only thing my engine didn't come with. Calling the yard I sourced the engine from scored me a flex plate for under $30 - easy enough. Searching the local ****** and pay yards landed various misc bits of wiring harness, plugs, bolts and other goodies I needed. While I was away from the shop I slid by my all too friendly GMPP dealer and walked away with a Muscle Car Oil Pan Kit.
A quick peek at the internals of the engine and all looked well, and hardly used.
Did anyone mention a 1997 truck transmission fill tube won’t work with a Gen III block? Ask me how I know this… Looking back I don’t even know what made me think this would work for my setup. The firewall of the bird is very tight to the block and even if it would have fit I wouldn’t have been able to run heater hoses or add oil. Of course I didn’t figure this out until AFTER I painted it. The original plan called for painting everything to contrast the car but wisdom told me otherwise. I’m glad I skipped that step, I would still be fixing stuff I painted and messed up or taping off things I wanted to spray… no good for quick. …as for my transmission fill tube solution, Lokar to the rescue!
Mismatch.
12-06-2009, 01:35 AM
#4
D-Day has finally come but instead of sending troops to Normandy to stop Hitler's advances I was wishing I had some help or counseling to tell me to stop this madness. After killing off three weeks of making notes, measuring, making more notes, making lists, parts hunting and head scratching I pulled the plug on a great running car and dropped the engine in the cradle with the trans attached. Since there isn’t anything special about pulling an engine there are no pictures. I simply unbolted, unclipped, unplugged and disconnected every line, hose, fitting, or wire experience told me would be in the way. I removed everything like the engine was going back in at some point since I didn’t know what I might need to reuse. The end result was this:

I created some legs and forms out of scrap to hold the engine cradle and trans cross member in relation to each other and off the floor. Yes it’s ugly but it has purpose. Since this is a sub frame car I don’t have the luxury of using the frame as a guide since NOTHING on it is parallel, symmetrical or even level in relation to the engine or road – (thanks Ford). so in lieu of pulling the engine alone multiple times to get angles correct and weld things properly I created this system. If I have taken all my measurements properly I will only need to place the 5.3 in its new home twice, once for mockup and once to stay! At this point every conceivable important angle and measurement was taken, noted and retaken before the original engine was removed. According to the measurements I should be able to use the factory driveshaft with the new engine / trans combo simply by swapping yokes.

Armed with a notebook full of measurements I hung the engine above the cradle and propped it at the correct angles. This helped me get an idea for motor mounts, exhaust, steering and any other future mishaps I would encounter.
Mock up.

Engine mounts came next.

I created some legs and forms out of scrap to hold the engine cradle and trans cross member in relation to each other and off the floor. Yes it’s ugly but it has purpose. Since this is a sub frame car I don’t have the luxury of using the frame as a guide since NOTHING on it is parallel, symmetrical or even level in relation to the engine or road – (thanks Ford). so in lieu of pulling the engine alone multiple times to get angles correct and weld things properly I created this system. If I have taken all my measurements properly I will only need to place the 5.3 in its new home twice, once for mockup and once to stay! At this point every conceivable important angle and measurement was taken, noted and retaken before the original engine was removed. According to the measurements I should be able to use the factory driveshaft with the new engine / trans combo simply by swapping yokes.
Armed with a notebook full of measurements I hung the engine above the cradle and propped it at the correct angles. This helped me get an idea for motor mounts, exhaust, steering and any other future mishaps I would encounter.
Mock up.
Engine mounts came next.
12-06-2009, 01:51 AM
#5
1997 and newer have the removable bell housing and are easy to spot.... and the price was right!  To work properly the trans has to be a PWM controlled trans, it can't be the old style on / off lock up clutch torque converter. Easy spotting feature is the PWM on the front pump.
 It isn't very clear in the first pic but it is circled, second pic shows it better.


Short version is the TC clutch is Pulse Width Modulated i.e. digital and not on / off like before. I don't know all the engineering behind it I just know it works. I've been told it was to eliminate noise and undesirable vibrations in the drive line. Works for me.
12-06-2009, 02:17 AM
#6
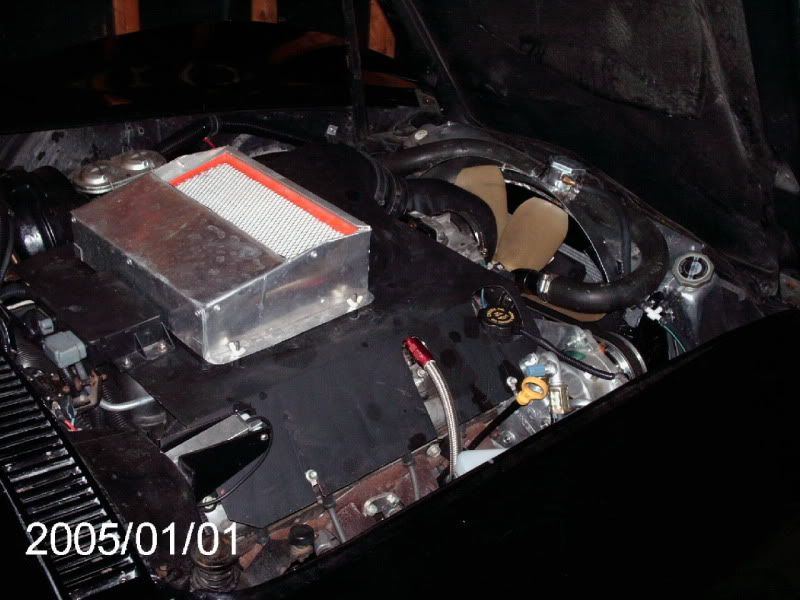
One Friday night the woman had a last minute change of plans so guess where I went? To the workshop! I finished my mockup engine and trans mounts and stuffed the 5.3 in the car! This pic was taken around midnight. I’m sure my neighbors LOVE me. I was trying to be quiet but excitement was in the air as I realized what I had hoped all along – IT FIT WITH THE HOOD CLOSED! 
I quietly celebrated a bit, stood in awe, cleaned up and went inside for sleep.

A new day has arrived and I’m one day short of one month in from the day I purchased the engine. I’m also 7 days past D-Day which means I am making great progress for working alone on such a tight budget. I was exhausted but hardly slept because I knew the engine fit in the car and no one would know once it was running unless I told them. One of the first goals of this project has been met and we are still well within budget and hoping to stay that way.
The next morning I still couldn't believe what I had done.

Tired but energized I double checked a few measurements and angles, removed the engine and finish welded the mounts. Since the Corvette exhaust manifolds are sheet metal and the truck versions were cast I was forced to use the ‘Vette parts since neither was going to fit without heavy modification. I guess I’ll save the truck bits for another project since I was able to cut the Vette parts and fabricate collectors for them. I then modified the Corvette factory exhaust manifolds and reinstalled the engine. The factory T Bird steering linkage is in a tight spot and can’t be moved or modified so some true headers will have to be created if I want decent flow. At some point as the budget and time allows I will make real custom headers which is not a goal for this stage of the build. I may try the “buy some Ford headers and cut the flanges off” trick if I can score some that aren’t ceramic coated for the right price. Ceramic coating sucks to weld - but that is another story…
Today the I placed the engine in the car for the last time unless it is a dud (I hope it runs, I hope it runs, I hope it runs…) just in time for someone to show up with real paying work for me to do. Working for a living is getting in the way of my fun and partying….
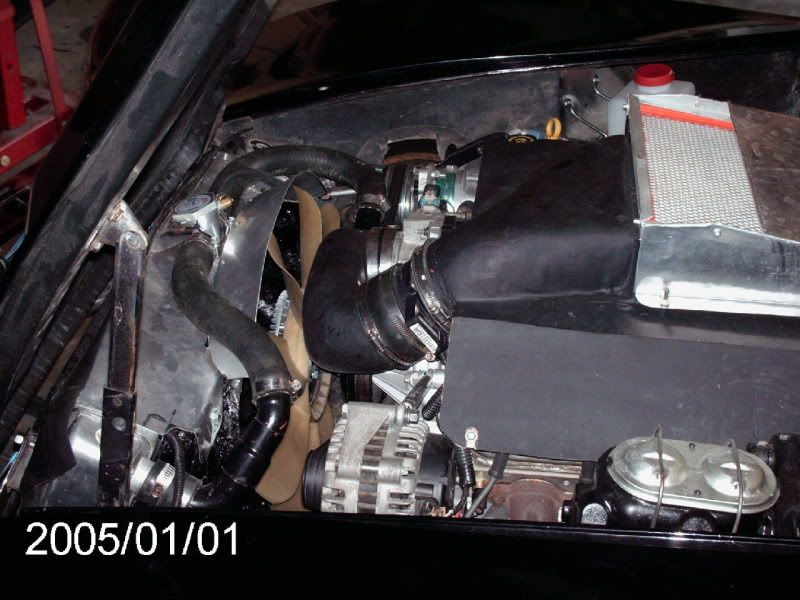
I haven’t gotten to do much more than round up bits I will need between other jobs. Today is the first time I can get back to my project and I was quite determined to make progress. I cut down the factory alternator and P/S bracket in my band saw. I also threw together a bracket to run the factory AC compressor with the new engine. Not visible in the photo is the custom made power steering hose created by crimping a GM fitting on the shortened factory Ford hose to mate it to the GM pump. There is also a kit that reduces the output pressure of the GM pump (11,000 PSI) for the Ford (9,000 PSI) rack. I did this, but didn't use all the shims. I would like to reduce the pressure a bit more but don't feel like taking down the PS system - and it's cold now. I always thought the Ford was a bit twitchy at high speed, using the higher pressure GM pump made it worse.
Home made and modified brackets.


Doing some test fitting and discovery. At this point my computer is at the speed shop getting reprogrammed to remove all the unnecessary bagpipes and BS. The computer won’t fit where I initially thought it would so things are in a bit of a shambles. I tried several alternate locations and may end up placing the computer between the outer and inner fender where the cruise control servo was using an S10 / Blazer bracket.
Wiring.


Fuel Rail.

I made a bracket to mount the alternator and an idler in the former AC compressor location.


Belt route with first tensioner placement.

I quietly celebrated a bit, stood in awe, cleaned up and went inside for sleep.
A new day has arrived and I’m one day short of one month in from the day I purchased the engine. I’m also 7 days past D-Day which means I am making great progress for working alone on such a tight budget. I was exhausted but hardly slept because I knew the engine fit in the car and no one would know once it was running unless I told them. One of the first goals of this project has been met and we are still well within budget and hoping to stay that way.
The next morning I still couldn't believe what I had done.
Tired but energized I double checked a few measurements and angles, removed the engine and finish welded the mounts. Since the Corvette exhaust manifolds are sheet metal and the truck versions were cast I was forced to use the ‘Vette parts since neither was going to fit without heavy modification. I guess I’ll save the truck bits for another project since I was able to cut the Vette parts and fabricate collectors for them. I then modified the Corvette factory exhaust manifolds and reinstalled the engine. The factory T Bird steering linkage is in a tight spot and can’t be moved or modified so some true headers will have to be created if I want decent flow. At some point as the budget and time allows I will make real custom headers which is not a goal for this stage of the build. I may try the “buy some Ford headers and cut the flanges off” trick if I can score some that aren’t ceramic coated for the right price. Ceramic coating sucks to weld - but that is another story…
Today the I placed the engine in the car for the last time unless it is a dud (I hope it runs, I hope it runs, I hope it runs…) just in time for someone to show up with real paying work for me to do. Working for a living is getting in the way of my fun and partying….
I haven’t gotten to do much more than round up bits I will need between other jobs. Today is the first time I can get back to my project and I was quite determined to make progress. I cut down the factory alternator and P/S bracket in my band saw. I also threw together a bracket to run the factory AC compressor with the new engine. Not visible in the photo is the custom made power steering hose created by crimping a GM fitting on the shortened factory Ford hose to mate it to the GM pump. There is also a kit that reduces the output pressure of the GM pump (11,000 PSI) for the Ford (9,000 PSI) rack. I did this, but didn't use all the shims. I would like to reduce the pressure a bit more but don't feel like taking down the PS system - and it's cold now. I always thought the Ford was a bit twitchy at high speed, using the higher pressure GM pump made it worse.
Home made and modified brackets.
Doing some test fitting and discovery. At this point my computer is at the speed shop getting reprogrammed to remove all the unnecessary bagpipes and BS. The computer won’t fit where I initially thought it would so things are in a bit of a shambles. I tried several alternate locations and may end up placing the computer between the outer and inner fender where the cruise control servo was using an S10 / Blazer bracket.
Wiring.
Fuel Rail.
I made a bracket to mount the alternator and an idler in the former AC compressor location.
Belt route with first tensioner placement.
Trending Topics
12-06-2009, 02:39 AM
#8
First start – Happy day! Holy cow, it lives – no weird noises, leaks, etc.! More celebration and elation.
http://www.youtube.com/watch?v=TNSw9Q0P3Dk
A few test drives around the block told me some things about the cooling system I didn’t realize and hadn’t run into before. I was always lucky enough to have a spare port on the radiator or a pressurized overflow to plumb the steam line into but not on this car. It needs to be pressurized. I fabbed up a tube in the upper radiator hose to accept the steam line. Problem solved. I know, I know, why didn’t I drill and tap the water pump? Because if I break down in middle of nowhere ville and need a water pump I don’t want to have to modify one to get back on the road. I also don’t want to answer questions from the parts guy about why he can’t accept my old one as a core because it has an extra hole in it.
Originally I used the factory single exhaust and soda straw sized pipe but I found it so restrictive the car was hardly responsive. I cut off the factory single and installed T bird V8 duals with Lincoln MK VIII 2.5” pipe from the mid point back with the larger Mark VIII “Y” pipe. I will have true duals front to back this coming summer but for the $35 at my favorite used parts vendor and some of my cutting and fabricating I had new factory looking / sounding exhaust. I know there are big money guys that are laughing out of their chairs right now but this car is supposed to be ultra budget and stock appearing. Ultra budget means upgrades happen as money flows in. The car is stock quiet but has a different tone that merely hints at the 300HP gorilla under the hood – if you know what to listen for. It reminds me a lot of my Cadillac Eldorado ETC, quiet deep rumble that makes you think it is a 6 but hints at V8. Most people have no idea what I have or what hit them until after they see the tail lights.
I installed a pair of Dakota Digital gauge interfaces to convert the GM speedo and tach signal to the factory Ford gauges. I did a test against my GPS to make sure the speedo was working well and that the speed limiter had been removed…
Not the true top speed but you get the idea...

Of course I was on a closed course and all safety precautions were taken! This does mean the tune shop did their thing properly which makes me a happy guy.
The car isn’t super fast, it isn’t a drag car nor is it a race car so it’s not supposed to be "fast." On the other hand it IS fun to drive, gets decent mileage when I keep my foot out of it, is completely stealth, fully reliable and idles smoothly while maintaining full use of all accessories.
Mission accomplished!
There are future upgrades being considered but but all revolve around keeping the stealth appearance and daily driver abilities.
Holy cow, it lives – no weird noises, leaks, etc.! More celebration and elation. http://www.youtube.com/watch?v=TNSw9Q0P3Dk
A few test drives around the block told me some things about the cooling system I didn’t realize and hadn’t run into before. I was always lucky enough to have a spare port on the radiator or a pressurized overflow to plumb the steam line into but not on this car. It needs to be pressurized. I fabbed up a tube in the upper radiator hose to accept the steam line. Problem solved. I know, I know, why didn’t I drill and tap the water pump? Because if I break down in middle of nowhere ville and need a water pump I don’t want to have to modify one to get back on the road. I also don’t want to answer questions from the parts guy about why he can’t accept my old one as a core because it has an extra hole in it.
Originally I used the factory single exhaust and soda straw sized pipe but I found it so restrictive the car was hardly responsive. I cut off the factory single and installed T bird V8 duals with Lincoln MK VIII 2.5” pipe from the mid point back with the larger Mark VIII “Y” pipe. I will have true duals front to back this coming summer but for the $35 at my favorite used parts vendor and some of my cutting and fabricating I had new factory looking / sounding exhaust. I know there are big money guys that are laughing out of their chairs right now but this car is supposed to be ultra budget and stock appearing. Ultra budget means upgrades happen as money flows in. The car is stock quiet but has a different tone that merely hints at the 300HP gorilla under the hood – if you know what to listen for.
It reminds me a lot of my Cadillac Eldorado ETC, quiet deep rumble that makes you think it is a 6 but hints at V8. Most people have no idea what I have or what hit them until after they see the tail lights. I installed a pair of Dakota Digital gauge interfaces to convert the GM speedo and tach signal to the factory Ford gauges. I did a test against my GPS to make sure the speedo was working well and that the speed limiter had been removed…
Not the true top speed but you get the idea...
Of course I was on a closed course and all safety precautions were taken!
This does mean the tune shop did their thing properly which makes me a happy guy. The car isn’t super fast, it isn’t a drag car nor is it a race car so it’s not supposed to be "fast." On the other hand it IS fun to drive, gets decent mileage when I keep my foot out of it, is completely stealth, fully reliable and idles smoothly while maintaining full use of all accessories.
Mission accomplished!
There are future upgrades being considered but but all revolve around keeping the stealth appearance and daily driver abilities.


 12-06-2009, 04:00 PM
#12

Glad to see this swap. I too always liked this body style since it came out. Looks good.
12-07-2009, 12:25 AM
#13
Launching!

Join Date: Jun 2005
Location: KCMO
Posts: 209
Likes: 0
Received 0 Likes
on
0 Posts
Dang...That IS nice. I would like to do it, but I am not sure I can bring myself to yet. I have too much Ford stuff sittin here. I will see what my 357 does and go from there.
SWS
P.S. Where are you? I would actually like to see the car if you are close.
SWS
P.S. Where are you? I would actually like to see the car if you are close.
12-07-2009, 12:49 PM
#14
...some of the snags I encountered and how I resolved them.
Trans linkage: Stock Ford cable actuated shifter with modified GM shifter arm using Ford components on a custom adjustable bracket.
Transmission cross member: Modified the factory piece and have decided this was a mistake. The factory part is about 4 – 6 inches aft of where the Ford transmission mount bolts (why do this?). Ironically this is nearly the same location as the GM transmission mount. The cross member also has rubber bushings which allow it to twist and flex. In my humble opinion this is a flawed design as it sits about 4 inches lower than the original transmissions’ mounting point and farther rear. Ford’s “solution” was to place an adapter on the cross member that moves the mount forward and up the required amount, attaches to the exhaust, then use a rubber transmission mount. I skipped this and modified the cross member accordingly. Now without the exhaust to stabilize things it twists even worse at the mounting points causing an intermittent vibration at high speed. I can’t remember ever seeing a GM car or truck with rubber bushings on the cross member mounts themselves – especially with a rubber trans mount. I think this is too much flex for any type of real power. Next project is to fab a real cross member the right way and put it in the right location where Ford should have and eliminate the angle.
Gauges: I used Dakota Digital signal converters for the speedometer SGI-5 and tachometer SGI-8 as my interface to the factory gauges. The SGI-5 will come in handy when I change gears. Next go round I will skip the tach module and adjust the tune for the tach I am using if I go factory gauges again. I didn't know about that option until I already had the PCM flashed, the car was running and the signal interface was installed. I haven't hooked up the temp sensor / gauge on the dash because I've been too lazy and the A/C stuff is in the way. My scan tool tells me the warmest the coolant has gotten so far is 210*. This drops like a rock when the fan kicks on or the car moves, then it stays at 195 - 197.
Air Intake: I haven't decided what I am going to do here. Where does everyone like to get their hoses? I've only seen one place but they only had tube diameter and no leg length info for elbows.
Last edited by gofastwclass; 12-07-2009 at 12:53 PM. Reason: the usual... f#$%^#& typing
12-07-2009, 07:25 PM
#16
Launching!
Join Date: Jun 2005
Location: KCMO
Posts: 209
Likes: 0
Received 0 Likes
on
0 Posts
You have to remember that the car is listed as a luxury sports car so the insurance is super low. The rubber bushings are not bad at the factroy power level. After that, it needs more stability.
SWS
SWS

 12-08-2009, 03:18 PM
#19
Thanks for the idea.
All other ideas are welcome!
