Does anyone have a write up for this?
 04-18-2007, 06:54 PM
#1
I am looking for a write up on how to install a dual pump kit on my 99. But not just that I want one with after market rails, fuel pressure regulator and after market lines. I know how to get into the tank, but need to know what to do with every thing else.
I have all of the parts except the fuel lines, and I am not positive on how to make everything work. If anyone has something or know where I can get it please let me know.
I have all of the parts except the fuel lines, and I am not positive on how to make everything work. If anyone has something or know where I can get it please let me know.
 04-18-2007, 08:09 PM
#2
I'm going through the same thing, I have all the parts but I'm interested to see how others have routed everything. I have a layout from speed inc but it's always nice to see some pics and get some added advice from others. I would explain mine but I'm not 100% on understanding it myself. I think once I start to layout my parts it will be a little more clear. If this thread is still going when I get a little farther along I'll post some pics.
04-22-2007, 11:03 PM
#4

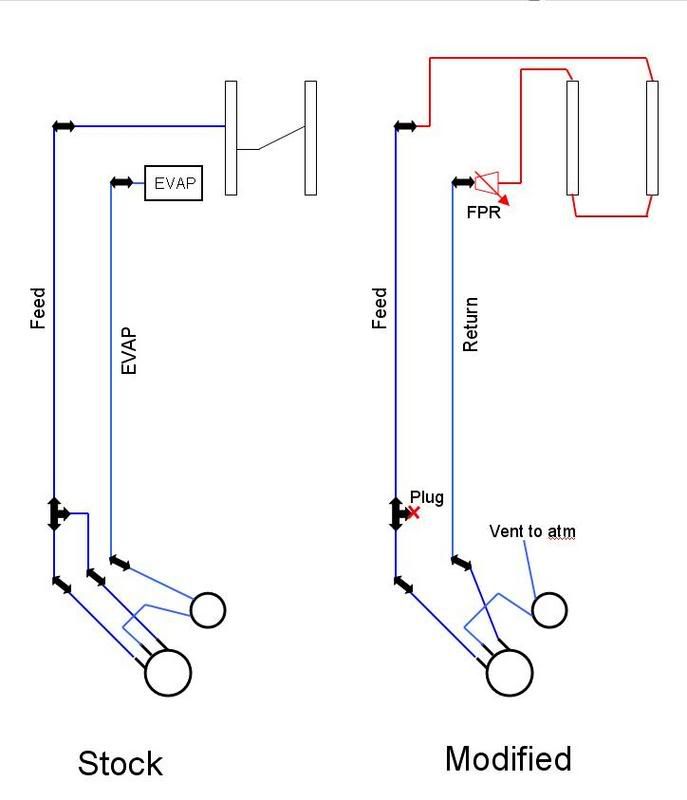
I just got done doing it a couple weeks ago. It is not too bad. I'm assuming you are going to be using your stock EVAP as a return line when using an aftermarket regulator.
I plan on doing a write up on just the fuel side of it when I get a chance, I just haven't had the time.
Heres a few pics and tips that will help you until I can get the entire write up complete.
This is a schematic a friend drew me on how to rig everything up:

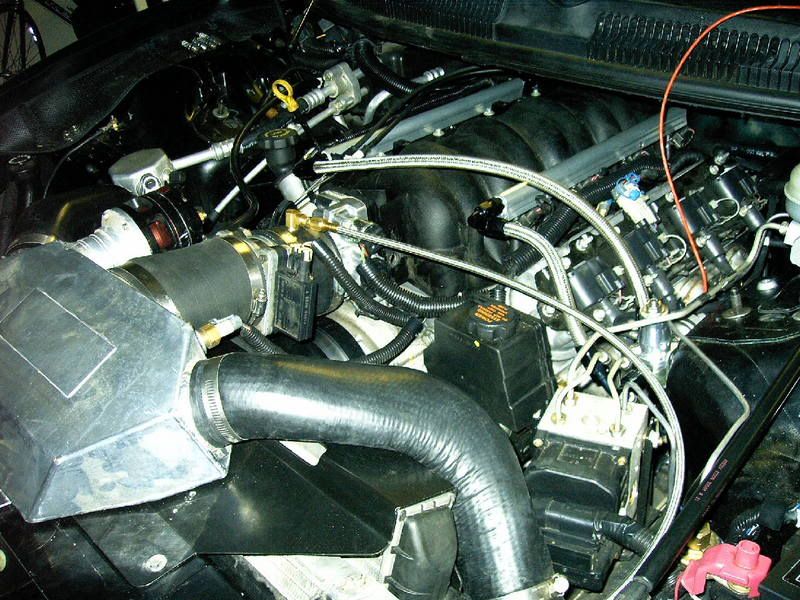
Here is a pic of the engine bay side of things all hooked up:
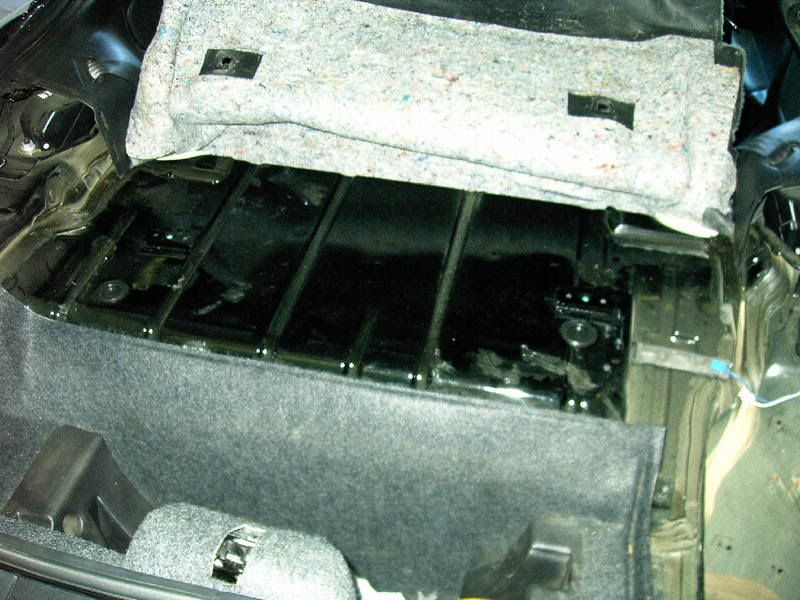
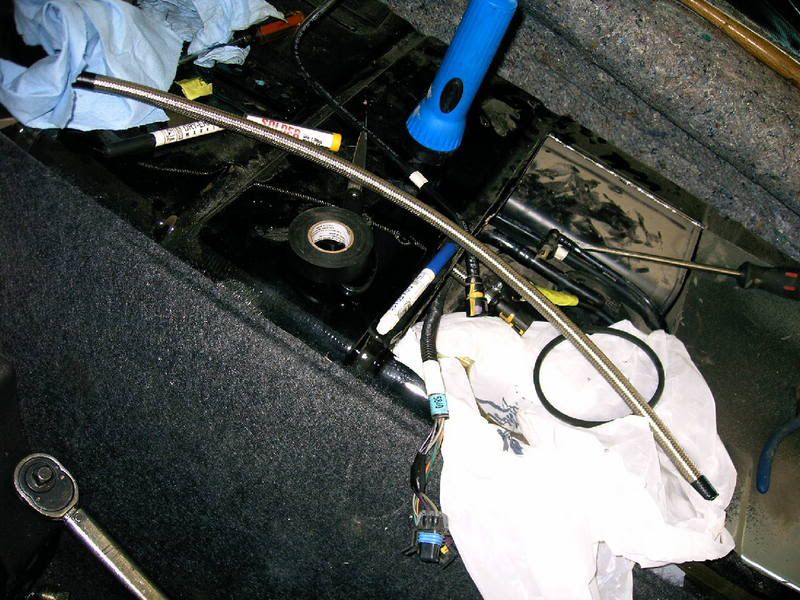
I decided to do a quick access door. You never know when you are going to have to get back in there for anything. So here is all the carpet pulled back:
Man, making that cut reduced a 3� cutoff wheel in a hurry!
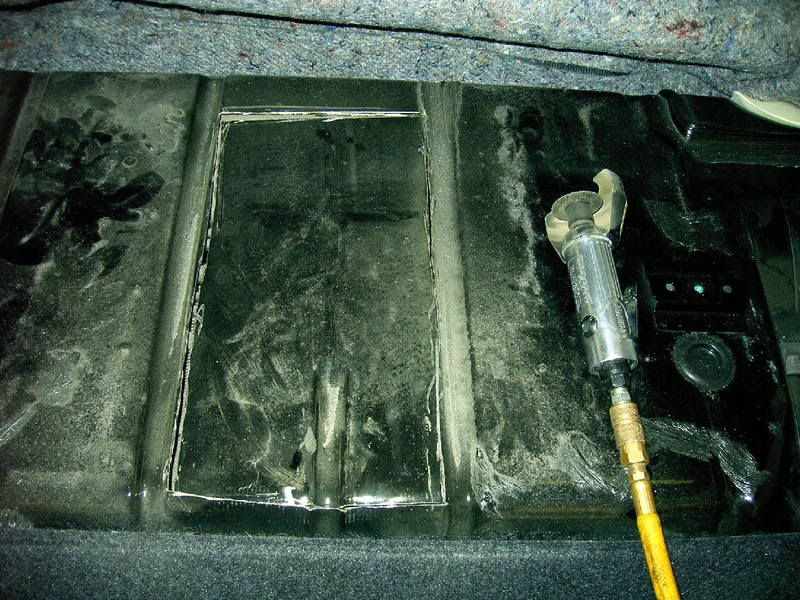
And we have access!
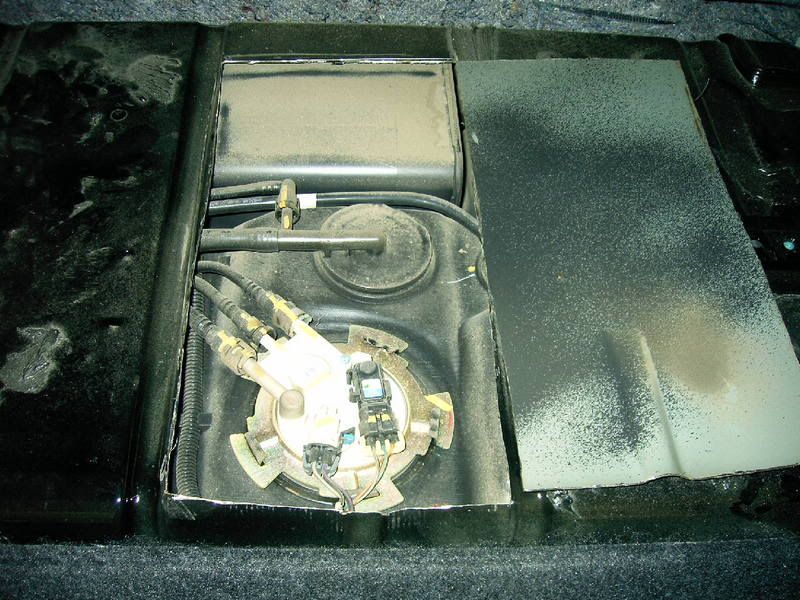
Took the unit out and put a bag over the hole to stop any debris from getting into the fuel tank:
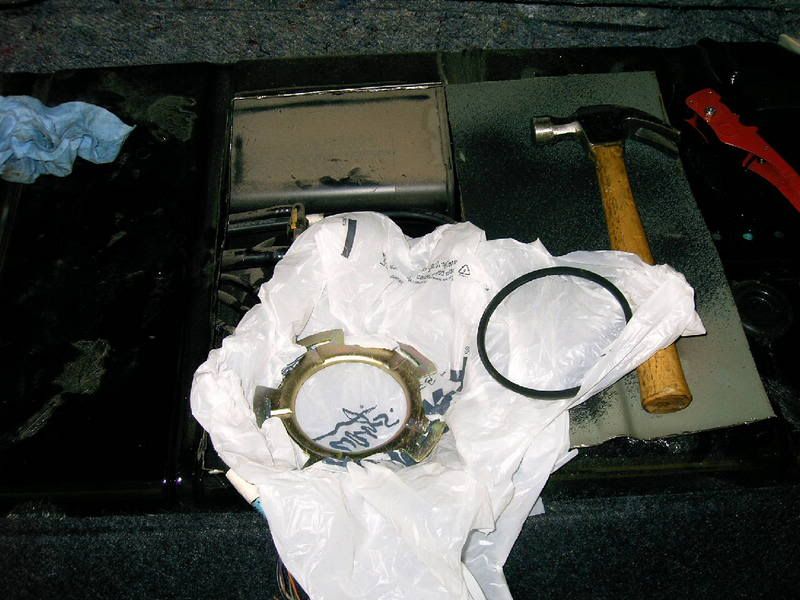
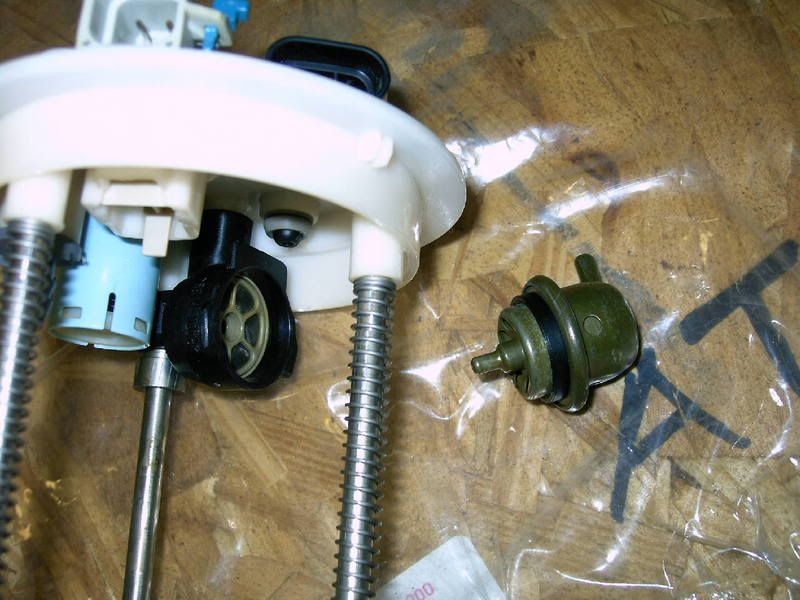
First order of operations is to remove the stock fuel pressure regulator:
I plan on doing a write up on just the fuel side of it when I get a chance, I just haven't had the time.
Heres a few pics and tips that will help you until I can get the entire write up complete.
This is a schematic a friend drew me on how to rig everything up:
Here is a pic of the engine bay side of things all hooked up:
I decided to do a quick access door. You never know when you are going to have to get back in there for anything. So here is all the carpet pulled back:
Man, making that cut reduced a 3� cutoff wheel in a hurry!
And we have access!
Took the unit out and put a bag over the hole to stop any debris from getting into the fuel tank:
First order of operations is to remove the stock fuel pressure regulator:
04-22-2007, 11:04 PM
#5
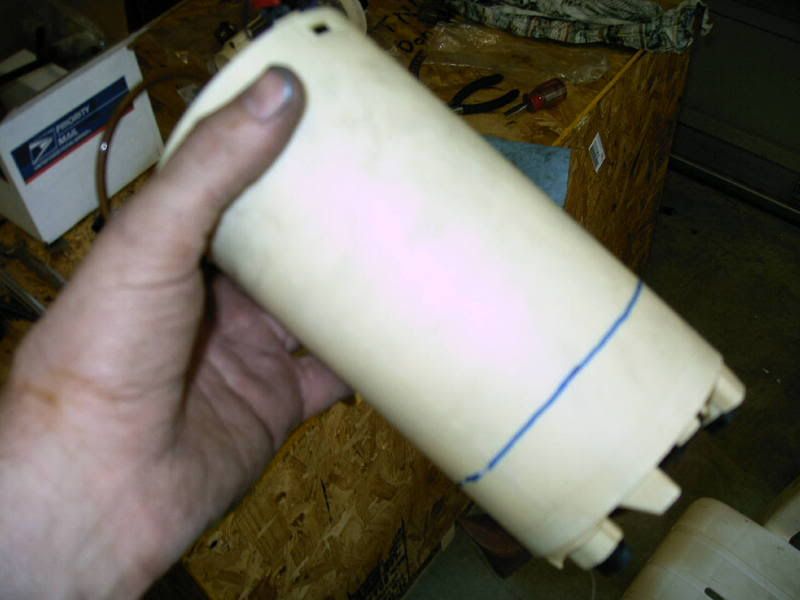
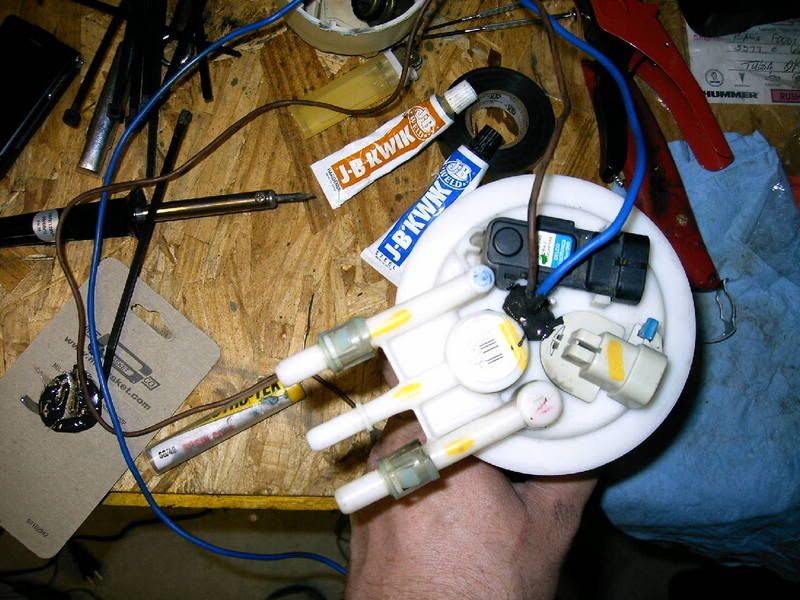
Next, I can start modifying the bucket to fit 2 pumps in there. I decided to totally cut off the bottom of the bucket. Drew my line:
And made the cut:
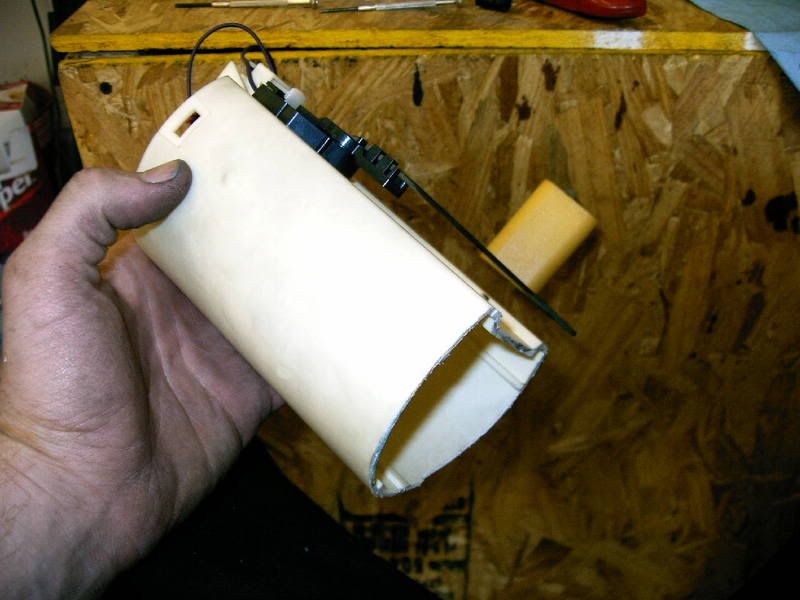
The fuel pumps I bought had their own connections which were not the same as the stock connections. So I had to cut the stock wires and solder the new connector on.
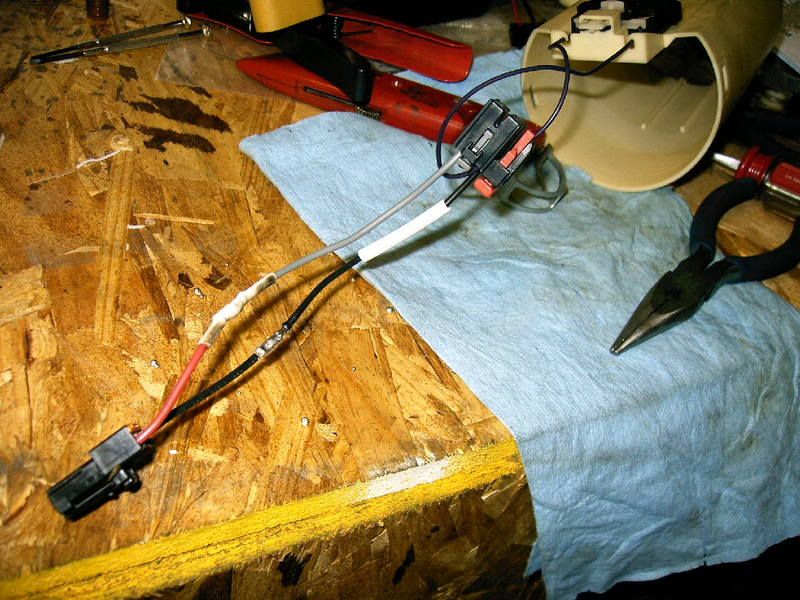
Also drilled 2 holes for the second pump wires and did the same for that connector:
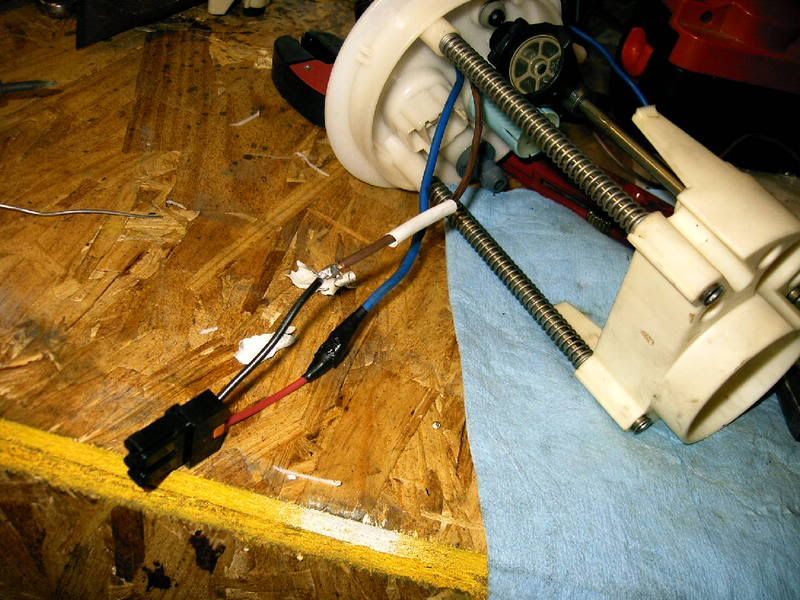
After the wires were soldered, they were covered with heat shrink and then wrapped in electrical tape. Then I sealed the 2 holes in top where the new wires were going thru with some JB quick weld.
And made the cut:
The fuel pumps I bought had their own connections which were not the same as the stock connections. So I had to cut the stock wires and solder the new connector on.
Also drilled 2 holes for the second pump wires and did the same for that connector:
After the wires were soldered, they were covered with heat shrink and then wrapped in electrical tape. Then I sealed the 2 holes in top where the new wires were going thru with some JB quick weld.
04-22-2007, 11:04 PM
#6
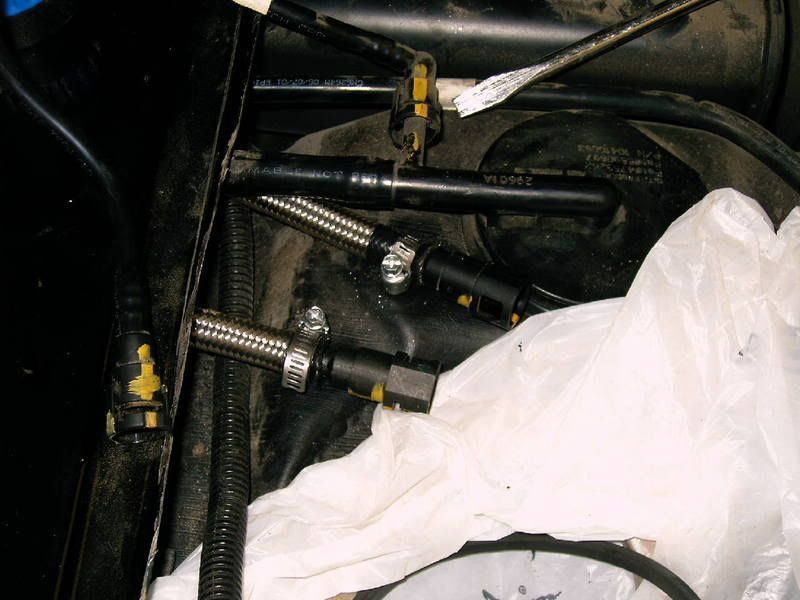
After much time and consideration, I figured out how to make the Y-block work with the factory type plastic lines. They key was to install the Y-block upside down (where it actually looked like a Y) and just bend the plastic lines 180�. There are no sharp turns so no kinks.
I had an inline pump on my previous setup:

I had cut my factory line going from the filter to the tank where I had installed the inline pump. I had ordered 10 feet of the –6 braided steel hose, so I had some left over from doing the fuel rails hookup. So I decided to go ahead and just replace the whole line going from the tank to the filter. Here is the old plastic line:
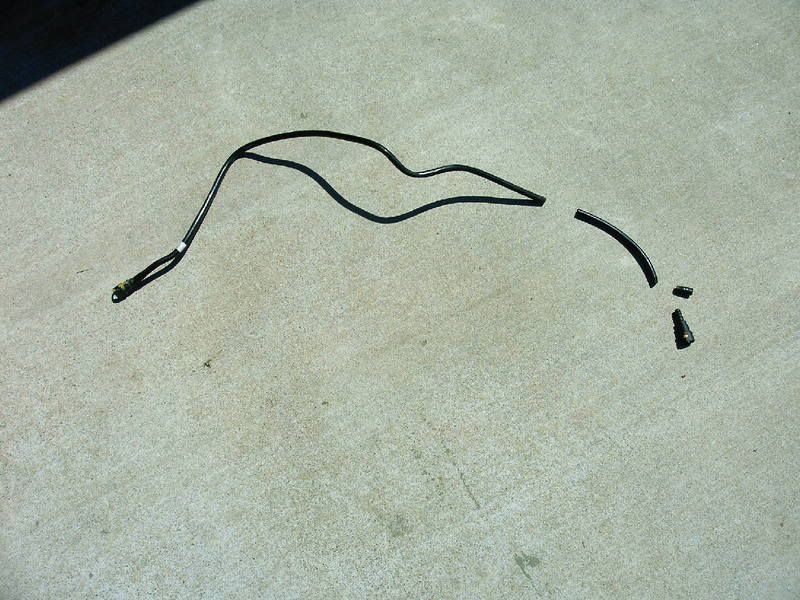
You can see where it was cut for the inline pump. I had to cut the line to remove the quick connect fittings that connected to the filter and the tank connection.
I had an inline pump on my previous setup:
I had cut my factory line going from the filter to the tank where I had installed the inline pump. I had ordered 10 feet of the –6 braided steel hose, so I had some left over from doing the fuel rails hookup. So I decided to go ahead and just replace the whole line going from the tank to the filter. Here is the old plastic line:
You can see where it was cut for the inline pump. I had to cut the line to remove the quick connect fittings that connected to the filter and the tank connection.
Last edited by ChevyChad; 12-10-2007 at 08:46 AM.
04-22-2007, 11:05 PM
#7
I then cut the –6 braided line to length and reused the factory quick disconnects in the braided line.
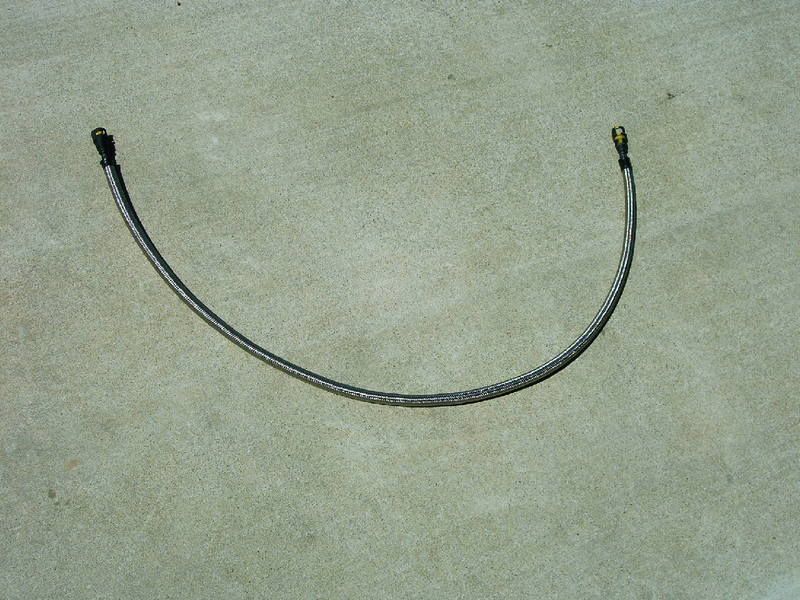
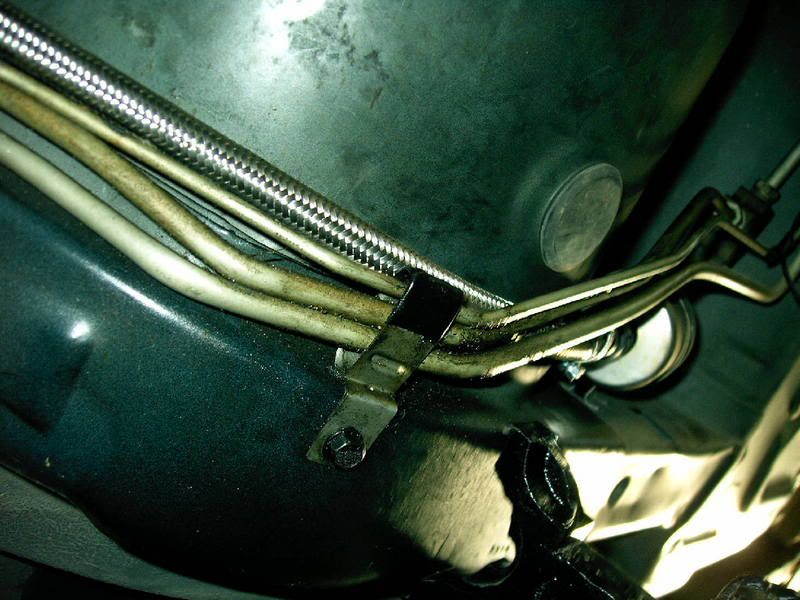
Got it all ran and into place:
Hell, I figured why stop there, may as well do the return line as well! So measured it out:
Again, reinstalled the stock fittings into the braided line, and ran it into place too:
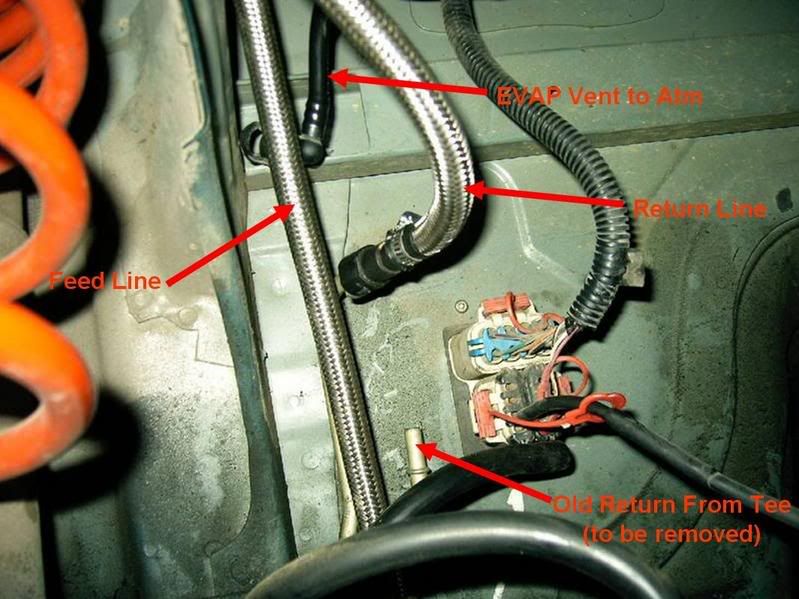
Got it all ran and into place:
Hell, I figured why stop there, may as well do the return line as well! So measured it out:
Again, reinstalled the stock fittings into the braided line, and ran it into place too:
Last edited by ChevyChad; 12-10-2007 at 08:46 AM.
Trending Topics
04-22-2007, 11:06 PM
#8
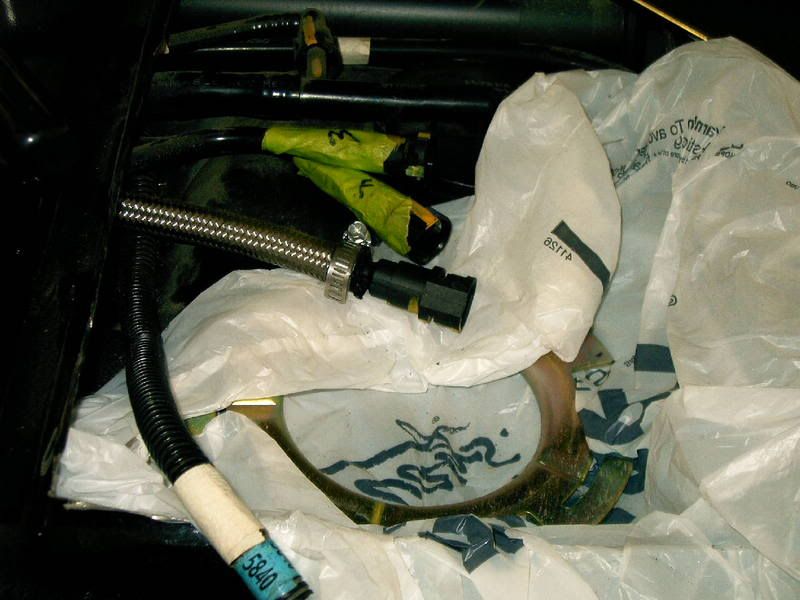
Next, plugged the �T� with a 1/4� NPT plug:
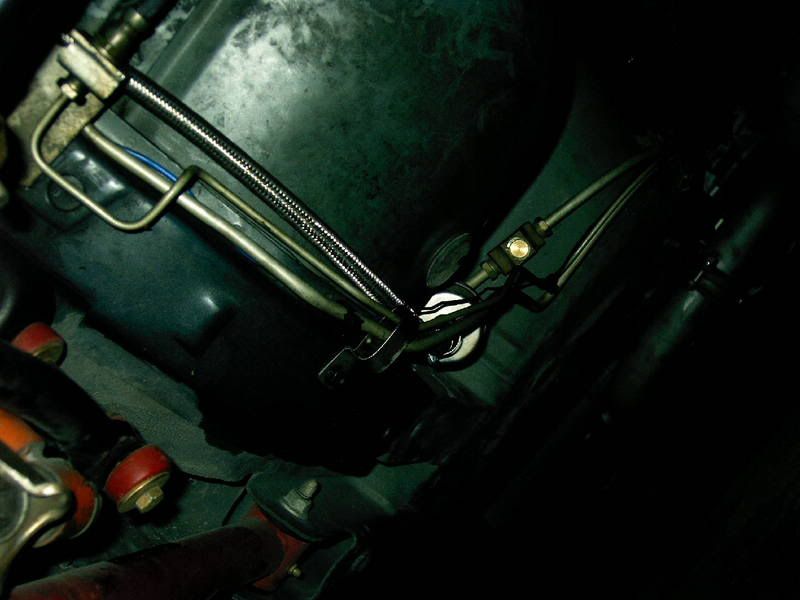
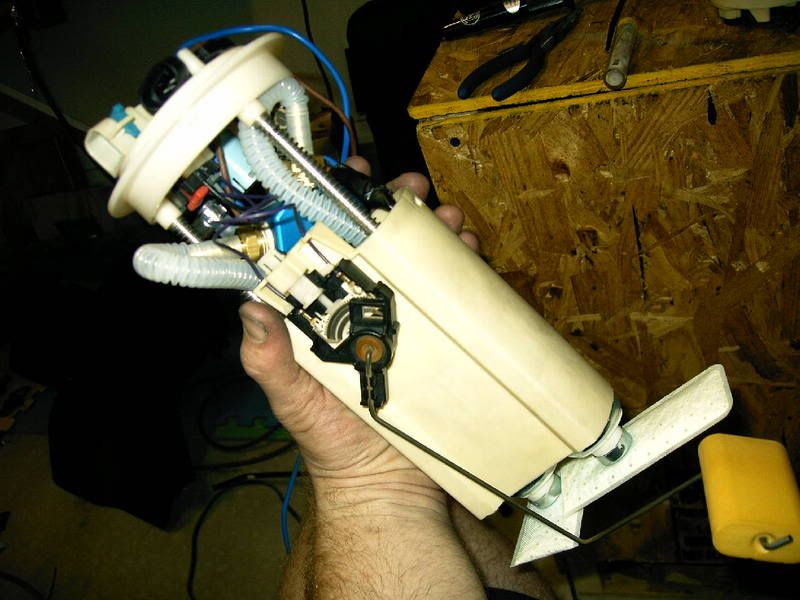
Put the fuel pump assembly back in, and connected the lines:
Connected the rest of the fuel pumps wiring, and put it all back together. Since I already had a relay for the previous inline pump, I just had to extend that wire for the second pump, and then run it to the boost switch in the engine bay.
Keep in mind, you don't need to do the rear lines. I just did that on mine because I couldn't re-use my stock plastic feed line coming from the tank...
Wow- that was almost a whole writeup! A few more details and some pretty labels on the pictures, and it will be complete! But you should be able to figure it out from here...
Last edited by ChevyChad; 09-07-2007 at 11:45 PM.
06-01-2007, 02:21 PM
#10
TECH Addict
iTrader: (11)
Join Date: Jan 2003
Location: Minnesota Corn Fields
Posts: 2,451
Likes: 0
Received 9 Likes
on
8 Posts

Chad,
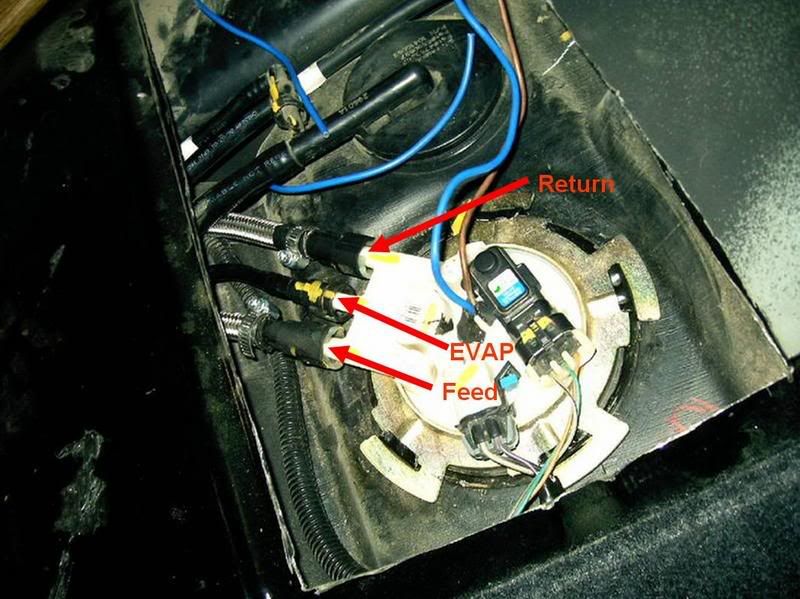
This may be a stupid question but, In the drawing you show the tee that you plugged. Is that the stock return line? I thought the stock return was inside the tank?
Are there 3 connections to the stock sending unit (feed, return, & EVAP)?
Could you essentially run a new return line and leave the EVAP alone?
Sorry for the questions but I have never actually seen the top of the tank(yet).
06-02-2007, 09:55 AM
#14
TECH Addict
iTrader: (11)
Join Date: Jan 2003
Location: Minnesota Corn Fields
Posts: 2,451
Likes: 0
Received 9 Likes
on
8 Posts
Originally Posted by NoGamesLS1
 Hey No Juice how much is E85 compare to regular? California, the most environmentally conscious state, only has like 2-3 stations and none are public
 06-04-2007, 06:47 AM
#16
TECH Addict
iTrader: (11)
Join Date: Jan 2003
Location: Minnesota Corn Fields
Posts: 2,451
Likes: 0
Received 9 Likes
on
8 Posts
Originally Posted by rufretic
I'm going through the same thing, I have all the parts but I'm interested to see how others have routed everything. I have a layout from speed inc but it's always nice to see some pics and get some added advice from others. I would explain mine but I'm not 100% on understanding it myself. I think once I start to layout my parts it will be a little more clear. If this thread is still going when I get a little farther along I'll post some pics.
The following users liked this post:
fucter (11-25-2022)
06-04-2007, 10:06 AM
#20