Another happy Tick M/C customer and a sub-par install How to
 06-29-2009, 01:48 PM
#1

Tick Adjustable Master Cylinder install how to with pics...
I just installed my tick master and I must say that I am impressed. The pedal is very firm, and everything seems to be working like it should be... finally. I had a stock 98 master cylinder of 135k miles, and needless to say my monster clutch didn't really like that one very much. It was loosing pressure anyway. You could pull popcorn kernel sized air bubbles while mity vacking it all day long, so it must have been sucking air from somewhere.
This thing shifts great now. At a dead stop you can shift into reverse or first without any extra effort. Shifting around town is noticeably better, and shifting with some RPM is much easier. This should really help to finish off the ol' 10 bolt properly
Install Notes:
All of the pictures were taken after I installed the Tick Master... sorry
The install was really easy. I did it completely by myself in about 3 hours. I could have done it in about an hour and a half if I hadnt of run into a few small setbacks that were my own fault, and I was going pretty slow just so I could try to figure out exactly what was involved with changing this thing anyway! I couldnt find any howto's on this thing, so I decided to just go do it. It was a little risky feeling though... it's my only ride until my wife gets off work, and I had to drive to my work (Harbor Freight tools Manager) to install it due to a really unstable driveway and a busy apt complex. SO!... I had to finish it or I wouldnt have any wheels,
Tools required... for me:
7mm socket
deep and regular well 1/2 (or 13mm)
extension
13mm wrench
14mm wrench
Mity Vac
deep well 7/16 1/4" drive socket
Various flat head screw drivers
Flashlight
Needle Nose Pliers
Cutting Pliers
Floor Jack/Stands
Leatherman with can opener
Are all of these items necessary? No. But each one made my life easier.
Alright... Who's ready to change this master cylinder? Where in the hell is it? Good question. You can't see it, and if you can its because you don't have any power brakes Its hidden way back under the brake booster, but don't wory. You won't be doing much work from this angle. All the wrenching happens inside the car.
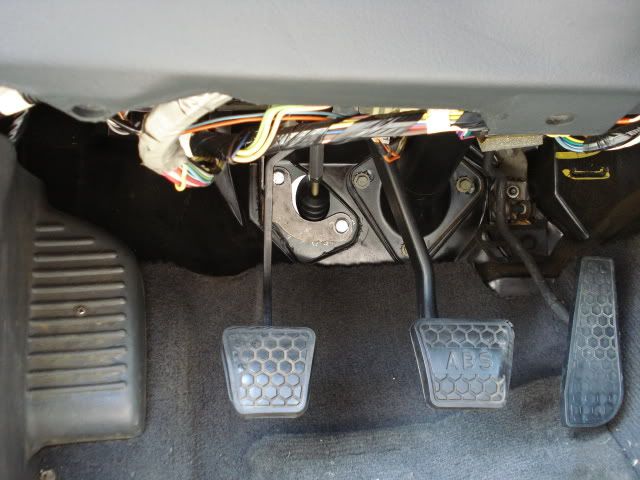
First thing is to get the kick panel out of the way. Remove the two 7mm bolts that are on the underside of the dash. Once they were out I was able to pull the panel that's hiding all the wiring/pedals/unicorns/etc. With this thing out you can finally see whats going on behind the scenes under the dash. If you look right on the firewall you can see the master cylinder sticking thru, with the long shiny rod that connects to the top of the clutch pedal. You're probably laying on your back now with your hands contorted above your head as you fumble around with things trying to figure out what to do next. Get your flashlight situated to where you can see whats going on
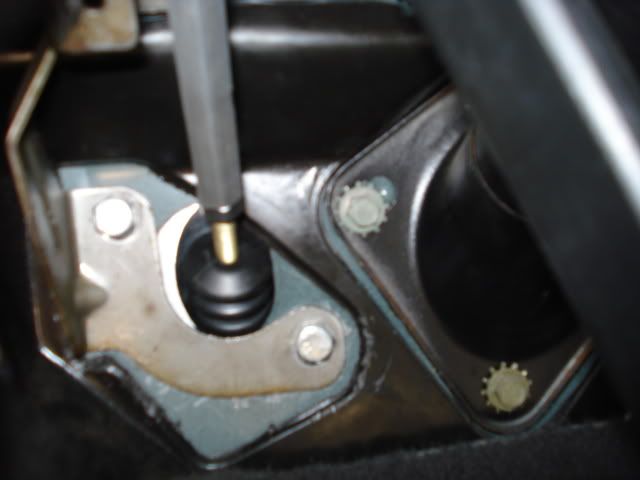
Notice that little clip holding the shiny rod onto the clutch pedal? Its got to come off. A little prying with a screw driver and it flies off, making it possible to remove it... later.
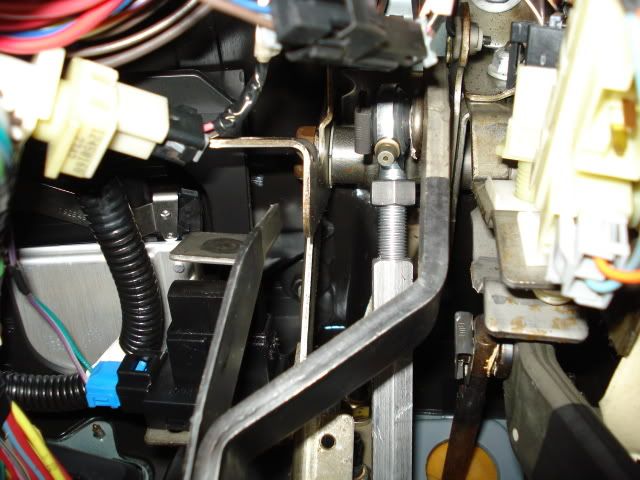
Now do you see those two 1/2" nuts on the firewall... the ones that appear to be holding the master on. You guessed it! They hold it in place... and those are actually the only things holding it in place. Use the deepwell socket and spin 'em off there. The studs sticking thru the firewall there apear to be studs, or something sticking out of the master. Its actually a U bolt, and for me it was a bitch to get it off. You can actually reach behind the brake booster from under the hood and grab ahold of this thing, but chances are it wont go anywhere... so stop trying. If you crawl back under the dash and look a little closer you will notice that the bottom right stud (U bolt) actually has a little hicky that keeps it from moving, sorta like a lock washer, but only flat/star like/ and just in the way. What you probably didn't notice (if you were hammering on it or REALLY trying to pull on it from under the hood) is that the fangled bracketry that makes up the clutch pedal assy is actually caught in the threads too... making it really hard to push the U bolt thru. I tried and tried to pry this bracket up so that it didnt interfere with the U bolt, but it was too stuborn. Somehow I accidentally ended up prying it over the rod so that it was not even touching it anymore. This allowed me to use the can opener on my leatherman to mangle up that little locking hikey so it would come off. There wasnt anything preventing the top left side from moving. Slide the rod off of the top of the clutch pedal.
Climb under the hood and just reach under there for the u bolt. With little convincing it, it should come right out. You've now passed the point of no return.
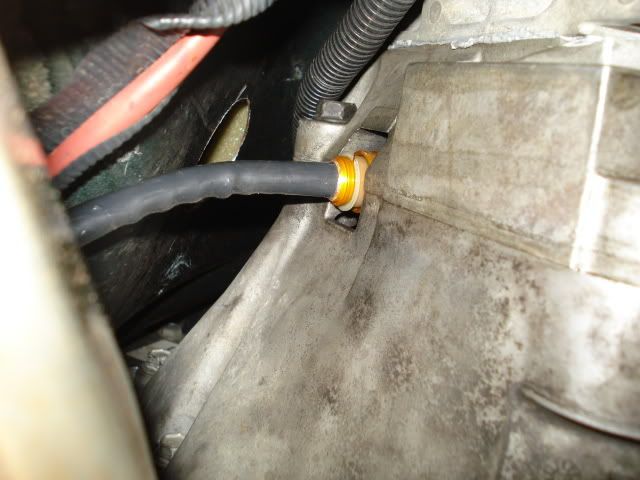
Now's when you want to get the car in the air enough to slide under it from the drivers side. If you look up on the drivers side of the tranny you will notice a braided/hose covered line going right into the side of the tranny. See that yellow looking brassy thing on the end of the hose kinda inside the transmission? Thats the connector. There should be a white looking plastic ring on it. Get your screw driver (or can opener) and push that little plastic ring toward the transmission. You want it to slide in equally all the way around the connector. What that little thing is doing is folding up these little frail aluminum spikes that keep the hose from backing out. Its a little like the quils of a porcupine. Pulling on the hose is like petting the porcupine backwards. Pushing the plastic ring in folds everything down so it doesnt catch. Be very careful on this step. Screwing up this would mean you just screwed up the slave cylinder. That means dropping the trans... Note the position/route this hose is taking up to the master. You'll want to feed the tick hose back down the same way.
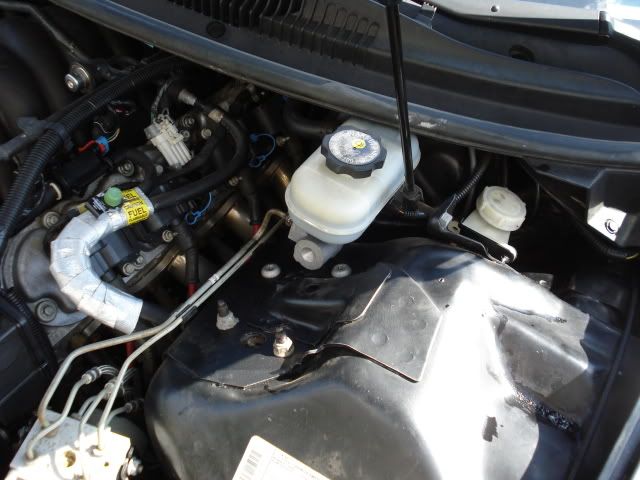
Once that hose is out of the trans, go back under the hood and pull the fluid resivior hose off of the master cylinder. Once that is off it is no longer connected to the car. A little snatching and it comes right out.
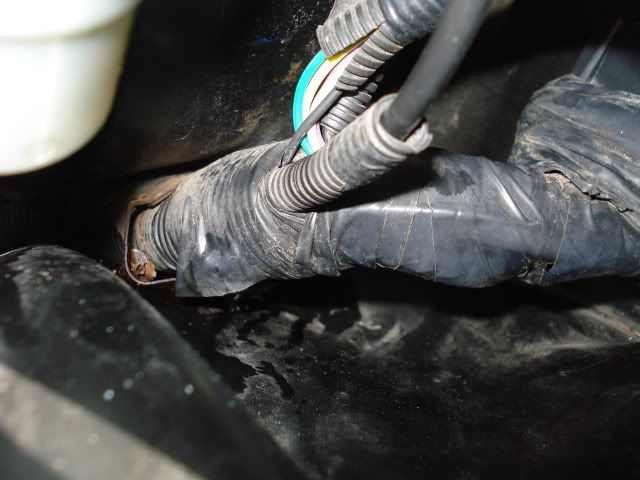
When you look at the stock master and compare it to the tick, you'll see that massive piece of aluminum. Thats going to make it a little more difficult putting it back in. Peek back under the hood. Notice that wiring harness that snakes from the firewall... kinda under the brake booster, and around towards... towards the front I think? That bundle of wire is going to prevent the tick from slipping in. If you notice, there is a plastic clip/stud holding the wires to a bracket... seen from the resivior side of the booster. I tried prying that plastic stud up enough to pop it out of the braket... but found it easier just to go into the wheel well (behind the tire) and just cut it off. Should you? Probably not... Im sure there is a better way. No matter what, though, you'll want to move those wires.
Assuming you freed the wires from the clutches of their bracket, go ahead and pull on them lightly so that they come up infront of the booster. That should give you the room needed to finagle the tick towards the stock location on the firewall. Make sure you attatch the fluid resivior hose onto the the tick before you try pushing it to where you cant see it anymore (use a ziptie to secure it in place), and be sure to remove the two bolts that are fastened into the back of the master... those you'll need to bolt it up from inside the car. You'll also want to wait to put the long rod on the back of it until you inside the car. I don't think you could get everything to fit under the booster with that part on anyway.
I didn't have too much trouble lining up the holes. Just keep working it from under the hood until it looks like its lined up from inside the car. You'll know you're getting close when the threaded rod on the cab side of the master is sticking thru the hole it was intended to stick thru.
I found it easier to use a 3/8 extension with a shallow 13mm socket to hold the hardware while I threaded them into the holes. The same rules apply to threading stuff here. Don't go hog wild on one side until you know the other is in... and in correctly. Even though this thing looks beast, I wouldnt want to strip out or cross thread anything. Take your time lining it up and don't force anything. Once they thread in easily go ahead and tighten them down equally. I didn't torque them down, just hand tight.
I just installed my tick master and I must say that I am impressed. The pedal is very firm, and everything seems to be working like it should be... finally. I had a stock 98 master cylinder of 135k miles, and needless to say my monster clutch didn't really like that one very much. It was loosing pressure anyway. You could pull popcorn kernel sized air bubbles while mity vacking it all day long, so it must have been sucking air from somewhere.
This thing shifts great now. At a dead stop you can shift into reverse or first without any extra effort. Shifting around town is noticeably better, and shifting with some RPM is much easier. This should really help to finish off the ol' 10 bolt properly
Install Notes:
All of the pictures were taken after I installed the Tick Master... sorry
The install was really easy. I did it completely by myself in about 3 hours. I could have done it in about an hour and a half if I hadnt of run into a few small setbacks that were my own fault, and I was going pretty slow just so I could try to figure out exactly what was involved with changing this thing anyway! I couldnt find any howto's on this thing, so I decided to just go do it. It was a little risky feeling though... it's my only ride until my wife gets off work, and I had to drive to my work (Harbor Freight tools Manager) to install it due to a really unstable driveway and a busy apt complex. SO!... I had to finish it or I wouldnt have any wheels,
Tools required... for me:
7mm socket
deep and regular well 1/2 (or 13mm)
extension
13mm wrench
14mm wrench
Mity Vac
deep well 7/16 1/4" drive socket
Various flat head screw drivers
Flashlight
Needle Nose Pliers
Cutting Pliers
Floor Jack/Stands
Leatherman with can opener
Are all of these items necessary? No. But each one made my life easier.
Alright... Who's ready to change this master cylinder? Where in the hell is it? Good question. You can't see it, and if you can its because you don't have any power brakes
Its hidden way back under the brake booster, but don't wory. You won't be doing much work from this angle. All the wrenching happens inside the car.First thing is to get the kick panel out of the way. Remove the two 7mm bolts that are on the underside of the dash. Once they were out I was able to pull the panel that's hiding all the wiring/pedals/unicorns/etc. With this thing out you can finally see whats going on behind the scenes under the dash. If you look right on the firewall you can see the master cylinder sticking thru, with the long shiny rod that connects to the top of the clutch pedal. You're probably laying on your back now with your hands contorted above your head as you fumble around with things trying to figure out what to do next. Get your flashlight situated to where you can see whats going on
Notice that little clip holding the shiny rod onto the clutch pedal? Its got to come off. A little prying with a screw driver and it flies off, making it possible to remove it... later.
Now do you see those two 1/2" nuts on the firewall... the ones that appear to be holding the master on. You guessed it! They hold it in place... and those are actually the only things holding it in place. Use the deepwell socket and spin 'em off there. The studs sticking thru the firewall there apear to be studs, or something sticking out of the master. Its actually a U bolt, and for me it was a bitch to get it off. You can actually reach behind the brake booster from under the hood and grab ahold of this thing, but chances are it wont go anywhere... so stop trying. If you crawl back under the dash and look a little closer you will notice that the bottom right stud (U bolt) actually has a little hicky that keeps it from moving, sorta like a lock washer, but only flat/star like/ and just in the way. What you probably didn't notice (if you were hammering on it or REALLY trying to pull on it from under the hood) is that the fangled bracketry that makes up the clutch pedal assy is actually caught in the threads too... making it really hard to push the U bolt thru. I tried and tried to pry this bracket up so that it didnt interfere with the U bolt, but it was too stuborn. Somehow I accidentally ended up prying it over the rod so that it was not even touching it anymore. This allowed me to use the can opener
on my leatherman to mangle up that little locking hikey so it would come off. There wasnt anything preventing the top left side from moving. Slide the rod off of the top of the clutch pedal.Climb under the hood and just reach under there for the u bolt. With little convincing it, it should come right out. You've now passed the point of no return.
Now's when you want to get the car in the air enough to slide under it from the drivers side. If you look up on the drivers side of the tranny you will notice a braided/hose covered line going right into the side of the tranny. See that yellow looking brassy thing on the end of the hose kinda inside the transmission? Thats the connector. There should be a white looking plastic ring on it. Get your screw driver (or can opener
) and push that little plastic ring toward the transmission. You want it to slide in equally all the way around the connector. What that little thing is doing is folding up these little frail aluminum spikes that keep the hose from backing out. Its a little like the quils of a porcupine. Pulling on the hose is like petting the porcupine backwards. Pushing the plastic ring in folds everything down so it doesnt catch. Be very careful on this step. Screwing up this would mean you just screwed up the slave cylinder. That means dropping the trans... Note the position/route this hose is taking up to the master. You'll want to feed the tick hose back down the same way. Once that hose is out of the trans, go back under the hood and pull the fluid resivior hose off of the master cylinder. Once that is off it is no longer connected to the car. A little snatching and it comes right out.
When you look at the stock master and compare it to the tick, you'll see that massive piece of aluminum. Thats going to make it a little more difficult putting it back in. Peek back under the hood. Notice that wiring harness that snakes from the firewall... kinda under the brake booster, and around towards... towards the front I think? That bundle of wire is going to prevent the tick from slipping in. If you notice, there is a plastic clip/stud holding the wires to a bracket... seen from the resivior side of the booster. I tried prying that plastic stud up enough to pop it out of the braket... but found it easier just to go into the wheel well (behind the tire) and just cut it off. Should you? Probably not... Im sure there is a better way. No matter what, though, you'll want to move those wires.
Assuming you freed the wires from the clutches of their bracket, go ahead and pull on them lightly so that they come up infront of the booster. That should give you the room needed to finagle the tick towards the stock location on the firewall. Make sure you attatch the fluid resivior hose onto the the tick before you try pushing it to where you cant see it anymore (use a ziptie to secure it in place), and be sure to remove the two bolts that are fastened into the back of the master... those you'll need to bolt it up from inside the car. You'll also want to wait to put the long rod on the back of it until you inside the car. I don't think you could get everything to fit under the booster with that part on anyway.
I didn't have too much trouble lining up the holes. Just keep working it from under the hood until it looks like its lined up from inside the car. You'll know you're getting close when the threaded rod on the cab side of the master is sticking thru the hole it was intended to stick thru.
I found it easier to use a 3/8 extension with a shallow 13mm socket to hold the hardware while I threaded them into the holes. The same rules apply to threading stuff here. Don't go hog wild on one side until you know the other is in... and in correctly. Even though this thing looks beast, I wouldnt want to strip out or cross thread anything. Take your time lining it up and don't force anything. Once they thread in easily go ahead and tighten them down equally. I didn't torque them down, just hand tight.
Last edited by KurtRardin; 06-29-2009 at 05:06 PM.
 06-29-2009, 01:49 PM
#2
From under the hood, feed the tranny line coming out of the end of the master down to the tranny in the same fashion as the stock hose. Climb back under the car, armed with a few zipties, and put the connector back into the tranny. Did you feel it snap in place? Good. Your work under the car is done only after ziptying the hose up so it won't get burned or melted... you wouldnt want that happening
Climb back under the dash and thread the supplied rod all the way onto the master, then work the clutch pedal so that it reaches the really shortened adjustable rod (if you read your instructions that came with it then you will make sure its at its shortest possible length...from both the eylet end and the other end). Slide the rod end over the clutch pedal stud with the grease fitting pointed down. Remember that little clip that flew off earler? Find it, and cram your needle nose pliers into it so it is kinda pried open, but do it so the pliers arent going to interfere with the stud. I tried and tried to get that clip back on but unless it is held open somehow it is too tight to go back on all the way. Opening it up with needle nose pliers seems to help open it up enough, and you can reach everything a little easier now too.
Unless I am forgetting something, then ladies and gentlemen, its installed, and all that's left at this point is bleeding the hydraulics, and adjusting the rod. The instructions provide very clear adjustment procedures.
To bleed it I used a combination of my mity-vac and the slave bleeder hole... really easy to get to the slave bleeder hole if you do this: https://ls1tech.com/forums/manual-transmission/1093207-need-bleed-your-clutch-yourself.html
The slave bleeder is why you would want the 7/16 deep well socket and extension/ 1/4" ratchet.
If you've been puting off changing the fluid in the hydraulics, first off shame on you, now is the time baby. Get the big can of brake fluid (dot 3 I think). Will you need all of that? No... but you better start changing that **** more often. Is the old stuff as black as military rationed coffee? It is? Don't let it get that bad again... It should be almost clear!
Once its adjusted correctly you will really enjoy it. Its definitely worth every penny, and the old saying is true here: You get what you pay for!
 Did I miss anything? If there is some worthless advice here please speak up, so I can correct it.
Climb back under the dash and thread the supplied rod all the way onto the master, then work the clutch pedal so that it reaches the really shortened adjustable rod (if you read your instructions that came with it then you will make sure its at its shortest possible length...from both the eylet end and the other end). Slide the rod end over the clutch pedal stud with the grease fitting pointed down. Remember that little clip that flew off earler? Find it, and cram your needle nose pliers into it so it is kinda pried open, but do it so the pliers arent going to interfere with the stud. I tried and tried to get that clip back on but unless it is held open somehow it is too tight to go back on all the way. Opening it up with needle nose pliers seems to help open it up enough, and you can reach everything a little easier now too.
Unless I am forgetting something, then ladies and gentlemen, its installed, and all that's left at this point is bleeding the hydraulics, and adjusting the rod. The instructions provide very clear adjustment procedures.
To bleed it I used a combination of my mity-vac and the slave bleeder hole... really easy to get to the slave bleeder hole if you do this: https://ls1tech.com/forums/manual-transmission/1093207-need-bleed-your-clutch-yourself.html
The slave bleeder is why you would want the 7/16 deep well socket and extension/ 1/4" ratchet.
If you've been puting off changing the fluid in the hydraulics, first off shame on you, now is the time baby. Get the big can of brake fluid (dot 3 I think). Will you need all of that? No... but you better start changing that **** more often. Is the old stuff as black as military rationed coffee? It is? Don't let it get that bad again... It should be almost clear!
Once its adjusted correctly you will really enjoy it. Its definitely worth every penny, and the old saying is true here: You get what you pay for!
Did I miss anything? If there is some worthless advice here please speak up, so I can correct it. Last edited by KurtRardin; 06-29-2009 at 04:58 PM.
06-29-2009, 06:52 PM
#3
In the process I broke some little sensor that goes on the clutch petal. It detects when the clutch is in the up position... I'm not sure what it really is, but it still won't start without the clutch pressed in... so it doesnt have anything to do with that Its white and has some kind of plunger on it 
If you would not like to brake yours too, then take care when letting the clutch petal fly back up to its starting position after taking the rod off that connects it to the stock master cylinder...
Its white and has some kind of plunger on it If you would not like to brake yours too, then take care when letting the clutch petal fly back up to its starting position after taking the rod off that connects it to the stock master cylinder...
06-29-2009, 08:38 PM
#4
12 Second Club
iTrader: (13)

Join Date: Apr 2004
Location: Belleville, MI
Posts: 1,027
Likes: 0
Received 0 Likes
on
0 Posts
The sensor that touches the clutch pedal works with the cruise control. With the cruise on, if you hit the brake pedal or if you engage the clutch pedal the cruise is disengaged. The plunger sensor that is on the clutch pedal is what recognizes that you engaged it.
06-29-2009, 08:54 PM
#5
Staging Lane
Join Date: Feb 2009
Location: Too far from home
Posts: 61
Likes: 0
Received 0 Likes
on
0 Posts
On a different car i had I had to touch the clutch pedal to turn off cruise control because my brake wouldnt turn it off.
06-30-2009, 11:52 PM
#7
Teching In
Join Date: Sep 2007
Posts: 14
Likes: 0
Received 0 Likes
on
0 Posts
I did the same install this past weekend. And I tried pulling those wires away to make room to get the MC in there and damn it was just not happening. So after some pretty bad scraps on my knuckles (looks like I was in a pretty mean fight), I tried putting the MC upside down (so the rod is facing down - actually the old man suggested it first) and then once you have it past the brake booster flipping it up so you can get the bolts in it. That worked like a charm!
When he first suggested it I thought there is no way that would work... but finally I gave it a try and it did work. Hopefully this might help other people doing it.
When he first suggested it I thought there is no way that would work... but finally I gave it a try and it did work. Hopefully this might help other people doing it.
Trending Topics
09-22-2009, 10:49 AM
#10
TECH Regular

If you broke your cruse control switch you are going to get a SES light soon. I know because after my Tick install my clutch arm didn't come up high enough to engauge the switch. After the SES light came on and my cruse didn't work anymore I figured it out. I adjusted the cruse switch out so the pedal would engauge and after about 100 cycles the SES light went out.
03-13-2010, 04:55 PM
#12
I wish I could figure out what my issue is with my hydraulics. It will shift smooth as silk for like a block, then its back to being notchy. I'll adjust the cylinder out some more, and then same scenario. I've adjusted it out to the point to where I don't think I should adjust it out anymore, and I've bled it and bled it over and over. The petal is spongy, shifting is notchy, and I'm really getting tired of fighting with it.
Any clues to what could be going on? My slave/clutch is all new from Monster, maybe 7k miles on them.
Any clues to what could be going on? My slave/clutch is all new from Monster, maybe 7k miles on them.
06-09-2010, 04:43 PM
#14
No, but they gave me some ideas to look for. I think I've pretty much gotta take my trans back out to look at the pressure plate and see if anything looks out of the ordinary. It could also be the slave. They haven't heard of anything like that happening so they're interested in what it might be. The master cylinder is okay though.