
LSx into '67-'69 Camaro, the basics
 01-08-2006, 01:02 AM
#1

This is in response to multiple questions i've recieved via email..
All websites, names with an "*" are Ls1Tech Sponsors, please support them, as they help to keep this great site running. If I forgot one, please inform me, and I'll add it.
1. Engine and Transmission.
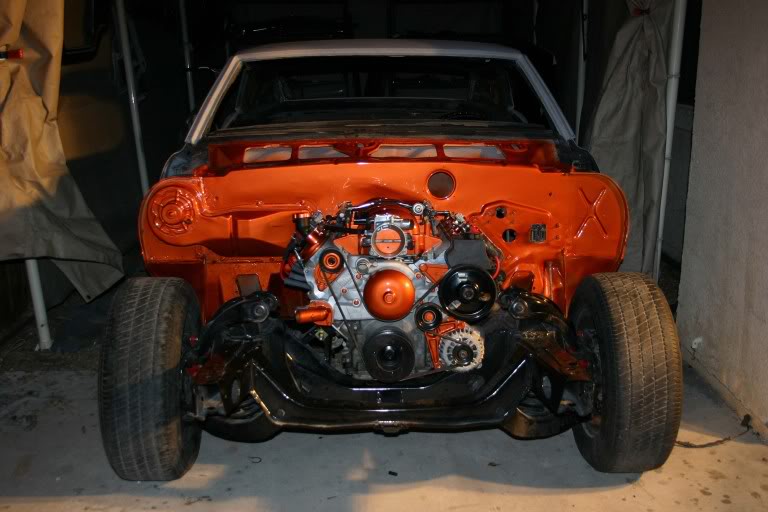
First you need a powertrain. Any LSX engine will fit, from a truck 4.8l to a LSX 454+. All of the engines are the same external dimensions, exhaust will interchange between each, motor mounts, etc.. will all interchange between the GENIII and GENIV engines. Iron block engines are usually less expensive, and are more than enough muscle to get these light cars moving, aluminum will shave a decent amount of weight and be more visually appealing.
The easiest way to get the accessories working, other than a custom serpentine setup. ($$$) is to go with an F-body or a C5 corvette serpentine setup. Depending on your motor mount choices, the A/C compresser may or may not fit. Truck accessories will work, it has been done before, they are unsightly, but can be come across more cheaply. Be aware that the stock truck accessories sit 2" farther away from the block, so you'll compromise clearance for radiator, etc. The majority of truck accessories will fit, there's a lot of room in front of the engine pan, although the high mount A/C can get in the way. Accessory drive selection is a matter of preference more than function, the alternator on the F-body is mounted low on the drivers side, while on the corvette it's higher. They both run different power steering pumps and reservoirs as well.
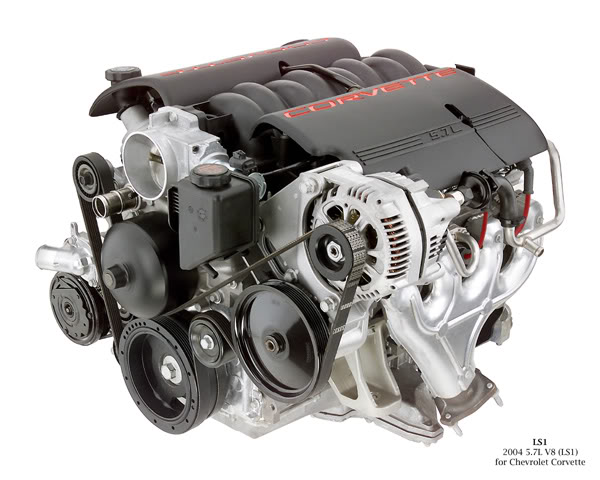
here's the 'vette engine
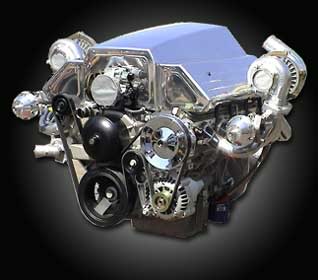
here's the f-body version.
A/C relocation brackets are available to make the compressor fit without minor notching of the frame.
Motor mounts are available from:
street and performance - www.hotrodlane.cc - billet aluminum, mount engine 2" off firewall, notching of f-body pan required.
I bought these, which are the exact same size, but made of steel, and a third of the price. http://carshop.carshopinc.com/produc...id/74328/LS1GM
ATS makes high quality mounts, and they're very similar, include what appears to be Grade 8 hardware, and are powdercoated black. They're available for $125 from www.t56kit.com
Hooker sells a set of motor mounts with their own headers and crossmember, that puts the engine in an optimum rearward location, very close to the firewall.
Any of those, along with your existing steel frame stands, and some normal GM small block motor mounts (i got nice ones from energy suspension, any will do, Tyler offers polyurethane ones at additional cost,) will put the motor right where you want it in the frame. This way of doing it requires no cutting of the car at all. There's another setup from BRP hotrods, that requires you to hack up the floor of your camaro, and I just couldn't do it. The BRP hotrods mounts place the engine 2" farther towards the front of the car than the other mounts, allowing you to keep the stock A/C position, but requiring you to run a relocated steering rack. The parts for that are available from Year One* www.yearone.com.
Hooker just recently came out with a set of mounts for the first gen camaro, to go along with their new headers, they put the engine 1 3/16" farther back, and 3/8" higher than S&P style mounts. They sell headers for their mounts, available in uncoated and coated versions.
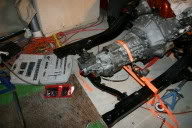
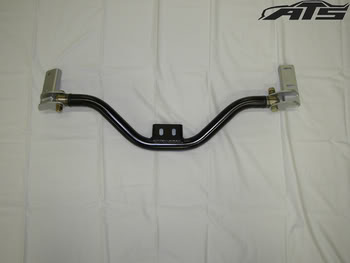
The transmission will also need its own crossmember, as either the auto tranny (either a 700R4, or 4L60E) , or the T56, as I'm using, is much longer than either the stock powerglides, muncies, or saginaws.
I fabbed my own transmission crossmember using a universal kit from competition engineering, as a few others have done, as I'm handy with a drill and welder. I'd highly reccomend that to anyone who has fabricating skills.
Here's mine.

and
I was not very experienced in fabrication, i've since learned to TIG, and could do a much better job, but it works for now.
You can also use a TH-400 crossmember, but add a 2x2" piece of square metal between the transmission mount and the crossmember, as a spacer, and it will come out very clean. Some have found that cutting off the mount on the bracket, flipping it, and re-welding it, also will do the trick for an automatic transmission. (4l60e)
ATS (www.t56kit.com) has come out with a significantly better one than my creation, designed for great exhaust clearance, and is made of powdercoated chromoly from what i remember.
. The engine and trans are now in place, and ready to hook up.
<ALSO!> Both transmissions are massive, and you'll have to either have a custom driveshaft made, or shorten the original
(thx ilovefirstgens)
You will also need to cut a new hole for the shifter about 4 inches back from the stock muncie/saginaw transmission for a T-56, I prefer it to the stock position, it's very comfortable.
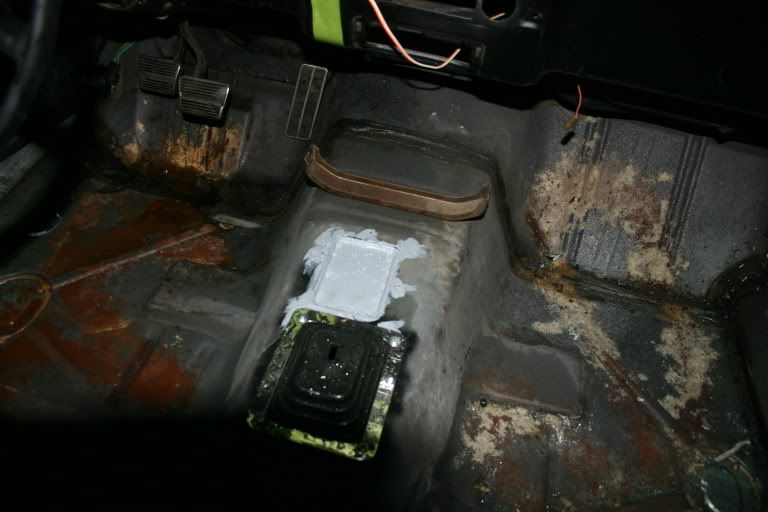
poor pic, but better than none.
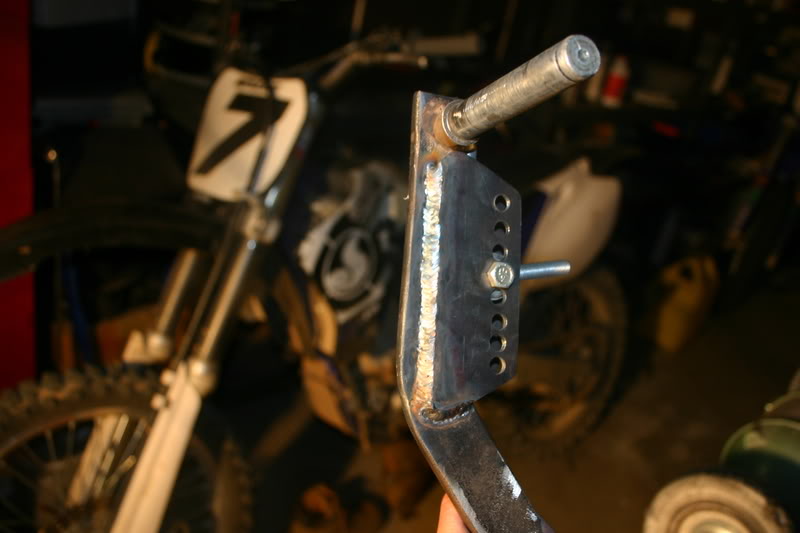
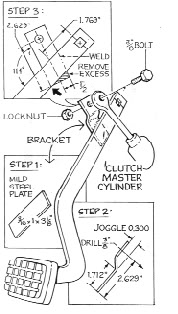
For the clutch, if you're using a hydraulic system (stock LS1 T56 and LT1 T56), will allow use of the stock clutch pedal. If I were to do it again, I would buy a CNC brand master cylinder, 13/16" bore, firewall mount, and mount it flush to the firewall, and connect my clutch line. If you want to use the stock F-body master cylinder, or an aftermarket one for the same vehicles, you can do so by utilizing a simple firewall bracket. ATS offers the correctly sized bracket, or make your own.
You will need to weld a small bracket onto the pedal to connect the linkage, try to make it a straight throw to prevent excessive wear to the master cylinder unit.
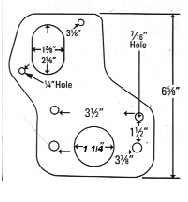
I ended up fabbing an adjustable bracket to locate my heim joint to the master, because the original bracket was too weak.
here's what I did.
To use a stock master, use these instructions, to use a short (2 inches) piece of bar stock, use existing hole.
For an auto, you just run a cable for the 700r4, or plug in the connector for the 4L60E.
All websites, names with an "*" are Ls1Tech Sponsors, please support them, as they help to keep this great site running. If I forgot one, please inform me, and I'll add it.
1. Engine and Transmission.
First you need a powertrain. Any LSX engine will fit, from a truck 4.8l to a LSX 454+. All of the engines are the same external dimensions, exhaust will interchange between each, motor mounts, etc.. will all interchange between the GENIII and GENIV engines. Iron block engines are usually less expensive, and are more than enough muscle to get these light cars moving, aluminum will shave a decent amount of weight and be more visually appealing.
The easiest way to get the accessories working, other than a custom serpentine setup. ($$$) is to go with an F-body or a C5 corvette serpentine setup. Depending on your motor mount choices, the A/C compresser may or may not fit. Truck accessories will work, it has been done before, they are unsightly, but can be come across more cheaply. Be aware that the stock truck accessories sit 2" farther away from the block, so you'll compromise clearance for radiator, etc. The majority of truck accessories will fit, there's a lot of room in front of the engine pan, although the high mount A/C can get in the way. Accessory drive selection is a matter of preference more than function, the alternator on the F-body is mounted low on the drivers side, while on the corvette it's higher. They both run different power steering pumps and reservoirs as well.
here's the 'vette engine
here's the f-body version.
A/C relocation brackets are available to make the compressor fit without minor notching of the frame.
Motor mounts are available from:
street and performance - www.hotrodlane.cc - billet aluminum, mount engine 2" off firewall, notching of f-body pan required.
I bought these, which are the exact same size, but made of steel, and a third of the price. http://carshop.carshopinc.com/produc...id/74328/LS1GM
ATS makes high quality mounts, and they're very similar, include what appears to be Grade 8 hardware, and are powdercoated black. They're available for $125 from www.t56kit.com
Hooker sells a set of motor mounts with their own headers and crossmember, that puts the engine in an optimum rearward location, very close to the firewall.
Any of those, along with your existing steel frame stands, and some normal GM small block motor mounts (i got nice ones from energy suspension, any will do, Tyler offers polyurethane ones at additional cost,) will put the motor right where you want it in the frame. This way of doing it requires no cutting of the car at all. There's another setup from BRP hotrods, that requires you to hack up the floor of your camaro, and I just couldn't do it. The BRP hotrods mounts place the engine 2" farther towards the front of the car than the other mounts, allowing you to keep the stock A/C position, but requiring you to run a relocated steering rack. The parts for that are available from Year One* www.yearone.com.
Hooker just recently came out with a set of mounts for the first gen camaro, to go along with their new headers, they put the engine 1 3/16" farther back, and 3/8" higher than S&P style mounts. They sell headers for their mounts, available in uncoated and coated versions.
The transmission will also need its own crossmember, as either the auto tranny (either a 700R4, or 4L60E) , or the T56, as I'm using, is much longer than either the stock powerglides, muncies, or saginaws.
I fabbed my own transmission crossmember using a universal kit from competition engineering, as a few others have done, as I'm handy with a drill and welder. I'd highly reccomend that to anyone who has fabricating skills.
Here's mine.
and
I was not very experienced in fabrication, i've since learned to TIG, and could do a much better job, but it works for now.
You can also use a TH-400 crossmember, but add a 2x2" piece of square metal between the transmission mount and the crossmember, as a spacer, and it will come out very clean. Some have found that cutting off the mount on the bracket, flipping it, and re-welding it, also will do the trick for an automatic transmission. (4l60e)
ATS (www.t56kit.com) has come out with a significantly better one than my creation, designed for great exhaust clearance, and is made of powdercoated chromoly from what i remember.
. The engine and trans are now in place, and ready to hook up.
<ALSO!> Both transmissions are massive, and you'll have to either have a custom driveshaft made, or shorten the original
(thx ilovefirstgens)
You will also need to cut a new hole for the shifter about 4 inches back from the stock muncie/saginaw transmission for a T-56, I prefer it to the stock position, it's very comfortable.
poor pic, but better than none.
For the clutch, if you're using a hydraulic system (stock LS1 T56 and LT1 T56), will allow use of the stock clutch pedal. If I were to do it again, I would buy a CNC brand master cylinder, 13/16" bore, firewall mount, and mount it flush to the firewall, and connect my clutch line. If you want to use the stock F-body master cylinder, or an aftermarket one for the same vehicles, you can do so by utilizing a simple firewall bracket. ATS offers the correctly sized bracket, or make your own.
You will need to weld a small bracket onto the pedal to connect the linkage, try to make it a straight throw to prevent excessive wear to the master cylinder unit.
I ended up fabbing an adjustable bracket to locate my heim joint to the master, because the original bracket was too weak.
here's what I did.
To use a stock master, use these instructions, to use a short (2 inches) piece of bar stock, use existing hole.
For an auto, you just run a cable for the 700r4, or plug in the connector for the 4L60E.
Last edited by 67RSCamaroVette; 11-05-2007 at 08:28 PM.
 01-12-2006, 07:15 PM
#2
2. Suspension, Steering
Now, you'll need to make a choice on whether you want to use the original steering box and link, or upgrade to a rack and pinion unit. I vouched for the original style steering box, upgraded to a very quick 3rd gen box. (The power assisted box is available from your local autozone for around $170, ask for a late model (say, 88 to '91) steering box WITH performance suspension.) I pulled my own box out of a junkyard, from an IROC camaro, (2.5 turns lock to lock), the same box is available from a thirdgen Trans AM WS6. If you want a box with 3.5 turns lock to lock, get one from a regular thirdgen. For the pitman arm, you'll need a Moog P/N K6582 and a correct spline 3/4" coupler, Tyler at ATS sells the correct one for $79 as of right now. I bought a generic rag joint rebuild kit, and merged the one I took off the turdgen and my steering column and made it work, that's just me. The stock steering arms, drag link, etc will function fine.
THE PROBLEM with using this type setup, is that the drag link will hit the LS1 F-Body oil pan. I notched mine, and Street and Performance will notch and weld one for you, as a bolt on, but a good solution is ATS's oil pan, which sells for around 500 dollars, which has good capacity, excellent baffling, and optional external 10AN plumbing for turbo, etc, should you want to upgrade to power adders in the future.
Here's basically what needs to be done. I milled away 2 1/4" down (with pan facedown) and 2" back. If i did it again, i would have done it slightly deeper (shallower) seeing as the piece I filled it with was 1/4" thick.
Here's mine, I used a mill to remove material, and make the insert, and had a professional welder friend of mine weld it up for me. 6061 alloy works great.

Using a rack and pinion setup you will also need to notch the oil pan, although if you use the BRP* hotrods ( www.BRPhotrods.com ) setup that puts it in front of the frame drop, you're free to use the original F-body pan unmodified, and it fits well.
You'll want to think about getting some coilover adjustable suspension, drop spindles, lighter spring rate front coils, chop the springs, etc etc, because of the lighter weight of the LS1.
Some people running aging suspensions have a sagged ride height to begin with, and may still look normal after the LS1 swap. With my SBC springs, and 2" drop spindles, I still had to remove 3/4 of a coil on each side to bring it where i wanted it (really low).
Now, you'll need to make a choice on whether you want to use the original steering box and link, or upgrade to a rack and pinion unit. I vouched for the original style steering box, upgraded to a very quick 3rd gen box. (The power assisted box is available from your local autozone for around $170, ask for a late model (say, 88 to '91) steering box WITH performance suspension.) I pulled my own box out of a junkyard, from an IROC camaro, (2.5 turns lock to lock), the same box is available from a thirdgen Trans AM WS6. If you want a box with 3.5 turns lock to lock, get one from a regular thirdgen. For the pitman arm, you'll need a Moog P/N K6582 and a correct spline 3/4" coupler, Tyler at ATS sells the correct one for $79 as of right now. I bought a generic rag joint rebuild kit, and merged the one I took off the turdgen and my steering column and made it work, that's just me. The stock steering arms, drag link, etc will function fine.
THE PROBLEM with using this type setup, is that the drag link will hit the LS1 F-Body oil pan. I notched mine, and Street and Performance will notch and weld one for you, as a bolt on, but a good solution is ATS's oil pan, which sells for around 500 dollars, which has good capacity, excellent baffling, and optional external 10AN plumbing for turbo, etc, should you want to upgrade to power adders in the future.
Here's basically what needs to be done. I milled away 2 1/4" down (with pan facedown) and 2" back. If i did it again, i would have done it slightly deeper (shallower) seeing as the piece I filled it with was 1/4" thick.
Here's mine, I used a mill to remove material, and make the insert, and had a professional welder friend of mine weld it up for me. 6061 alloy works great.
Using a rack and pinion setup you will also need to notch the oil pan, although if you use the BRP* hotrods ( www.BRPhotrods.com ) setup that puts it in front of the frame drop, you're free to use the original F-body pan unmodified, and it fits well.
You'll want to think about getting some coilover adjustable suspension, drop spindles, lighter spring rate front coils, chop the springs, etc etc, because of the lighter weight of the LS1.
Some people running aging suspensions have a sagged ride height to begin with, and may still look normal after the LS1 swap. With my SBC springs, and 2" drop spindles, I still had to remove 3/4 of a coil on each side to bring it where i wanted it (really low).
Last edited by 67RSCamaroVette; 12-19-2006 at 12:50 AM.
01-12-2006, 07:22 PM
#3
3. PCM, Harness
Electronics wise, you have multiple options.
1. You can have an original F-Body harness re-worked for under $400 from a number of places.
I would reccomend John at Speartech,* www.speartech.com, because he seems to be extremely helpful at getting your conversion running. He posts here all the time, offering advice and suggestions. He offers re-working services, or new harnesses.
<part numbers coming soon>
www.painlesswiring.com also offers new harnesses.
www.wait4meperformance.com offers re-working services as well.
Here's the Wiring Harness's from F.A.S.T. for stock PCM's:
Here's the F.A.S.T. XFI EFI System:
Here's the F.A.S.T. LS1 EDist. that is needed with the XFI:
If you're brave and know the black magic art that is electronics, you can find pinouts in a sticky at the top of this forum, and get information from others that have done it before.
(Note: if you're doing it yourself, you'll still need to either have your PCM edited, or do it yourself using LS1edit or HPtuners*.
You will need a relay to turn the fuel pump on, any of these people can help you. They can also help you with fan on/off triggers, etc.
No matter which way you choose to go, your PCM (computer) will need VATS (the safety feature that cuts ignition to the engine if the proper key isn't inserted) deleted, to get the engine to run properly. I believe there are 5 wires that need to be connected in the engine harness, you can work them into the original fuse box/ignition tumbler if you're handy with wiring, many people in this section will be more than happy to help you with it.
Last edited by 67RSCamaroVette; 01-13-2006 at 07:21 PM.
01-12-2006, 07:26 PM
#4
4. Fuel and Plumbing
There are a few different places that offer '67-69 camaro tanks that have been sumped/baffled, with internal LS1 compatible pumps. I welded up my own fuel sump, using a Competition Engineering Universal 3/8" kit, but they're out there.
You can run an in-tank fuel pump setup (quiet and reliable), which means you'll just run the line from that (regulated to 58 psi) to the inlet on the fuel rail. If you've got the cash to dish out for a nice stainless, internal pump unit, go for it. They're available from Rick's Hot Rod Shop. www.rickshotrodshop.com/
Third option is a fuel cell. They simply have feed lines, and mount either in your trunk, sunken, or inside the compartment. They're simple, effective, and cheap. I personally don't want one in my car. With a fuel cell, unless you can find one with an internal pump, you'll have to run an external
Aeromotive offers a complete fuel system that will work with a fuel cell or sumped setup. The part number for the complete Aeromotive EFI fuel system with the A1000 pump is 17125. You'll pay from $1200-1500 for this setup.
http://www.aeromotiveinc.com/pdf/17125.pdf
I'm doing the easy way, and running an external Walbro 255 inline fuel pump. Using the original 3/8" return style sender for the stock tank, (available for big-block cars) will work fine. 3/8" (6AN) lines for a n/a engine are plenty, unless you have a HUGE shot of nitrous or boost plans in the future. For an external setup, you'll need to plumb from the tank to a pressure regulator with a return, and the regulated pressure will go to the fuel rail, the return back to the tank. Here's what i'm doing.
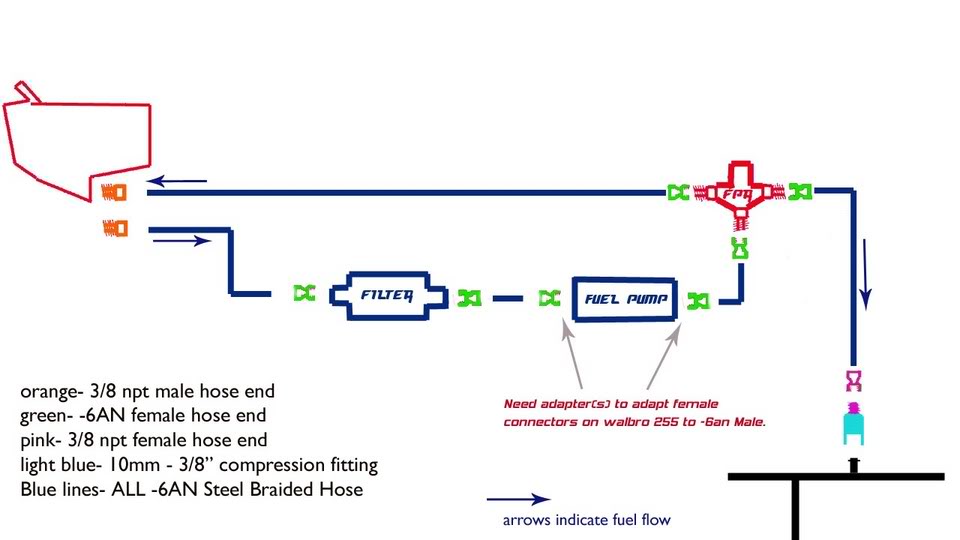
You'll need two -6an fittings for the walbro fuel pump if you use it with the -6an hose.
If you dont want to pay for, or don't care about, using rubber hose (rated for EFI, of course,) Just use barbed fittings and hose clamps everywhere, it works, is cheap, and easy..
Simple and effective.. Many say that the external pumps are noisy and unreliable, (My car is so loud, that I really don't care. I dont find it loud at all.) 70LS1 (member and mod) has been running a walbro 255 for 3 years with no problems, this system will work just fine.
A popular Fuel pressure Regulator, (FPR), is from a '99 corvette, which incorporates a return-regulator with a filter, and is disposable and cheap..
like this...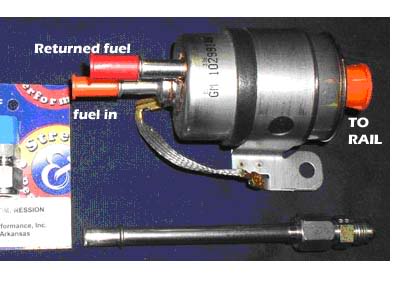
ATTENTION: 3/8" HOSE IS FEED INTO FILTER, 5/16" LINE IS RETURN! (Image Mislabeled)
Aeromotive offers a billet adjustable one with -6AN in/outlets that i'll be using.
You will need special fittings to adapt to the 3/8" feed lines and 5/8" return line. They are available from russell performance products.
You will need (2) 3/8" fittings, part number RUS-639210 or RUS-640850. They're for from the tank to regulator, and the line out to the rails.
You will need (1) 5/8" fitting (part number 640860) for the return to the fuel tank from the regulator. Those fittings have -6AN ends, so the rest of the -6AN fuel lines are cake.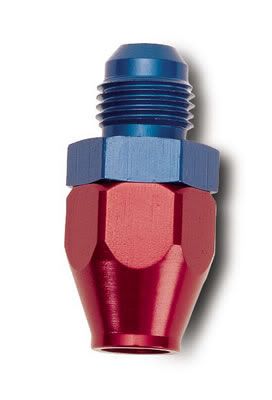
You'll also need a simple quick-connect for the fuel rail, too. Looks like this.
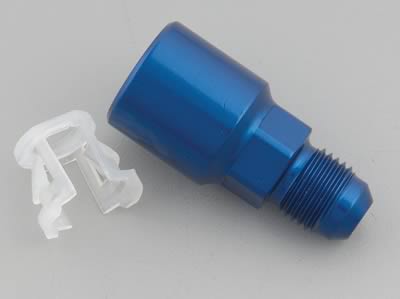 Russel part number RUS-640850. Note this has a 3/8 NPT outlet.
There are a few different places that offer '67-69 camaro tanks that have been sumped/baffled, with internal LS1 compatible pumps. I welded up my own fuel sump, using a Competition Engineering Universal 3/8" kit, but they're out there.
You can run an in-tank fuel pump setup (quiet and reliable), which means you'll just run the line from that (regulated to 58 psi) to the inlet on the fuel rail. If you've got the cash to dish out for a nice stainless, internal pump unit, go for it. They're available from Rick's Hot Rod Shop. www.rickshotrodshop.com/
Third option is a fuel cell. They simply have feed lines, and mount either in your trunk, sunken, or inside the compartment. They're simple, effective, and cheap. I personally don't want one in my car. With a fuel cell, unless you can find one with an internal pump, you'll have to run an external
Aeromotive offers a complete fuel system that will work with a fuel cell or sumped setup. The part number for the complete Aeromotive EFI fuel system with the A1000 pump is 17125. You'll pay from $1200-1500 for this setup.
http://www.aeromotiveinc.com/pdf/17125.pdf
I'm doing the easy way, and running an external Walbro 255 inline fuel pump. Using the original 3/8" return style sender for the stock tank, (available for big-block cars) will work fine. 3/8" (6AN) lines for a n/a engine are plenty, unless you have a HUGE shot of nitrous or boost plans in the future. For an external setup, you'll need to plumb from the tank to a pressure regulator with a return, and the regulated pressure will go to the fuel rail, the return back to the tank. Here's what i'm doing.
You'll need two -6an fittings for the walbro fuel pump if you use it with the -6an hose.
If you dont want to pay for, or don't care about, using rubber hose (rated for EFI, of course,) Just use barbed fittings and hose clamps everywhere, it works, is cheap, and easy..
Simple and effective.. Many say that the external pumps are noisy and unreliable, (My car is so loud, that I really don't care. I dont find it loud at all.) 70LS1 (member and mod) has been running a walbro 255 for 3 years with no problems, this system will work just fine.
A popular Fuel pressure Regulator, (FPR), is from a '99 corvette, which incorporates a return-regulator with a filter, and is disposable and cheap..
like this...
ATTENTION: 3/8" HOSE IS FEED INTO FILTER, 5/16" LINE IS RETURN! (Image Mislabeled)
Aeromotive offers a billet adjustable one with -6AN in/outlets that i'll be using.
You will need special fittings to adapt to the 3/8" feed lines and 5/8" return line. They are available from russell performance products.
You will need (2) 3/8" fittings, part number RUS-639210 or RUS-640850. They're for from the tank to regulator, and the line out to the rails.
You will need (1) 5/8" fitting (part number 640860) for the return to the fuel tank from the regulator. Those fittings have -6AN ends, so the rest of the -6AN fuel lines are cake.
You'll also need a simple quick-connect for the fuel rail, too. Looks like this.
Russel part number RUS-640850. Note this has a 3/8 NPT outlet. Last edited by -Joseph-; 04-18-2009 at 04:36 PM. Reason: error
01-12-2006, 07:35 PM
#5
5. Controls, Gauges.
For throttle, the LS1 incorporates either a drive-by-wire unit (just use its harness and pedal) or a cable. People are using cable gas pedals from a variety of different V6 cars along with the Lokar cable, or Lokar sells a pedal (known as the "Eliminator") that'll bolt right in and give you results.
Early 6 cylinder Novas, Camaros, and Firebirds have a V6 pedal that uses the original pivot location for your pedal, but has an arm that holds a cable.
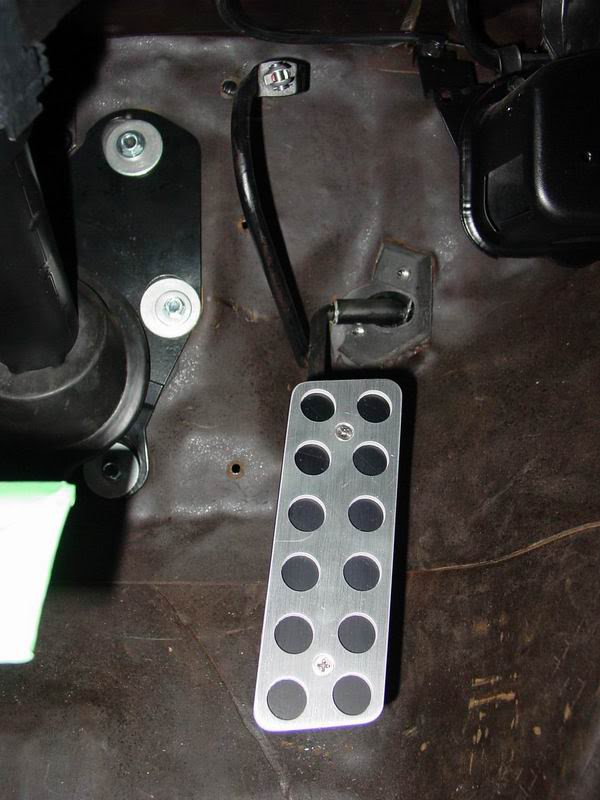
<Thanks, Rybar, John!>
I bought the above pedal (minus the aluminum pad) from Ricks First Generation, it's for the 1969 Z/28 crossram/6 cylinder models, comes with a nice new stock pedal/pad/bushing that fits great.
The orig cable speedo won't work with the VSS speedometer output from the pcm or trans, so you can get a converter that involves a little motor that spins the cable at the proper speed, you can get the converted tailshaft with a cable speedo output, OR you can simply run one of many aftermarket electronic speedometers.
5" Autometer gauges fit perfectly in the '67-68 gauge cluster, while the '69 will require surgery or an aftermarket panel. Here's one courtesy of a member here...
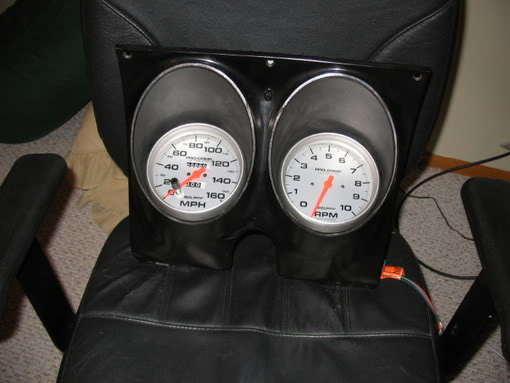
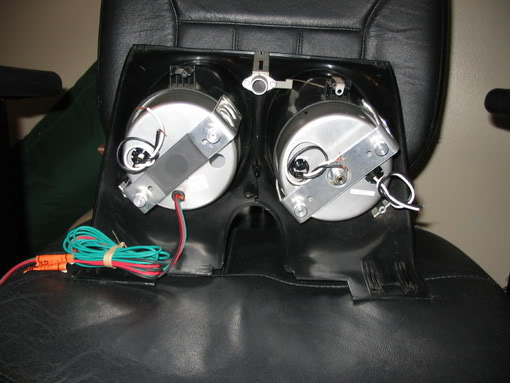
I believe these are 5" electric sport-comp gauges from autometer..
thanks steve68 for pics and mounting ideas.
Tach output is also removed from the PCM, an aftermarket tach set on "4cyl" mode will work perfectly, i hear.
A water temp sensor can be put into the back of the passenger side head.
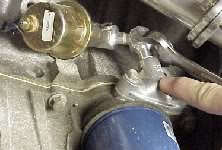
For an oil pressure sensor, you will need to drill the oil pressure tree with a 1/4" drill bit, then run a 1/8" NPT Fine thread pipe tap to thread in the sensor. The pressure tree is located above the oil filter and looks like this.
For throttle, the LS1 incorporates either a drive-by-wire unit (just use its harness and pedal) or a cable. People are using cable gas pedals from a variety of different V6 cars along with the Lokar cable, or Lokar sells a pedal (known as the "Eliminator") that'll bolt right in and give you results.
Early 6 cylinder Novas, Camaros, and Firebirds have a V6 pedal that uses the original pivot location for your pedal, but has an arm that holds a cable.
<Thanks, Rybar, John!>
I bought the above pedal (minus the aluminum pad) from Ricks First Generation, it's for the 1969 Z/28 crossram/6 cylinder models, comes with a nice new stock pedal/pad/bushing that fits great.
The orig cable speedo won't work with the VSS speedometer output from the pcm or trans, so you can get a converter that involves a little motor that spins the cable at the proper speed, you can get the converted tailshaft with a cable speedo output, OR you can simply run one of many aftermarket electronic speedometers.
5" Autometer gauges fit perfectly in the '67-68 gauge cluster, while the '69 will require surgery or an aftermarket panel. Here's one courtesy of a member here...
I believe these are 5" electric sport-comp gauges from autometer..
thanks steve68 for pics and mounting ideas.
Tach output is also removed from the PCM, an aftermarket tach set on "4cyl" mode will work perfectly, i hear.
A water temp sensor can be put into the back of the passenger side head.
For an oil pressure sensor, you will need to drill the oil pressure tree with a 1/4" drill bit, then run a 1/8" NPT Fine thread pipe tap to thread in the sensor. The pressure tree is located above the oil filter and looks like this.
Last edited by 67RSCamaroVette; 03-17-2006 at 08:48 AM.
01-12-2006, 07:38 PM
#6
6. Exhaust
For headers, you can run any shorty header, most exhaust manifolds without issue, but longtubes are another story. Tyler at ATS sells the best i've seen, if you've got the cash.
Stainless works* sells a nice set for factory steering, or an aftermarket subframe. http://www.stainlessworks.net/cart/i...ath=94_250_251
Hooker Headers just came out with a set of their own mounts, that put the engine very very close to the firewall, and have a nice set of coated headers that clear stock steering.
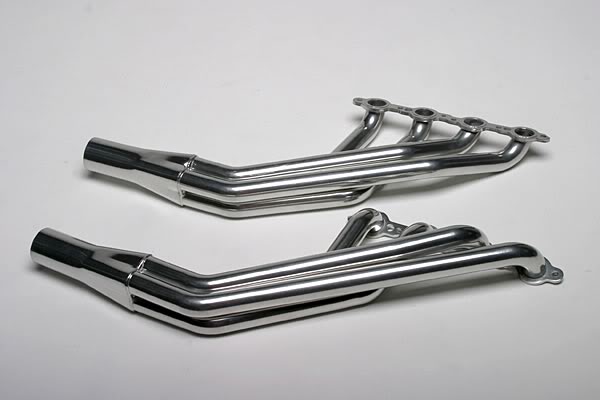
i believe they're around $500 uncoated, prob around 650 coated.. (available from www.ilovemyhookerheaders.com or www.summitracing.com)
Tyler's are used with his motor mounts, and are a work of art, he claims awesome power gains from the Tri-Y type setup. (www.t56kit.com)
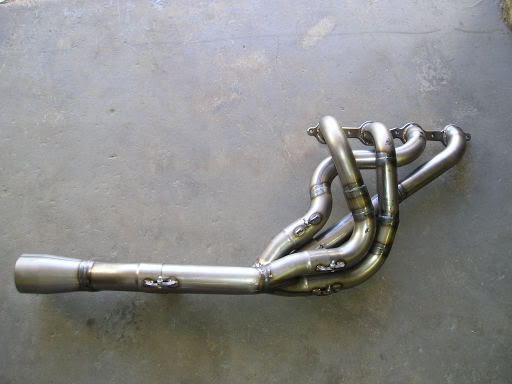
They start at $2k.
Be sure to check out LS1 sounds to find a great sounding muffler system. http://www.ls1sounds.com/
For headers, you can run any shorty header, most exhaust manifolds without issue, but longtubes are another story. Tyler at ATS sells the best i've seen, if you've got the cash.
Stainless works* sells a nice set for factory steering, or an aftermarket subframe. http://www.stainlessworks.net/cart/i...ath=94_250_251
Hooker Headers just came out with a set of their own mounts, that put the engine very very close to the firewall, and have a nice set of coated headers that clear stock steering.
i believe they're around $500 uncoated, prob around 650 coated.. (available from www.ilovemyhookerheaders.com or www.summitracing.com)
Tyler's are used with his motor mounts, and are a work of art, he claims awesome power gains from the Tri-Y type setup. (www.t56kit.com)
They start at $2k.
Be sure to check out LS1 sounds to find a great sounding muffler system. http://www.ls1sounds.com/
Last edited by 67RSCamaroVette; 03-25-2006 at 03:52 AM.
01-12-2006, 07:40 PM
#7
7. Cooling
For cooling, you can find an aftermarket radiator with dual electric fans from lots of places, your harness guy (the guy who programmed the PCM for you) can set you up with a computer operated relay to turn them on, OR you can use a stand alone type relay setup with probe. I have two relays set up, one for each fan, and have them to start at 180 and 200 degrees, respectively. They're controlled by ground via PCM, which means constant hot to the fans, and the control side of the circuit, and the fans are powered up by completing the ground.

Good luck! Search around, and you'll find many of your questions will be answered.
EDIT: I'm adding everything I missed, to possibly make this a sticky. Throw any useful info you can find, my way. BIG THANKS to people that contributed, I wouldnt know a thing about the LS1 if it weren't for the people here.
Olly
For cooling, you can find an aftermarket radiator with dual electric fans from lots of places, your harness guy (the guy who programmed the PCM for you) can set you up with a computer operated relay to turn them on, OR you can use a stand alone type relay setup with probe. I have two relays set up, one for each fan, and have them to start at 180 and 200 degrees, respectively. They're controlled by ground via PCM, which means constant hot to the fans, and the control side of the circuit, and the fans are powered up by completing the ground.
Good luck! Search around, and you'll find many of your questions will be answered.
EDIT: I'm adding everything I missed, to possibly make this a sticky. Throw any useful info you can find, my way. BIG THANKS to people that contributed, I wouldnt know a thing about the LS1 if it weren't for the people here.
Olly
Last edited by 67RSCamaroVette; 11-25-2010 at 10:29 AM. Reason: Added Schematic Drawing
Trending Topics
01-12-2006, 08:01 PM
#8
LSxGuy widda 9sec Mustang
iTrader: (12)
Join Date: Nov 2001
Location: Texas and Qatar
Posts: 3,043
Likes: 0
Received 0 Likes
on
0 Posts

Olly, looks like you found the thread I made earlier. I thought I deleted it because it was supposed to be sticky and it wasn't there.  I'm keeping this thread open so that members can contribute more info as its available. Thanks for taking the time to research this stuff Olly.
I'm keeping this thread open so that members can contribute more info as its available. Thanks for taking the time to research this stuff Olly.
01-12-2006, 10:31 PM
#9
Good thread, looks like you got alot covered Olly. Also a quick mention about fittings for the fuel system, the vette regulator requires quick disconnects as well as the fuel rail. I ran Russell fittings but you can also get them from Street & Performance.
I beleive these are the ones (640850 & 640860): http://www.russellperformance.com/au...uel-3-27.shtml
You'll also need to run the exit adapter (available from S&P) or other suppliers.
BTW: nice gas pedal pic!
I beleive these are the ones (640850 & 640860): http://www.russellperformance.com/au...uel-3-27.shtml
You'll also need to run the exit adapter (available from S&P) or other suppliers.
BTW: nice gas pedal pic!
Last edited by Rybar; 01-12-2006 at 10:38 PM.

 01-13-2006, 05:00 PM
#12
LSxGuy widda 9sec Mustang
iTrader: (12)
Join Date: Nov 2001
Location: Texas and Qatar
Posts: 3,043
Likes: 0
Received 0 Likes
on
0 Posts
Here's the Wiring Harness's from F.A.S.T. for stock PCM's: http://www.powerandperformancenews.c...y_Code=PCWHRNS
Here's the F.A.S.T. XFI EFI System: http://www.powerandperformancenews.c...egory_Code=XFI
Here's the F.A.S.T. LS1 EDist. that is needed with the XFI: http://www.powerandperformancenews.c...y_Code=EDISTED
Here's the F.A.S.T. XFI EFI System: http://www.powerandperformancenews.c...egory_Code=XFI
Here's the F.A.S.T. LS1 EDist. that is needed with the XFI: http://www.powerandperformancenews.c...y_Code=EDISTED
01-13-2006, 05:30 PM
#13
LSxGuy widda 9sec Mustang
iTrader: (12)
Join Date: Nov 2001
Location: Texas and Qatar
Posts: 3,043
Likes: 0
Received 0 Likes
on
0 Posts
The part number for the complete Aeromotive EFI fuel system with the A1000 pump is 17125. I couldn't find a direct link, but here's the instruction manual: http://216.242.145.16/usrbin/product...tems/17125.pdf
You will need a fuel cell, or a sumped fuel cell for this type of fuel system. This is the kit I will be using.
I don't think Aeromotive is a sponsor, but I know several sponsors listed to the right that are dealers. I've seen it for low $1200's when on sale, but MSRP is listed at $1466.99.
You will need a fuel cell, or a sumped fuel cell for this type of fuel system. This is the kit I will be using.
I don't think Aeromotive is a sponsor, but I know several sponsors listed to the right that are dealers. I've seen it for low $1200's when on sale, but MSRP is listed at $1466.99.
01-15-2006, 05:33 PM
#14
Great info Olly.Thought I should add something.
For those who might want an intank setup and don't want to pay the price for a rockvalley or rickshotrod shop tank, then this might help.
I bought a new tank for my 71 camaro and cut out the top and had a buddy weld a plate for the pump and sender.

I then assembled the pump module from Tanks Inc and the sender that would work with my original fuel gauge. The pump module works best with tank depths of 6.5' or deeper. I had 5.5' left after welding on the plate so I had to mod the fuel pump module to fit.

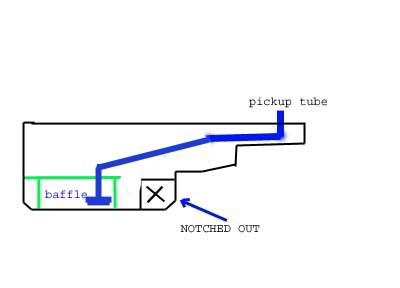
The pump then sits in a baffle

I made sure the welds were sealed and that they would remain that way. I used a fuel safe sealer on the inside of the welds and on the outside to. I then painted the top of the tank. I did not paint the bottom because I prefer the original look than the painted look.


For the fuel plumbing, I am going with a 3/8 aluminium supply line and 3/8 braided hose between the components. I have heard that braided lines can alloy fuel vapors to sip through causing the strong smell of fuel in the car. Aluminium is also cheaper.
For fittings, I chose to go with stainless steel compression fittings and endura finish hose ends. Here is a pic of the fittings on the Corvette FFR.

The parts#
3/8 compression fitting. Goes onto the 3/8 supply in and out SS-600-6-6AN
5/16 Pipe reducer. goes from 5/16 return to a 3/8 pipe allowing use of the above fitting SS-500-R-6
These fitting are from swagelok
For those who might want an intank setup and don't want to pay the price for a rockvalley or rickshotrod shop tank, then this might help.
I bought a new tank for my 71 camaro and cut out the top and had a buddy weld a plate for the pump and sender.
I then assembled the pump module from Tanks Inc and the sender that would work with my original fuel gauge. The pump module works best with tank depths of 6.5' or deeper. I had 5.5' left after welding on the plate so I had to mod the fuel pump module to fit.
The pump then sits in a baffle
I made sure the welds were sealed and that they would remain that way. I used a fuel safe sealer on the inside of the welds and on the outside to. I then painted the top of the tank. I did not paint the bottom because I prefer the original look than the painted look.
For the fuel plumbing, I am going with a 3/8 aluminium supply line and 3/8 braided hose between the components. I have heard that braided lines can alloy fuel vapors to sip through causing the strong smell of fuel in the car. Aluminium is also cheaper.
For fittings, I chose to go with stainless steel compression fittings and endura finish hose ends. Here is a pic of the fittings on the Corvette FFR.
The parts#
3/8 compression fitting. Goes onto the 3/8 supply in and out SS-600-6-6AN
5/16 Pipe reducer. goes from 5/16 return to a 3/8 pipe allowing use of the above fitting SS-500-R-6
These fitting are from swagelok
 02-16-2006, 12:44 AM
#17
Originally Posted by highspeedspecialist
How much more work is involed in doing a ls7 swap?
olly
Originally Posted by ahowudoin
since you dropped the sender from the oe height, did it effect your gauge?
02-16-2006, 03:22 PM
#18
Originally Posted by 67RSCamaroVette
That's one of those aftermarket deals where you shorten the post based on the tank depth, and then bend the wire until it touches the bottom of the tank. As long as they're the correct Ohm (i believe 0 - 90 for stock) they'll work fine. I know of a few people that are using them.
03-19-2006, 08:08 PM
#20
Staging Lane

Join Date: Oct 2004
Posts: 77
Likes: 0
Received 0 Likes
on
0 Posts
Hey guys - I'm still waiting to see what people's results were on Hooker headers (part # 2288-1KHR) with S&P mounts on a first-gen Camaro...anyone know how/if they fit?
If they fit, there's no doubt I'm getting them for my '69 with an LS1 an S&P motor mounts!
If they fit, there's no doubt I'm getting them for my '69 with an LS1 an S&P motor mounts!