
Mounts for transmission and motor
 05-16-2006, 09:37 PM
#1
TECH Senior Member
Thread Starter
iTrader: (23)
Join Date: Aug 2005
Location: Watertown, NY
Posts: 8,797
Likes: 0
Received 0 Likes
on
0 Posts
Prothane Motor Mount Install
Tools needed:
-13mm rachet gear end wrench (This is a MUST to do this easily)
-10mm rachet gear end wrench
-Deep and short metric socket set.
-Rachet with a few different extentions and swivel joints
-Flathead Screwdriver
-Vise or Decent sized C-Clamp
-Drill with small bit and a 3/8 bit
-High floor jack with 2 jackstands and a block of wood.
-Vise grips are good to have too
Steps:
1. Disconnect battery since alternator and starter will be disconnected later.
2. Disconnect intake bellow from throttle body with a screwdriver.
3. Using a 15mm socket, take out the 4 A/C compressor and bracket bolts that can be accessed from the hood area. Take off both belts too.
4. Raise car up as high as the jack will allow and place jackstands under.
5. Using a 15mm socket, first take off the idler pulley and then take off the 3 bolts that hold the alternator and bracket on. Then be sure to take the small electrical connector out of the top of the alternator. Then move alternator foward by laying it on the sway bar.
6. Place jack with block of wood up to the oil pan to support the weight.
7. Now you can see the mount area well. What I did was put a set of vise grips on the nut in the back and a 18mm socket on the front to get the mounting bolt out. Go ahead and unbolt it and pull the long bolt out. Now that side of the engine is detached from the chassis. Go ahead and raise the motor a little with the jack to give yourself more room to work with.
8. Now you will take the clamshell that hold the actual rubber/poly mount out. On the top of my driver clamshell there was a heatshield that I had to take off to expose the clamshell to motor bolts. Use a 10mm wrench to get the heatshield bolts off then remove the heatshield. Once the heatshield is out use the 13mm rachet end wrench to take the clamshell bolts out of the motor block. They are in there tight and you will need to use a lot of force to loosen them. The rachet wrench will be your savior when taking these bolts out, without it it is very difficult. On the back bottom bolt I was able to get a long thin socket extention up there to get that one out.
9. Once all 4 clamshell bolts are out you can now pivot the clamshell around till you get it out, it can be kinda frustrating. Once it is out you will notice there are 2 rivets on one end and 3 on the other. These need to be drilled out to split the shell. I first used a very small bit and followed up with the needed 3/8 bit. After it is drilled you cn use vise grips and the C-Clamp to split the shell, it takes some force because each half of the shell is bonded to the rubber mount inside.
10. Once it is split you can take out the old rubber mount and place the new poly mount in there, make sure you place it with the tabs being faced up when it is all done. You can use a vise or a C-Clamp to force the new mount into the shell, once its in put the new bolts in that will hold the clamshell together. Now you are ready to attach the shell back to the motor.
11. Pivot the shell until you get it back in place, remember TABS UP!! Put the shell to motor bolts in, then use the jack to line the holes up and put the long bolt through the mount pedestal. Then just plug the alternator wire back in and mount the alternator and replace the idler pulley. Now we can go to the passenger side.
12. At the passenger side, take out the remaining A/C compressor bolts and move the compressor foward some, then remove the A/C belt tensioner, this will expose the A/C bracket bolts, remove these too and then take the entire bracket and set it aside somewhere.
13. Now go and remove the 13mm starter bolts and drop the starter. then remove the wires from it and set it aside.
14. Remove all electrical connectors that look like they can be in the way. Once you remove them you will have a great amount of room to work in compared to the drivers side.
15. Like the other side, go ahead and remove that 18mm pedestal to clamshell bolt. Then use the 13mm rachet wrench and take the 4 clamshell to motor bolts out. Then go ahead and pivot the shell around until you can get it out.
16. Perform steps 9 and 10 again to break the shell and install the new poly mount.
17. Pivot the shell again to get it in position and then bolt it to the motor. Then use the jack again to line up the holes and push the bolt through. This side was harder to line up since the other mount was already installed.
18. Reconnect the starter, electrical connectors, belts, and the A/C components.
19. Dont forget to reinstall the bolts for the A/C compressor and bracket from the top area. Then just reconnect your intake stuff to the engine.
20. Thats it, youre done fire it up and watch the stillness of the engine in the bay.
I can not stress the importance of the rachet end wrench. That is what allowed me to do this in half decent time. Without it it would have taken me an easy 3 hours longer at least. If you dont have one you better go get one.
I am not sure how much different this install would be with other type headers but since so many have pacesetters, this should help some. I did it in around 5-6 hours.
Once again thanks to Luna for his write up that helped me out and now here is mine with a few tweaks from how he did his. Enjoy.
I have a pic of the the old little rubber mount compared to the new nice poly mount. What a difference, the new one actually fills up the entire shell unlike the rubber one. Someone needs to post it for me though because my computer is all jacked up and I cant get the attachment pop up to display. I will send it to someone if they want to post it for me.
Last edited by TheBlurLS1; 05-16-2006 at 10:49 PM.
 05-17-2006, 12:58 AM
#2

Transmission Mount Replacement
Symptoms of bad one:
Excessive shifter movement (M6 cars), trans/tq arm hitting body under acceleration, popping sounds while turning (sounds like posi is going out), exhaust system banging (sometimes), etc.
Tools needed:
-13mm socket
-15mm socket
-18mm DEEP socket
-jack and jackstands
-new tranny mount
a)OEM trans mount - 22146231 1LE Transmission Mount or 22174970 Transmission Mount
b) Polyurethane mount - Energy Suspension brand from Speed Inc. ETC.
Steps:
1. Jackup front of car high enough to get under comfortably.
2. Place jackstands to support front of car. I like them under the control arm bushing housings just beside the k-member.
3. Place jack under transmission in a secture spot, raise untill it just touches it and begins to lift.
4. Remove the 18mm nut from the stud on the tranny mount which is recessed into the center of the tranny crossmember.
5. Remove the 4 15mm bolts holding the tranny crossmember to the body and set aside. Be carefull while removing these bolts to make sure the tranny is supported while the crossmember comes down. It's best to loosen all 4 bolts, then wobble to make sure there's no load on it before removing all 4 bolts.
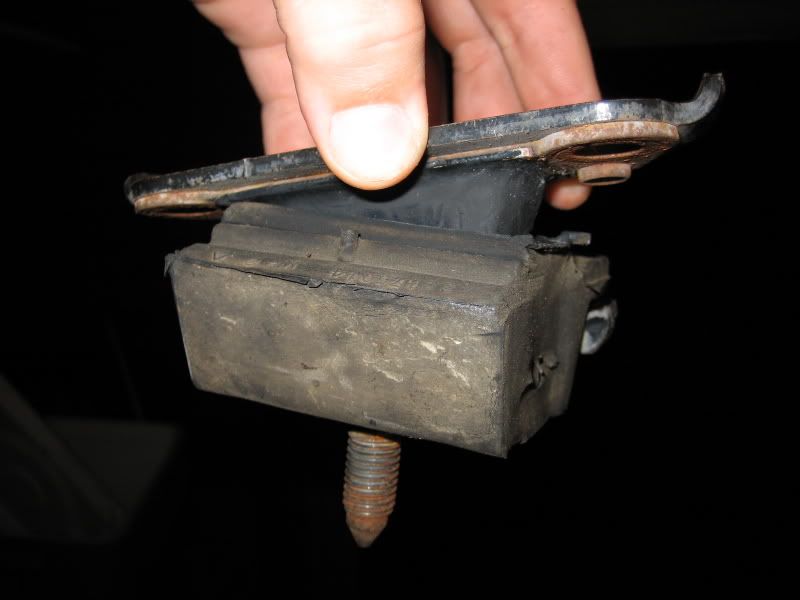
6. Inspect transmission mount, a torn one will usually look like the picture. Sometimes they will not totally seperate, but will allow too much movement.
7. Remove 2 13mm bolts and remove tranny mount if broken.
8. Replace with new OEM mount or poly tranny mount. Poly tranny mounts can be found at Autozone for about $20. It is made by energy suspension. The part comes with a spacer and some new bolts. The spacer is not used on LS1 f-bodies. The poly mount will have 2 small bumps on the stud side (faces down) which most people like to grind off, although I did not.
9. Bolt the tranny mount to the transmission and do the process in reverse.
Notes:
The poly trans mount WILL cause a little interior vibration, however you should forget about it after a few drives. Before this mod, my shifter would raise out of the console pretty noticably under hard acceleration, now it doesn't move much at all. It seemed to have helped some wheel hop problems I was having before as well. Shifts felt much more predictable and smooth.
Symptoms of bad one:
Excessive shifter movement (M6 cars), trans/tq arm hitting body under acceleration, popping sounds while turning (sounds like posi is going out), exhaust system banging (sometimes), etc.
Tools needed:
-13mm socket
-15mm socket
-18mm DEEP socket
-jack and jackstands
-new tranny mount
a)OEM trans mount - 22146231 1LE Transmission Mount or 22174970 Transmission Mount
b) Polyurethane mount - Energy Suspension brand from Speed Inc. ETC.
Steps:
1. Jackup front of car high enough to get under comfortably.
2. Place jackstands to support front of car. I like them under the control arm bushing housings just beside the k-member.
3. Place jack under transmission in a secture spot, raise untill it just touches it and begins to lift.
4. Remove the 18mm nut from the stud on the tranny mount which is recessed into the center of the tranny crossmember.
5. Remove the 4 15mm bolts holding the tranny crossmember to the body and set aside. Be carefull while removing these bolts to make sure the tranny is supported while the crossmember comes down. It's best to loosen all 4 bolts, then wobble to make sure there's no load on it before removing all 4 bolts.
6. Inspect transmission mount, a torn one will usually look like the picture. Sometimes they will not totally seperate, but will allow too much movement.
7. Remove 2 13mm bolts and remove tranny mount if broken.
8. Replace with new OEM mount or poly tranny mount. Poly tranny mounts can be found at Autozone for about $20. It is made by energy suspension. The part comes with a spacer and some new bolts. The spacer is not used on LS1 f-bodies. The poly mount will have 2 small bumps on the stud side (faces down) which most people like to grind off, although I did not.
9. Bolt the tranny mount to the transmission and do the process in reverse.
Notes:
The poly trans mount WILL cause a little interior vibration, however you should forget about it after a few drives. Before this mod, my shifter would raise out of the console pretty noticably under hard acceleration, now it doesn't move much at all. It seemed to have helped some wheel hop problems I was having before as well. Shifts felt much more predictable and smooth.
05-29-2006, 03:26 AM
#3
Here's another great writeup for installing poly motor mounts done by Luna.
https://ls1tech.com/forums/generation-iii-external-engine/492703-best-poly-motor-mount-write-up-ever-written.html
https://ls1tech.com/forums/generation-iii-external-engine/492703-best-poly-motor-mount-write-up-ever-written.html