
How-To: Enhance your interior with french seams!
 06-13-2008, 09:32 PM
#1
Restricted User
Thread Starter
iTrader: (24)
Join Date: Mar 2004
Location: Fleetwood, PA
Posts: 1,398
Likes: 0
Received 0 Likes
on
0 Posts
Mods do with this what you wish. I dunno if it should be here, or somewhere else so I leave it up to you.
Several members have asked for a how-to pertaining to my rather unique (and admittedly brutal) interior work. So here it is.
Pretty much all modern car interiors utilize seams like this somewhere. The nicer ones utilize them everywhere, creating a very upscale feel. The seam or �stitch� is known as a �Double French Seam�. Standard (Single) French seams are used for their strength. They are among the strongest flat seams in existence. The Double French Seam is no stronger than a standard straight stitch, however it is really elegant in appearance.

You can use them wherever you are brave enough to try.
For this project you will need:
Vinyl of your choice.
All purpose thread in color of your choice
Adhesive (I used 3M spray 80)
Sewing machine (I used a plain old classic Singer)
Wide masking tape
X-acto knife (make sure it is SHARP!)
Scissors (make sure they are SHARP!)
Sharpie or other permanent black marker
Isopropyl alcohol
I will note before we get started that these steps are the best I could come up with so far. I�ve re-done this piece three times now and finally got one that I�m happy with, and in that time I�ve changed a lot about how I perform the process. Despite that, I have no doubt that someone out there can add to this to make it easier or better.
START
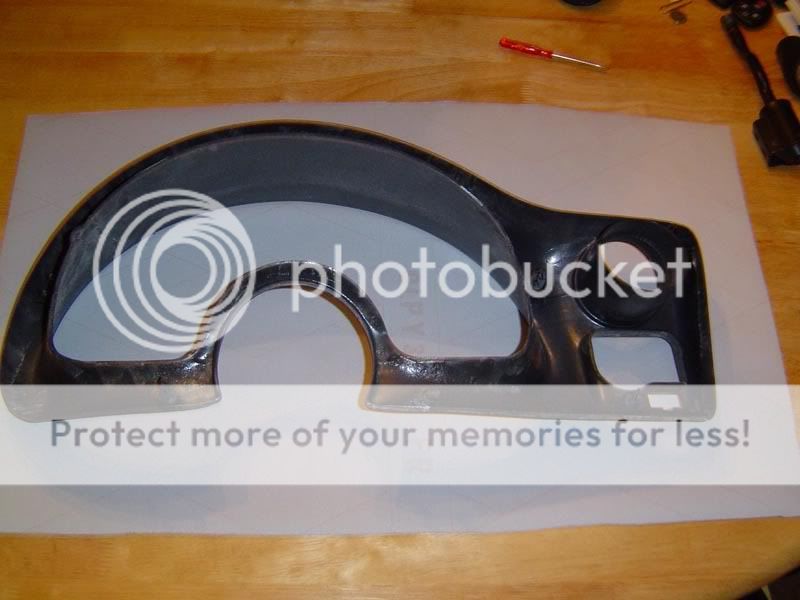
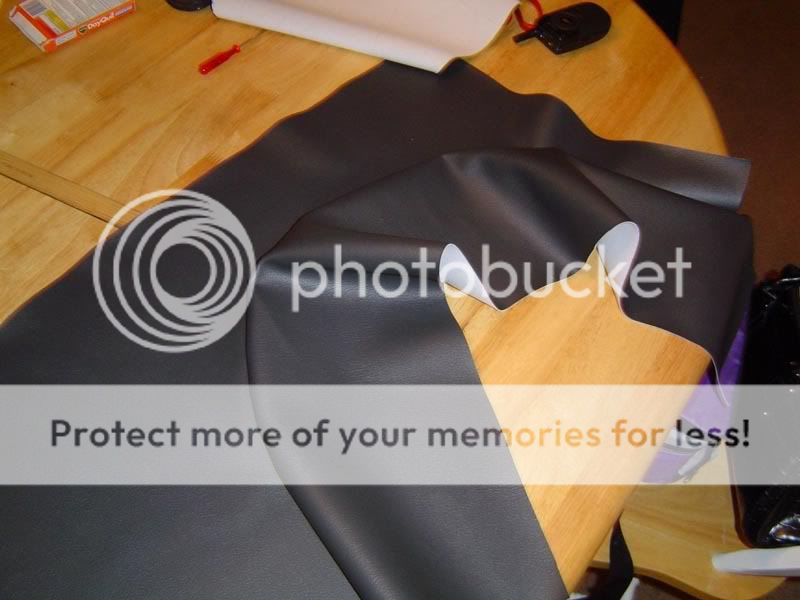
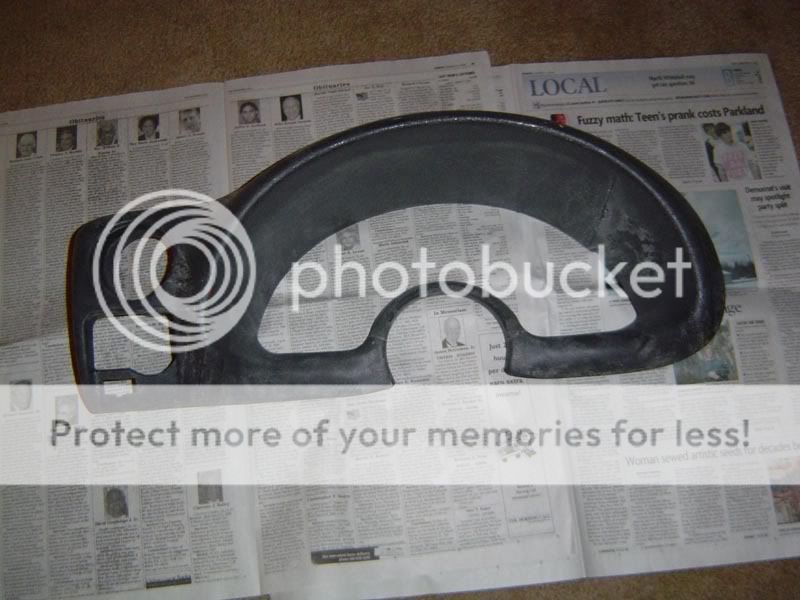
First you have to measure out a swatch of vinyl to work with. You can easily do this by placing the gauge cluster shroud on the vinyl and marking out a piece much larger. Remember you have to wrap around all the edges, so leave plenty of extra.
Now you want to trace out where you want your seam. To do this I simply used the opening on the cluster as a guide.
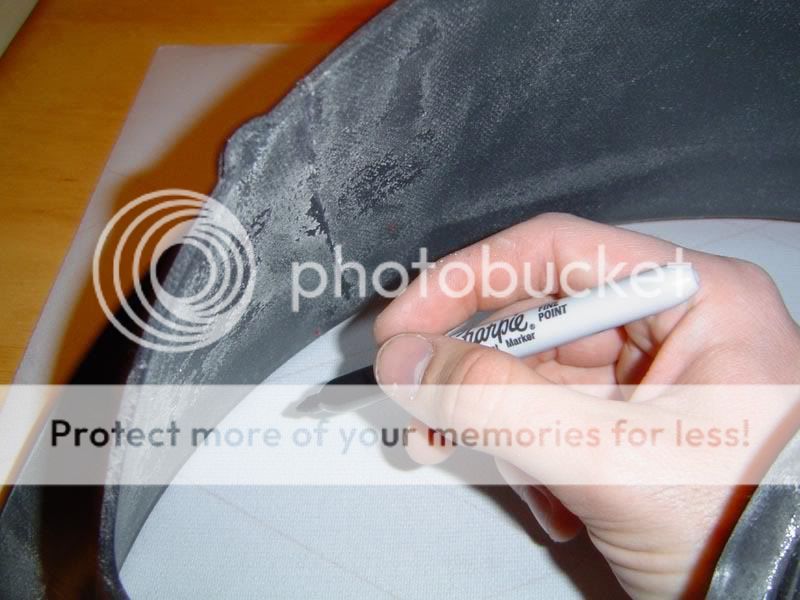
Trace out inside the opening with a marker.
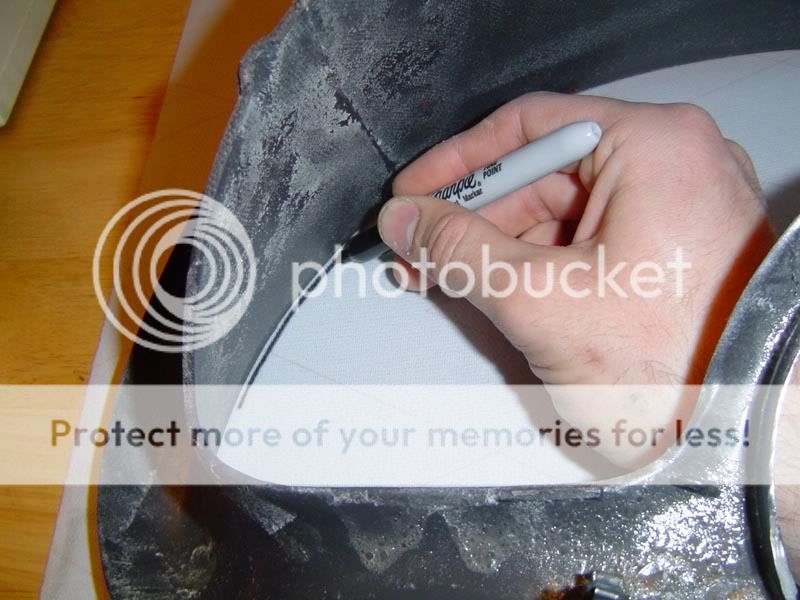
I did not choose to do a closed circle because I knew it would be an absolute nightmare. I simply traced the opening to the point where it turns inward at the bottom of the cluster, then removed the cluster and drew straight down to the edges of the vinyl. This will take the seam straight down the cluster, which is a lot easier to do, and looks just fine.
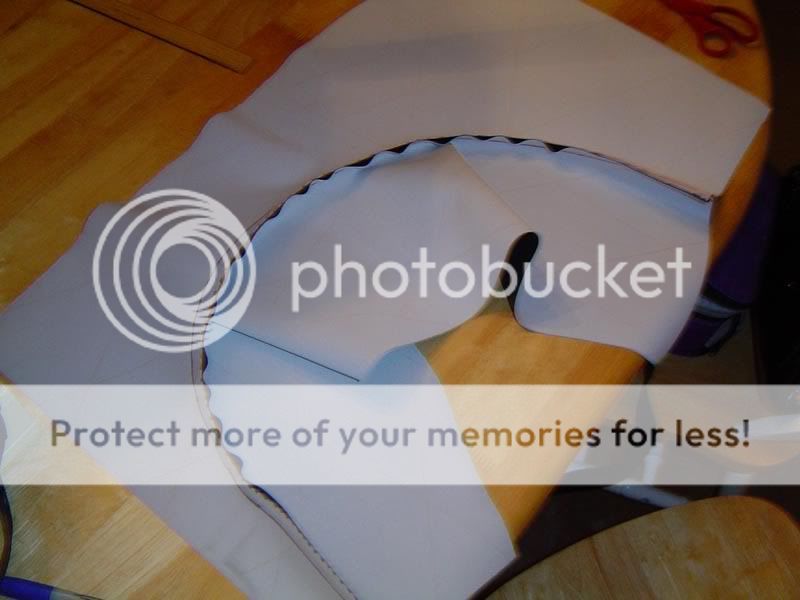
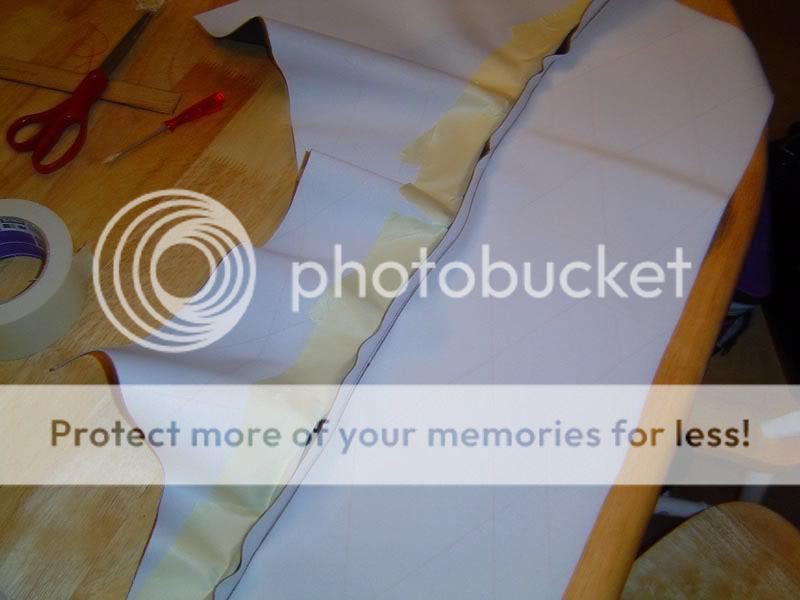
Now you have marked where the seam will be. However we still need to account for the overlap we will need for the side stitches. To do this I simply eyeballed a dotted line about �� inside the solid line.
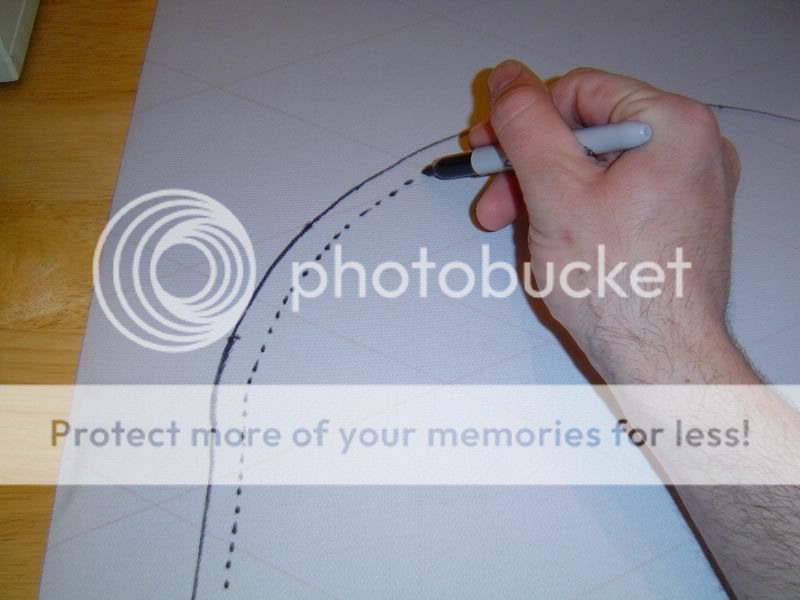
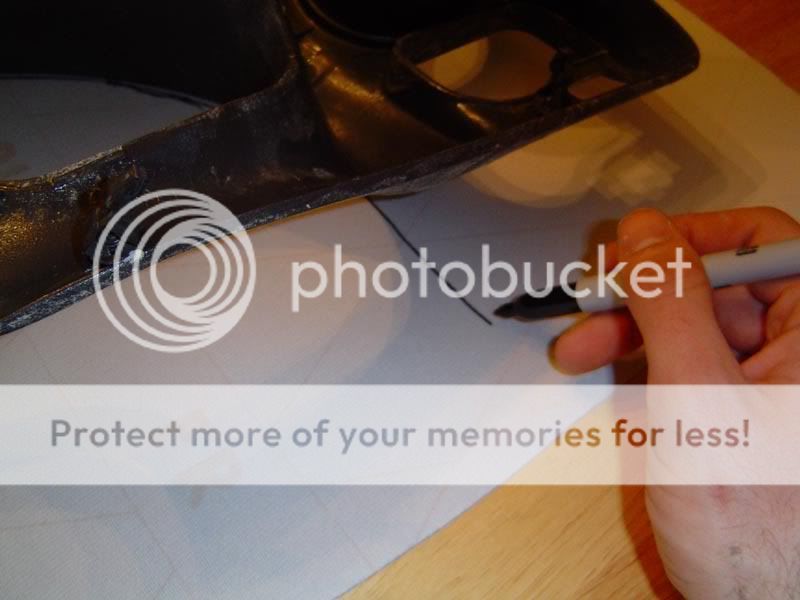
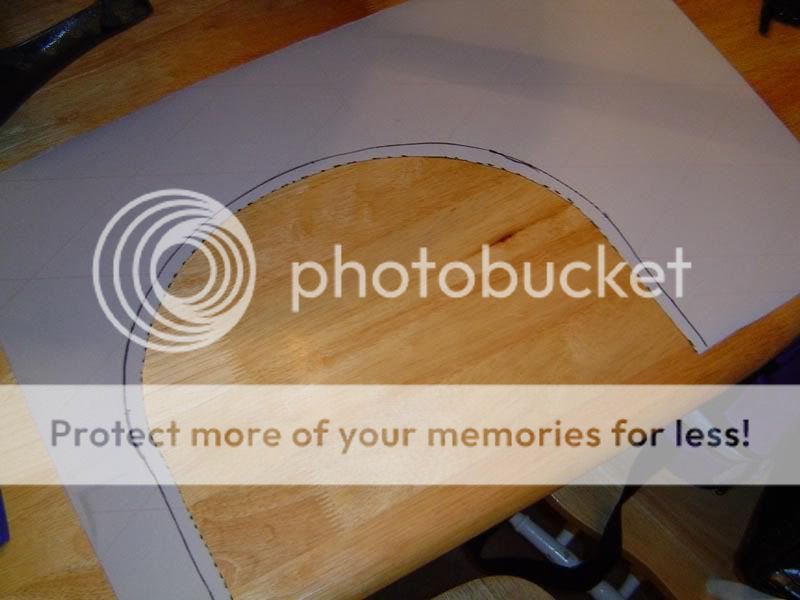
The result. The solid line will be where the actual seam will be, and the dotted line will be where we cut.
7
Now go ahead and cut along the dotted line.

Now we have the outer piece ready.
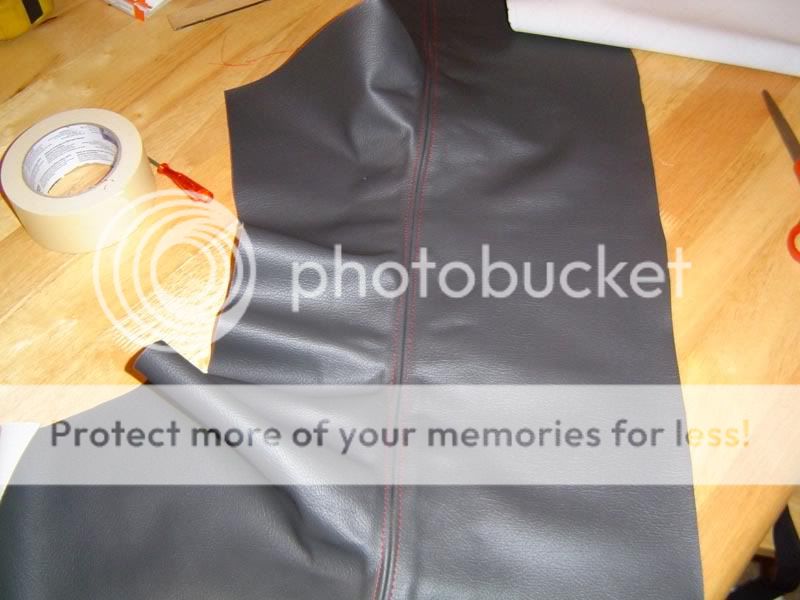
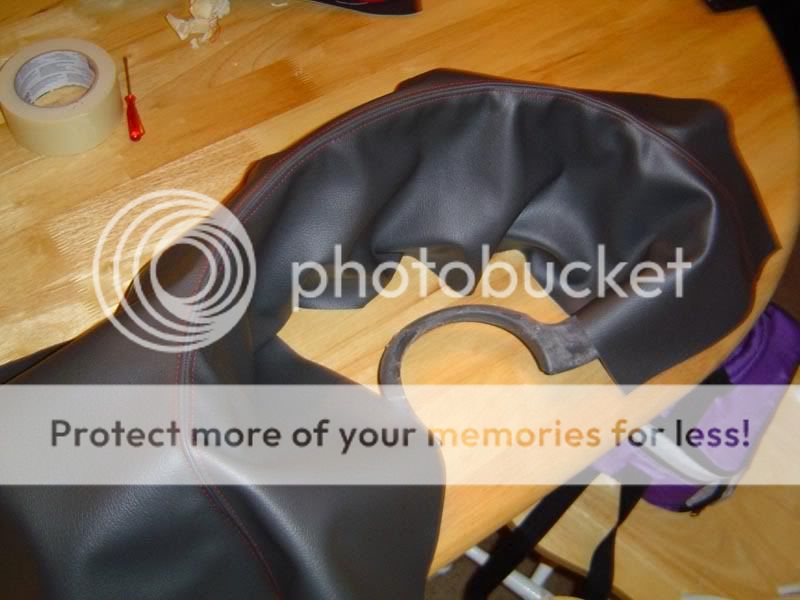
Now we need the second, or inner, piece of vinyl. The picture shows that I used a straight strip. This is one thing I have now changed. I used a strip cut with a convex edge with much more success. The problem was that the straight strip left way too much vinyl to stretch out of the inside of the cluster�I ended up with wrinkles that I couldn�t get rid of. The convex piece leaves a lot less vinyl to work with, and I actually had to stretch to to cover, which is a much better situation than trying to hide extra.
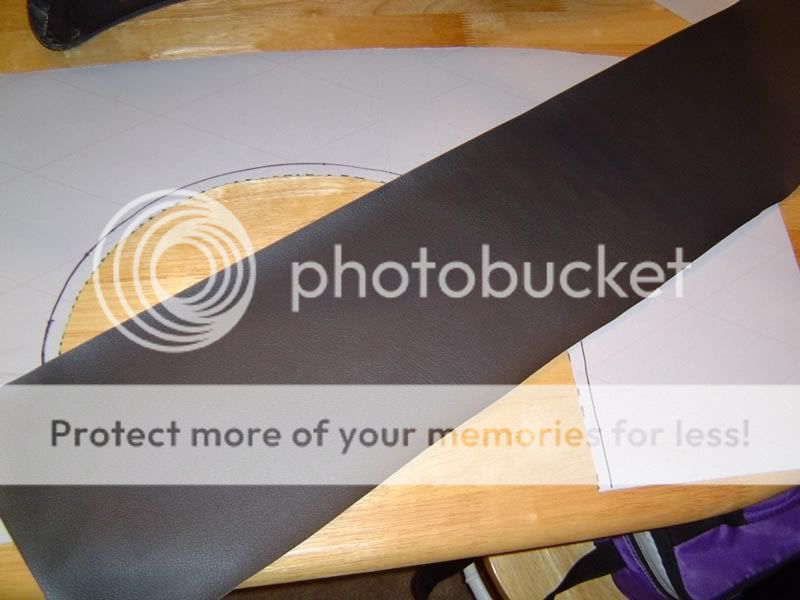
You can draw a line �� in from the convex edge or just leave it blank. I left it blank and put this piece on the bottom for the stitching. The outer piece requires a lot more maneuvering and therefore should be on top anyway.
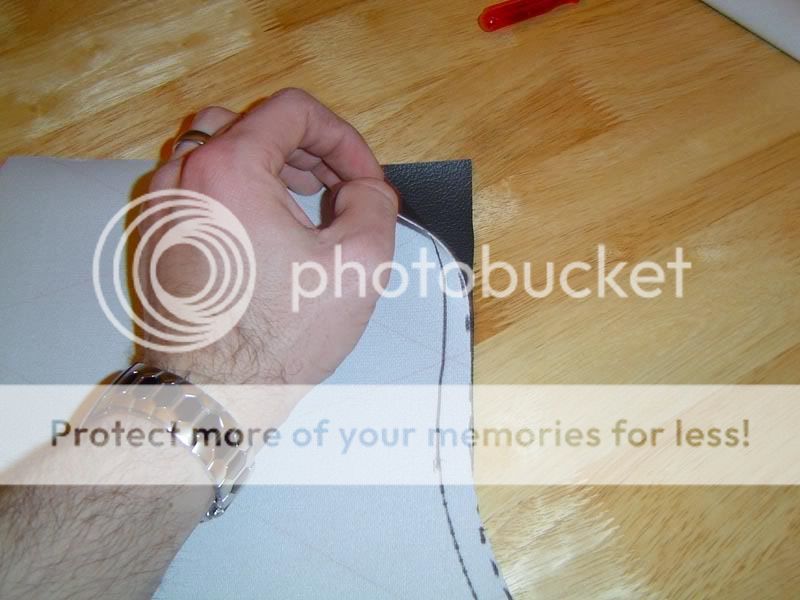
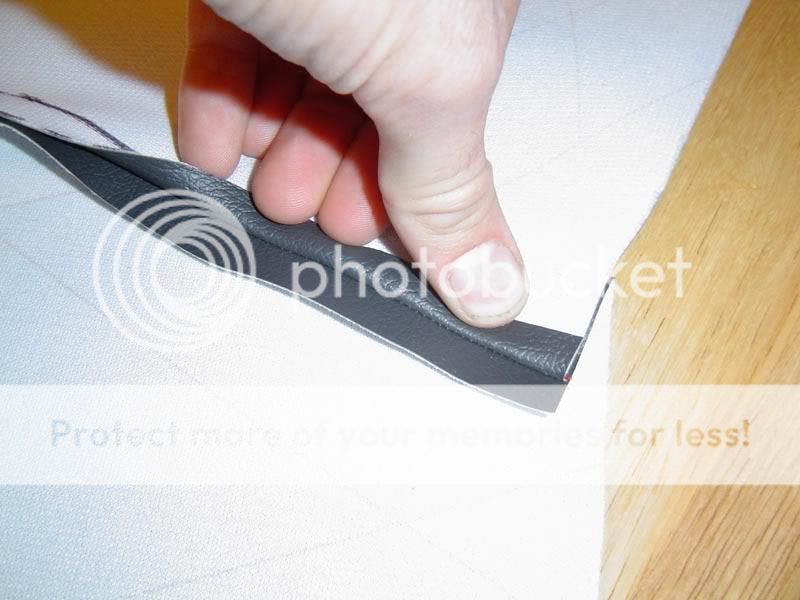
Now for the stitching process. Lay the convex inner strip on the bottom, color side up, and lay the outer piece on top, color side down. It is very important that the color (plastic) sides be facing each other or else you will get useless weirdness. The convex edge of the inner piece must follow the (concave) edge of the outer piece for the stitch to fall in the right place. This takes some careful maneuvering and a light foot on the pedal.
Note: the following requires basic knowledge of a sewing machine. I�m not about to go into how to thread the machine and use it. This is about cars, not sweaters. Consult grandma if needed.
Now pick an end to start at and line up your edges in the machine.
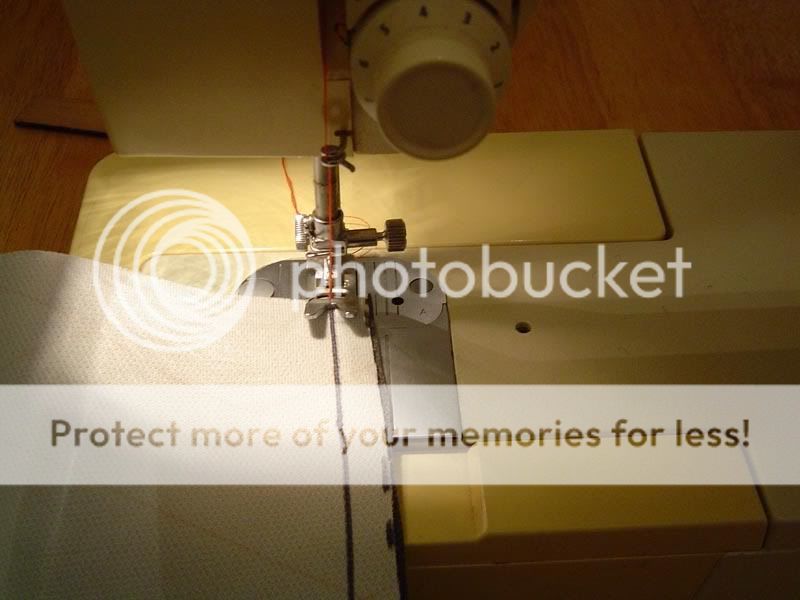
Slowly guide the material through the machine so you can maneuver the top piece over the bottom. This takes patience, you cannot go too fast because if you screw up, you�re done. You will have to sorta rotate the outer (top) piece over the inner (bottom piece). The outer piece will bunch up like crazy�that�s not a problem. Just keep it flat where the seam is, and follow your line carefully while making sure the bottom piece�s edge lines up.

If you successfully made it through that, you should have something that looks kinda like this:
Several members have asked for a how-to pertaining to my rather unique (and admittedly brutal) interior work. So here it is.
Pretty much all modern car interiors utilize seams like this somewhere. The nicer ones utilize them everywhere, creating a very upscale feel. The seam or �stitch� is known as a �Double French Seam�. Standard (Single) French seams are used for their strength. They are among the strongest flat seams in existence. The Double French Seam is no stronger than a standard straight stitch, however it is really elegant in appearance.
You can use them wherever you are brave enough to try.
For this project you will need:
Vinyl of your choice.
All purpose thread in color of your choice
Adhesive (I used 3M spray 80)
Sewing machine (I used a plain old classic Singer)
Wide masking tape
X-acto knife (make sure it is SHARP!)
Scissors (make sure they are SHARP!)
Sharpie or other permanent black marker
Isopropyl alcohol
I will note before we get started that these steps are the best I could come up with so far. I�ve re-done this piece three times now and finally got one that I�m happy with, and in that time I�ve changed a lot about how I perform the process. Despite that, I have no doubt that someone out there can add to this to make it easier or better.
START
First you have to measure out a swatch of vinyl to work with. You can easily do this by placing the gauge cluster shroud on the vinyl and marking out a piece much larger. Remember you have to wrap around all the edges, so leave plenty of extra.
Now you want to trace out where you want your seam. To do this I simply used the opening on the cluster as a guide.
Trace out inside the opening with a marker.
I did not choose to do a closed circle because I knew it would be an absolute nightmare. I simply traced the opening to the point where it turns inward at the bottom of the cluster, then removed the cluster and drew straight down to the edges of the vinyl. This will take the seam straight down the cluster, which is a lot easier to do, and looks just fine.
Now you have marked where the seam will be. However we still need to account for the overlap we will need for the side stitches. To do this I simply eyeballed a dotted line about �� inside the solid line.
The result. The solid line will be where the actual seam will be, and the dotted line will be where we cut.
7
Now go ahead and cut along the dotted line.
Now we have the outer piece ready.
Now we need the second, or inner, piece of vinyl. The picture shows that I used a straight strip. This is one thing I have now changed. I used a strip cut with a convex edge with much more success. The problem was that the straight strip left way too much vinyl to stretch out of the inside of the cluster�I ended up with wrinkles that I couldn�t get rid of. The convex piece leaves a lot less vinyl to work with, and I actually had to stretch to to cover, which is a much better situation than trying to hide extra.
You can draw a line �� in from the convex edge or just leave it blank. I left it blank and put this piece on the bottom for the stitching. The outer piece requires a lot more maneuvering and therefore should be on top anyway.
Now for the stitching process. Lay the convex inner strip on the bottom, color side up, and lay the outer piece on top, color side down. It is very important that the color (plastic) sides be facing each other or else you will get useless weirdness. The convex edge of the inner piece must follow the (concave) edge of the outer piece for the stitch to fall in the right place. This takes some careful maneuvering and a light foot on the pedal.
Note: the following requires basic knowledge of a sewing machine. I�m not about to go into how to thread the machine and use it. This is about cars, not sweaters. Consult grandma if needed.
Now pick an end to start at and line up your edges in the machine.
Slowly guide the material through the machine so you can maneuver the top piece over the bottom. This takes patience, you cannot go too fast because if you screw up, you�re done. You will have to sorta rotate the outer (top) piece over the inner (bottom piece). The outer piece will bunch up like crazy�that�s not a problem. Just keep it flat where the seam is, and follow your line carefully while making sure the bottom piece�s edge lines up.
If you successfully made it through that, you should have something that looks kinda like this:
 06-13-2008, 09:34 PM
#2
Restricted User
Thread Starter
iTrader: (24)
Join Date: Mar 2004
Location: Fleetwood, PA
Posts: 1,398
Likes: 0
Received 0 Likes
on
0 Posts
Here you can kinda see how it will fit over the cluster shroud.
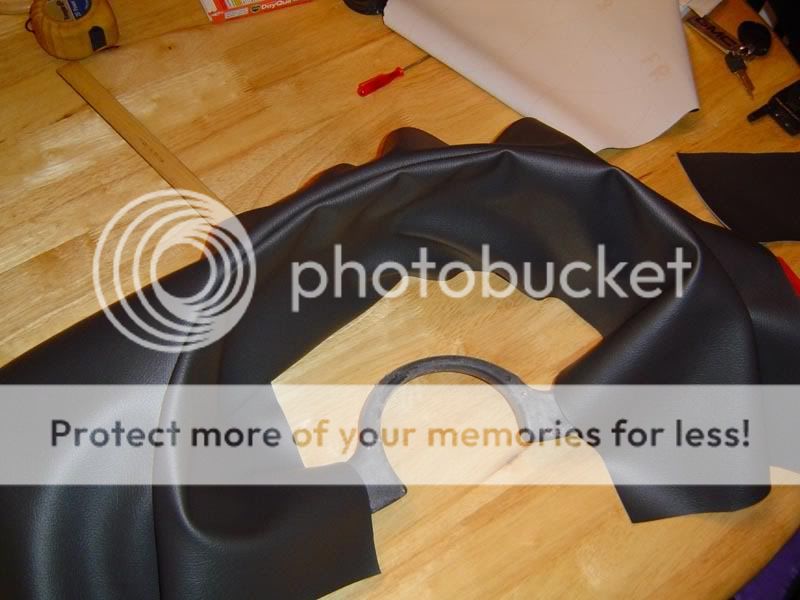
Now flip it over.
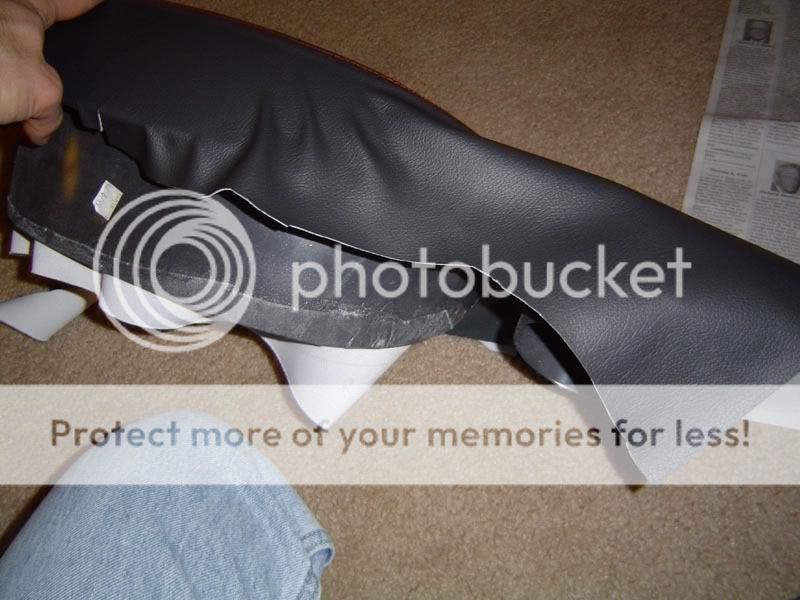
We now have to have a way to hold the overlapping edges down so we can make our decorative stitches (the important part).
I’m sure there is a better way to do this, but here is what I came up with. WIDE MASKING TAPE. Yup. Tape the edges down using the tape as pictured.
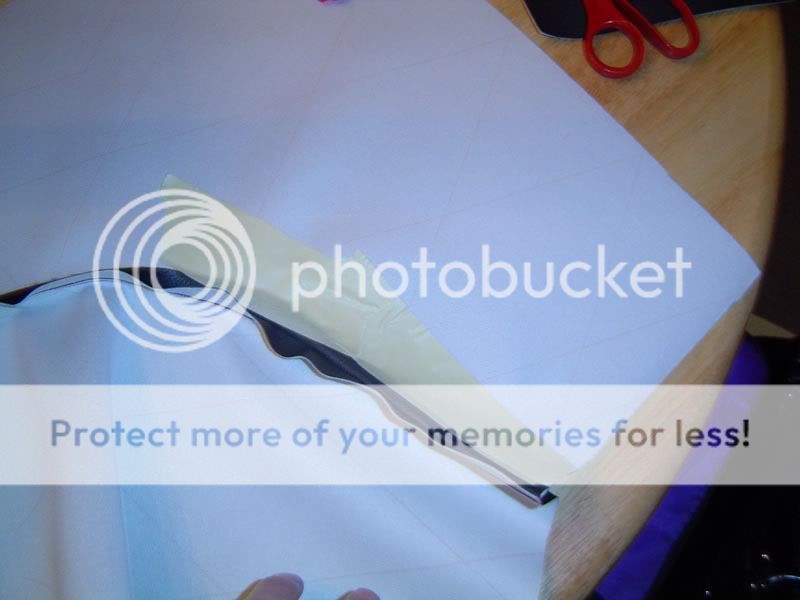
One side done…now do the other.
With both edges taped down, you can flip it over and set it up in the machine again. I ran the stitch about �” off the original seam. On my first two tries I used a single line of all purpose thread. I later noticed that most OEM’s use a heavier thread. I was unable to source this thread, so I simply doubled-up the all-purpose thread. Worked great. It makes the seam a lot more noticeable which is especially good if you are using contrasting thread.

Do this for both sides of the seam. Take your time, if you go to fast and screw up, you’re done. Even picking the stitch will leave holes in the vinyl which will be very noticeable when installed.
With that done, flip over the cover and CAREFULLY remove the tape. You have to do it slowly and carefully because you may have stitched through the tape while doing the side stitches. If you pull the tape too hard, it can rip up a stitch.

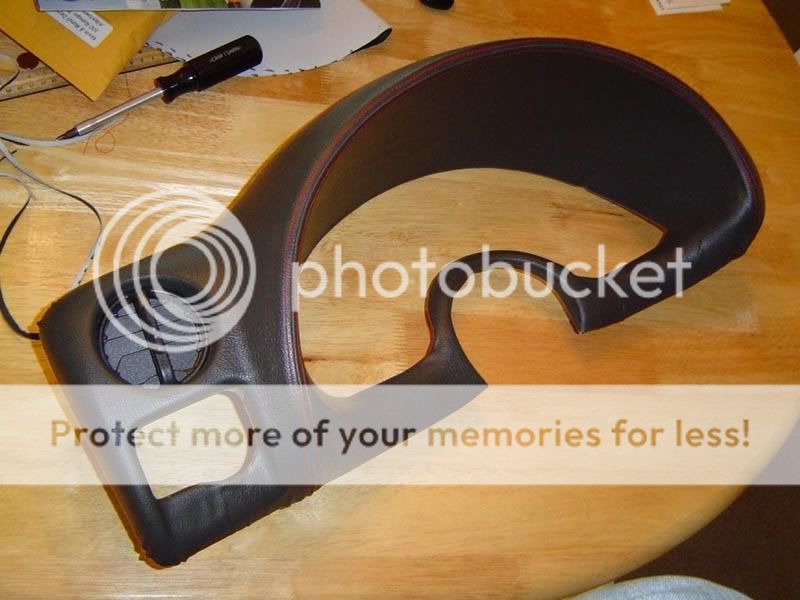
With all the tape removed, flip the cover back over and enjoy your work. This is great time to take a break because you have accomplished something great, and it doesn’t get any easier from here.
Now comes the second part of the project, arguably the hardest part. We now have to attach the cover you just made to the plastic gauge shroud. I’m not going into great detail about the wrapping process since it has been covered in several other how-tos. I’m just focusing on the seams here and giving a basic guide for the wrapping process.
Start out by laying out your gauge shroud on newspaper or plastic as shown in the pic below. (Mine looks messy because it’s already got glue on it in this pic). I highly recommend cleaning the piece with Isopropyl Alcohol to remove all plastic/interior dressing you may have used.
Now, lay out the new cover and orient it correctly over the shroud. This way you can get a good visual of how the piece will go on. Look to make sure it’s going to fit pretty well…you don’t want to find that its too small once you have half of it glued.
Apply liberal amounts of glue to both the plastic and the vinyl. The 3M spray 80 that I used recommends two heavy coats on each surface. Since the vinyl soaks up some glue, and it tends to bleed through to the topside, I used only one coat on the vinyl and two on the plastic. You will notice that you can see the glue on the top (show) side of the vinyl right after you apply it, but don’t worry about that, it’s only the reducing agent and will evaporate when the glue sets. I always make sure that I have a few paper towels soaked in Isopropyl handy to get the glue off my fingers while I work. That way you don’t end up with gluey fingerprints on your finished product.
Since the seam is the focal point of this piece, and also the center in this case, we will lay the seam first, then move out from it. So very carefully lay your seam across the semi-circle of the shroud. Pay close attention to the vinyl at the bottom of the piece, you need to make sure that you have enough at both ends of the seam to cover the whole shroud.

Once you have the seam laid, start pulling the vinyl down onto the top of the shroud. Move from the seam outward, so you push any air pockets towards the edge of the piece. You will come across plenty of wrinkles during this process…remove them by stretching the vinyl over the edge of the shroud. You can stretch it surprisingly far, and this will pull out all the wrinkles.

You can continue this process to cover the entire shroud. Move from the seam outward, then trim the excess vinyl down to about 1” past the edges, and wrap it underneath and glue it down. This is not a very detailed description of the glueing phase, but as mentioned before, this is more about the seams and not so much about the vinyl wrapping as it has been covered in the past.
That’s it. Hopefully it turned out nice, like this one.
Now flip it over.
We now have to have a way to hold the overlapping edges down so we can make our decorative stitches (the important part).
I’m sure there is a better way to do this, but here is what I came up with. WIDE MASKING TAPE. Yup. Tape the edges down using the tape as pictured.
One side done…now do the other.
With both edges taped down, you can flip it over and set it up in the machine again. I ran the stitch about �” off the original seam. On my first two tries I used a single line of all purpose thread. I later noticed that most OEM’s use a heavier thread. I was unable to source this thread, so I simply doubled-up the all-purpose thread. Worked great. It makes the seam a lot more noticeable which is especially good if you are using contrasting thread.
Do this for both sides of the seam. Take your time, if you go to fast and screw up, you’re done. Even picking the stitch will leave holes in the vinyl which will be very noticeable when installed.
With that done, flip over the cover and CAREFULLY remove the tape. You have to do it slowly and carefully because you may have stitched through the tape while doing the side stitches. If you pull the tape too hard, it can rip up a stitch.
With all the tape removed, flip the cover back over and enjoy your work. This is great time to take a break because you have accomplished something great, and it doesn’t get any easier from here.
Now comes the second part of the project, arguably the hardest part. We now have to attach the cover you just made to the plastic gauge shroud. I’m not going into great detail about the wrapping process since it has been covered in several other how-tos. I’m just focusing on the seams here and giving a basic guide for the wrapping process.
Start out by laying out your gauge shroud on newspaper or plastic as shown in the pic below. (Mine looks messy because it’s already got glue on it in this pic). I highly recommend cleaning the piece with Isopropyl Alcohol to remove all plastic/interior dressing you may have used.
Now, lay out the new cover and orient it correctly over the shroud. This way you can get a good visual of how the piece will go on. Look to make sure it’s going to fit pretty well…you don’t want to find that its too small once you have half of it glued.
Apply liberal amounts of glue to both the plastic and the vinyl. The 3M spray 80 that I used recommends two heavy coats on each surface. Since the vinyl soaks up some glue, and it tends to bleed through to the topside, I used only one coat on the vinyl and two on the plastic. You will notice that you can see the glue on the top (show) side of the vinyl right after you apply it, but don’t worry about that, it’s only the reducing agent and will evaporate when the glue sets. I always make sure that I have a few paper towels soaked in Isopropyl handy to get the glue off my fingers while I work. That way you don’t end up with gluey fingerprints on your finished product.
Since the seam is the focal point of this piece, and also the center in this case, we will lay the seam first, then move out from it. So very carefully lay your seam across the semi-circle of the shroud. Pay close attention to the vinyl at the bottom of the piece, you need to make sure that you have enough at both ends of the seam to cover the whole shroud.
Once you have the seam laid, start pulling the vinyl down onto the top of the shroud. Move from the seam outward, so you push any air pockets towards the edge of the piece. You will come across plenty of wrinkles during this process…remove them by stretching the vinyl over the edge of the shroud. You can stretch it surprisingly far, and this will pull out all the wrinkles.
You can continue this process to cover the entire shroud. Move from the seam outward, then trim the excess vinyl down to about 1” past the edges, and wrap it underneath and glue it down. This is not a very detailed description of the glueing phase, but as mentioned before, this is more about the seams and not so much about the vinyl wrapping as it has been covered in the past.
That’s it. Hopefully it turned out nice, like this one.
Last edited by Blakbird24; 06-13-2008 at 10:05 PM.

 06-13-2008, 11:15 PM
#5
TECH Senior Member
iTrader: (96)
Join Date: Aug 2007
Location: Turnin' Wrenches Infractions: 005
Posts: 24,240
Likes: 0
Received 79 Likes
on
70 Posts

make sure you use an upholestry thread, it much thicker and stronger. for the extra seam, i found a button thread that was nice and thick and showed up great.
06-13-2008, 11:28 PM
#6

does it install back into place nicely or did you have trouble with fitment again? It looks like it would be extremely nice but would be "different" than the rest of the dash etc As in a different texture of course but thats the whole point of it too. It there any other way to get it to not "wrinkle on the corners of the peice because i can see where the vinyl kinda binds on the corners since there a curve and the material kinda wants to bunch together alittle....
looks badass though i give you major props, great idea and great craftsmanship.
looks badass though i give you major props, great idea and great craftsmanship.
06-13-2008, 11:32 PM
#7
DO you think that would be possible to do to the upper dash padwhere the vents are and the little red alarm led is? If you would do ALL the dash in that, it would look insane man!! Im just worried about that upper dash pad being to ofragile to hold together once you tighten everything down and glue it also. The heat would probably really fry that upper dash pad, POS!!
What do you think about the rest of the dash stitched like that, i would die happy if i could do my entire dash like that! It be like having a beemer, benz or porsche but with a ls1 stuck in it haha
What do you think about the rest of the dash stitched like that, i would die happy if i could do my entire dash like that! It be like having a beemer, benz or porsche but with a ls1 stuck in it haha
Trending Topics
 06-14-2008, 10:56 AM
#10
Restricted User
Thread Starter
iTrader: (24)
Join Date: Mar 2004
Location: Fleetwood, PA
Posts: 1,398
Likes: 0
Received 0 Likes
on
0 Posts
Originally Posted by fenix999
does it install back into place nicely or did you have trouble with fitment again? It looks like it would be extremely nice but would be "different" than the rest of the dash etc As in a different texture of course but thats the whole point of it too. It there any other way to get it to not "wrinkle on the corners of the peice because i can see where the vinyl kinda binds on the corners since there a curve and the material kinda wants to bunch together alittle....
Originally Posted by fenix999
DO you think that would be possible to do to the upper dash padwhere the vents are and the little red alarm led is? If you would do ALL the dash in that, it would look insane man!! Im just worried about that upper dash pad being to ofragile to hold together once you tighten everything down and glue it also. The heat would probably really fry that upper dash pad, POS!!
What do you think about the rest of the dash stitched like that, i would die happy if i could do my entire dash like that! It be like having a beemer, benz or porsche but with a ls1 stuck in it haha
What do you think about the rest of the dash stitched like that, i would die happy if i could do my entire dash like that! It be like having a beemer, benz or porsche but with a ls1 stuck in it haha
Originally Posted by SSquid
seems like a much better idea to send you the pieces and pay you
 06-14-2008, 07:32 PM
#15
Could you please tell me where to get this thread from? After visiting three different thread retailers and consulting two online "superstores" I came up empty. They all told me there is no such thing and said that "all-purpose thread" is what I should use. I simply doubled-up the all purpose thread and it came out great. But I would have loved to use this elusive thread that you speak of. Let me know where to get it and i'll add that to the How-to.
 . Now I'm dating myself!!
Here's what I found you should use:
Automotive Trim Thread Selection #1 T-70/90 Anefil Nylon� or Polyester�
http://www.coatsandclark.com/Product...tery+Nylon.htm
http://www.ctsusa.com/_e/gdept/01/Threads.htm
Oh btw you're near from where I was born/raised ....in Chester county!
-Michelle
Last edited by Flamin' bird; 06-14-2008 at 07:47 PM.


