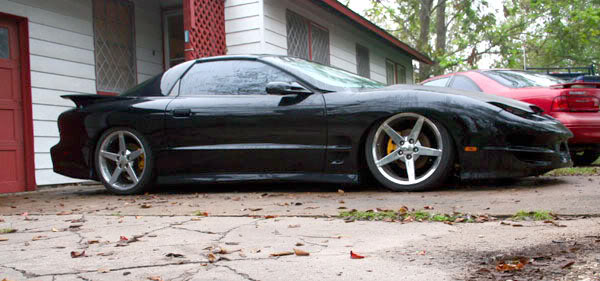
My Custom Air Suspension Install - 99 Trans Am
 05-20-2009, 02:55 AM
#1
The front and rear parts total $335.
The REAR
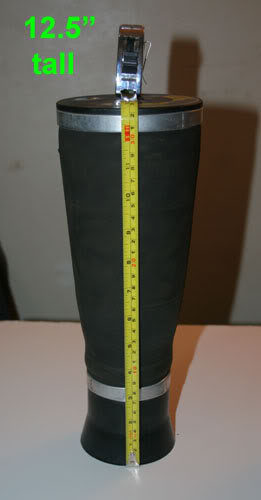
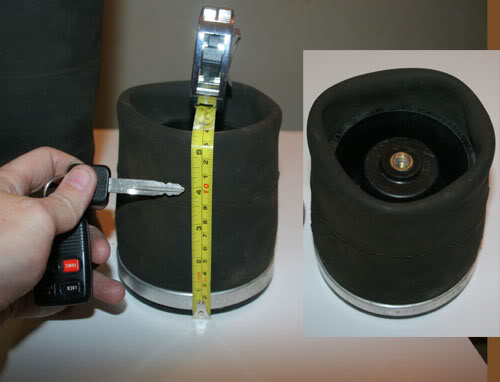
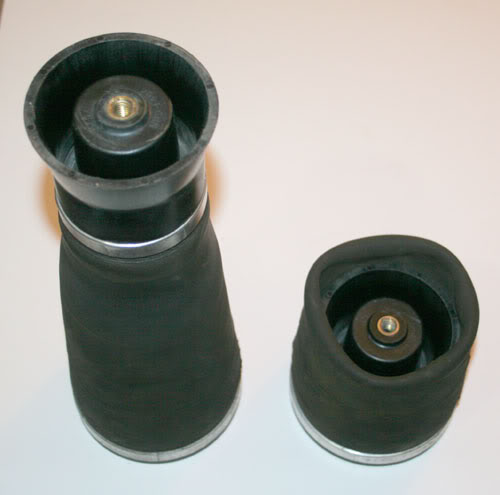
The rear bags are a tapered sleeve style from Firestone called the Ride Rite 9000. I got a used pair from ebay for about $70. That's like half price.
Manufacturer: Firestone
Part #: F9000 $64.95
Max. Height: 12"
Min. Height: 4.5"
Installed Height: 9"-9.5"
Diameter (Inflated): 5.7"
Single 1/4" Port
Capacity: 1,500 lbs.
My measurements:
Max. Height: 12.5"
Min. Height: 4"


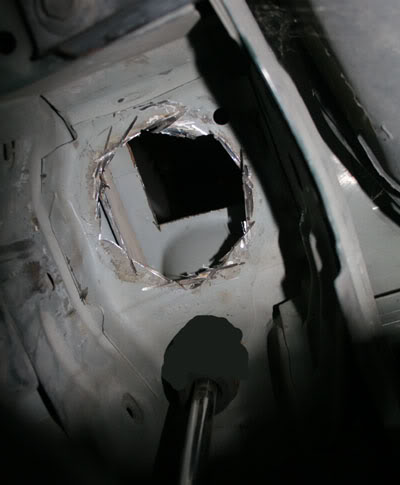
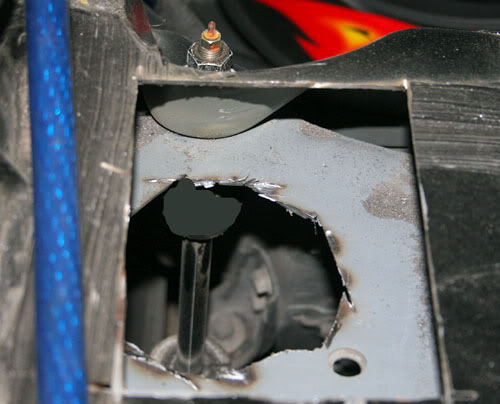
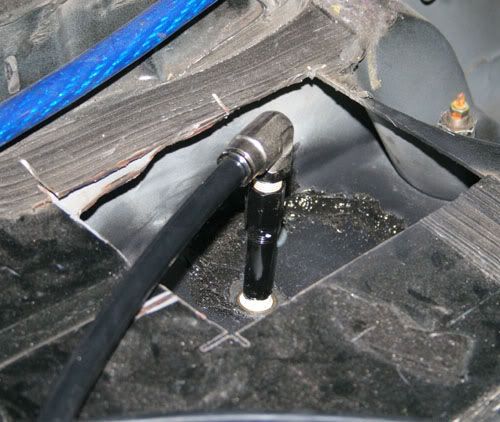
Now you've never seen an install done this way because I have some unique requirements. First I wanted the air lines to go straight up and into the car instead of snaking around under it. Secondly, I wanted to mount the bag to get more drop. So I decided to cut out the humps under the car that center the spring. We are talking about 2 layers of 16ga here. I wish I had a plasma cutter. For the average guy I would just copy the bracket design from Air Ride and bolt in them in. It's much simpler and reversible.
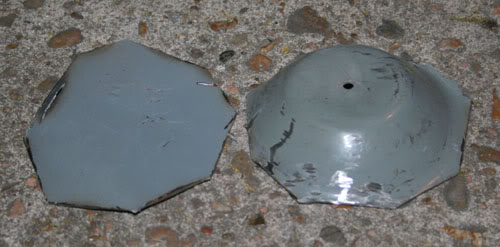
Then I cut out some upper plates from 1/8 or so steel. They look ugly because I used a gas torch. Then I tacked them into place. Well, a little more than a tack. I just needed to keep it from sliding around.

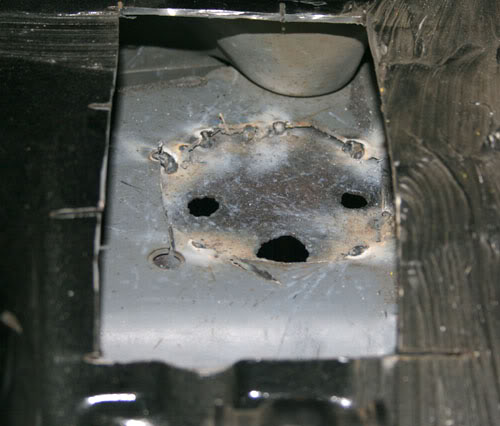
Throw a little paint on it. I added some silicone to seal it up even though I didn't have to.
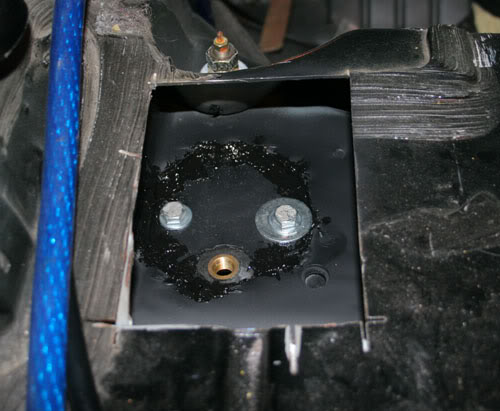
I then fabbed up some air line extensions by brazing together some brass pipe and a connector. This made it easy to screw in, plus no air leaks. I used some liquid sealant when I screwed these into the bag.
I also made up these lower brackets that fit over the stock spring locator and also holds the bag steady without bolting it into place. I painted these gloss black.
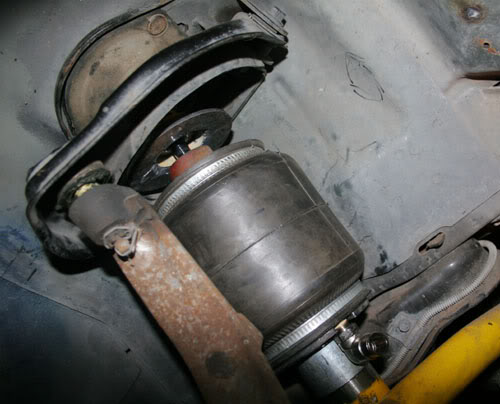
With the car jacked up.
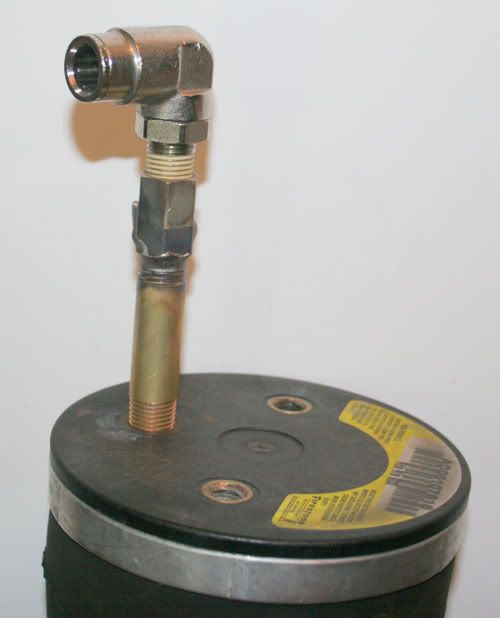
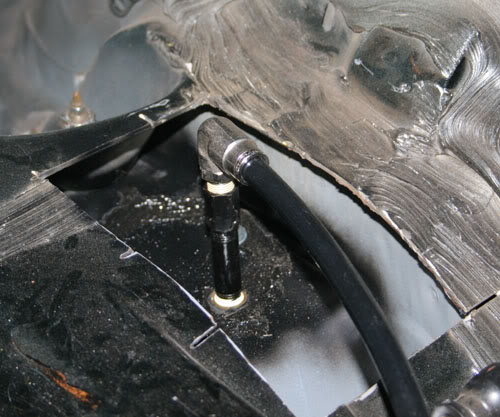
Here's the left and right sides, the simple air line setup and the inflation valve.
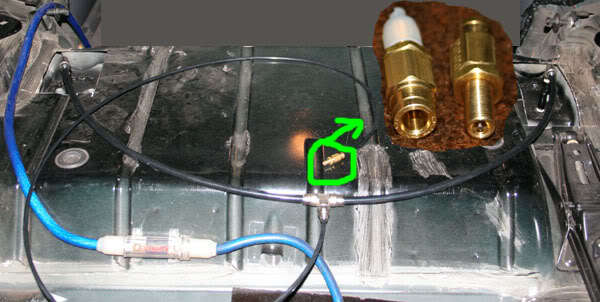
There you go. It's all very simple and can be expanded upon with electric valves and switches as money becomes available. The bags cost me $70pr used. The metal was scrap I had laying round. Same for the paint. All the air line was less than $10. The pipe extensions and sealant were about $10. I did splurge on some nice 1/2" 90* fittings, a 3 way T and the inflation valve. I think those were about $30 or so? I can't remember for sure. So for about 120 bucks I got the back riding on air.
For most folks I would recommend you make a copy of the Air Ride Tech upper mounting plate as opposed to doing all the cutting and work that I did. You can make a template out of paper, then cut the piece out of some scrap plate. Then bend the edges and bolt it into place.
The REAR
The rear bags are a tapered sleeve style from Firestone called the Ride Rite 9000. I got a used pair from ebay for about $70. That's like half price.
Manufacturer: Firestone
Part #: F9000 $64.95
Max. Height: 12"
Min. Height: 4.5"
Installed Height: 9"-9.5"
Diameter (Inflated): 5.7"
Single 1/4" Port
Capacity: 1,500 lbs.
My measurements:
Max. Height: 12.5"
Min. Height: 4"
Now you've never seen an install done this way because I have some unique requirements. First I wanted the air lines to go straight up and into the car instead of snaking around under it. Secondly, I wanted to mount the bag to get more drop. So I decided to cut out the humps under the car that center the spring. We are talking about 2 layers of 16ga here. I wish I had a plasma cutter. For the average guy I would just copy the bracket design from Air Ride and bolt in them in. It's much simpler and reversible.
Then I cut out some upper plates from 1/8 or so steel. They look ugly because I used a gas torch. Then I tacked them into place. Well, a little more than a tack. I just needed to keep it from sliding around.
Throw a little paint on it. I added some silicone to seal it up even though I didn't have to.
I then fabbed up some air line extensions by brazing together some brass pipe and a connector. This made it easy to screw in, plus no air leaks. I used some liquid sealant when I screwed these into the bag.
I also made up these lower brackets that fit over the stock spring locator and also holds the bag steady without bolting it into place. I painted these gloss black.
With the car jacked up.
Here's the left and right sides, the simple air line setup and the inflation valve.
There you go. It's all very simple and can be expanded upon with electric valves and switches as money becomes available. The bags cost me $70pr used. The metal was scrap I had laying round. Same for the paint. All the air line was less than $10. The pipe extensions and sealant were about $10. I did splurge on some nice 1/2" 90* fittings, a 3 way T and the inflation valve. I think those were about $30 or so? I can't remember for sure. So for about 120 bucks I got the back riding on air.
For most folks I would recommend you make a copy of the Air Ride Tech upper mounting plate as opposed to doing all the cutting and work that I did. You can make a template out of paper, then cut the piece out of some scrap plate. Then bend the edges and bolt it into place.
Last edited by JasonWW; 07-12-2010 at 06:53 PM.
 05-20-2009, 02:55 AM
#2
The FRONT
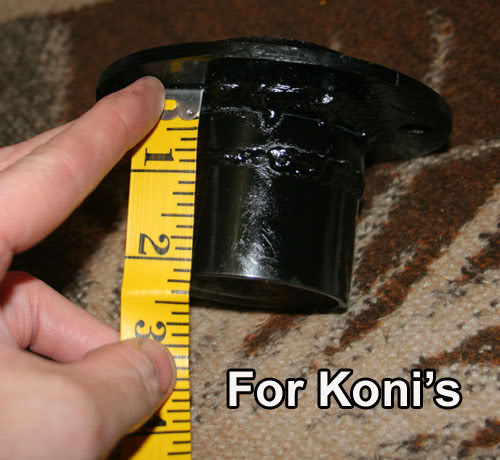
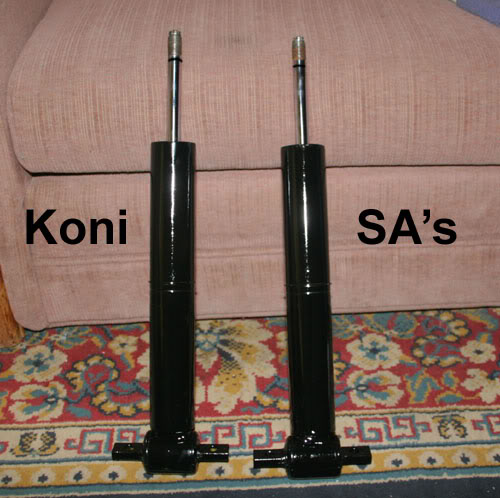
We all know the backs of these cars are pretty cheap to convert to air, but the fronts are the really expensive parts due to the factory coilover design. Bolt in replacements from Air Ride use Varishocks from Chris Alston's Chassisworks and cost about $950pr. Forget that. The Air Over Shock brand is a similar design, uses a Rancho made shock and is about $540pr, but cost aside, I don't like the shocks used on them either. I already have some nice Koni SA's and I want to keep them.
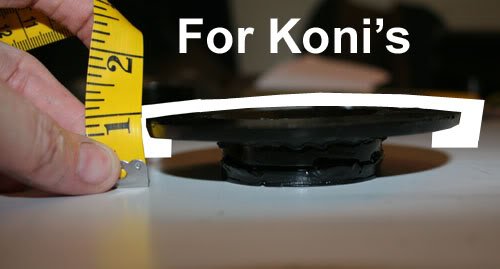
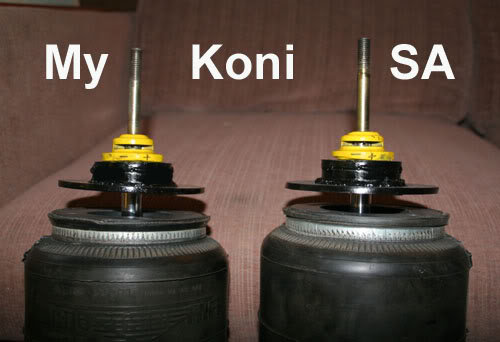
I decided to build my front mounts for my Koni SA's only. Screw the DeCarbons. So if your using Koni's then you can copy my design and dimensions. If your using a different shock, your mounts are going to be a different length. The pic below shows you why.:
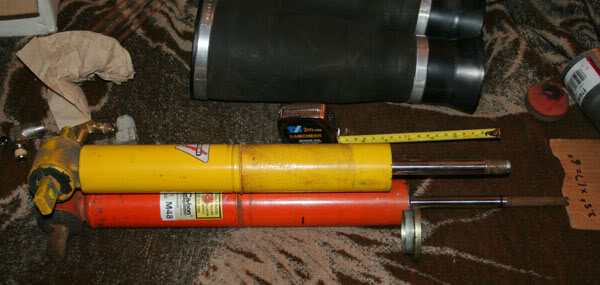
What I have is a pair of:
New they are about $350pr, I got a used set off ebay for $160pr. There is a lot more info about them in my older threads:
Air Ride Using YOUR Front Shocks for $350
How To Air Bag Your 4th Gen for $600.
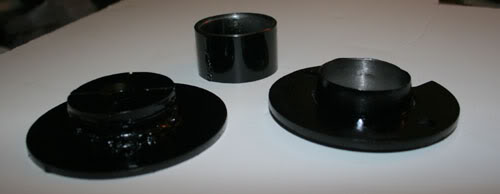
My parts:
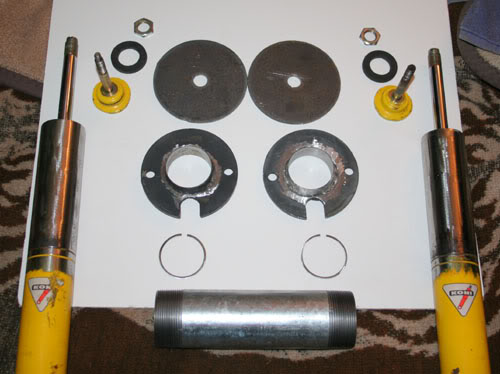
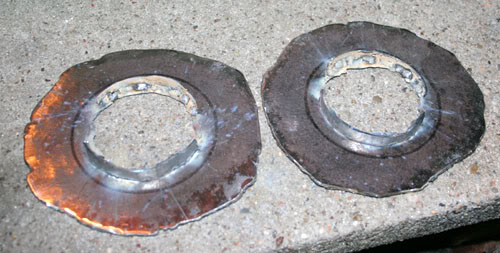
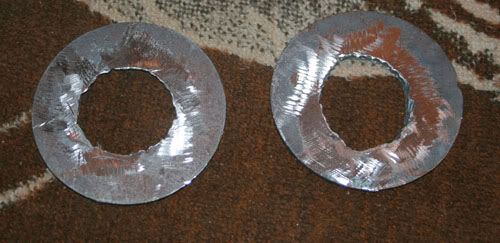
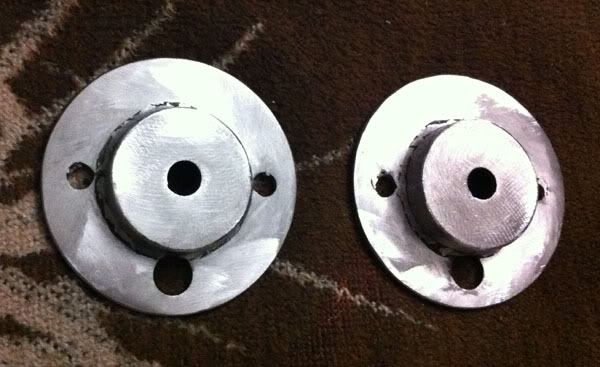
I got my lower mounts from the used bags I bought. I actually bought some Magnum shocks and bags and I cut the lower mounts off. These lower plates are just 4.5" diameter, 3/16" steel. They can be cut out with a torch.
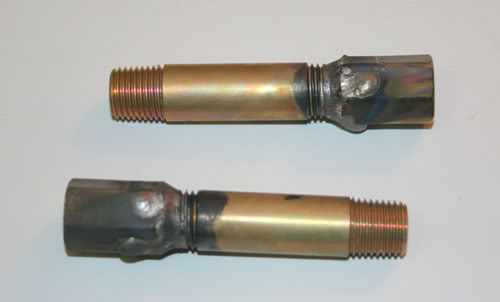
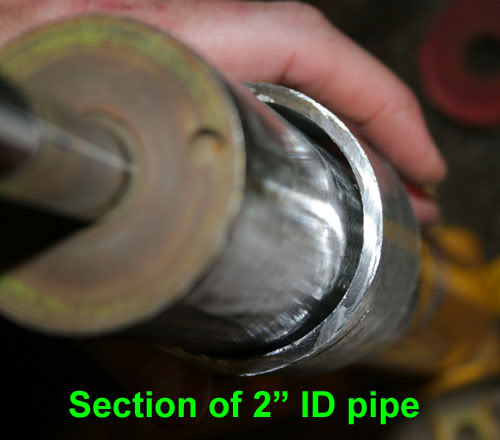
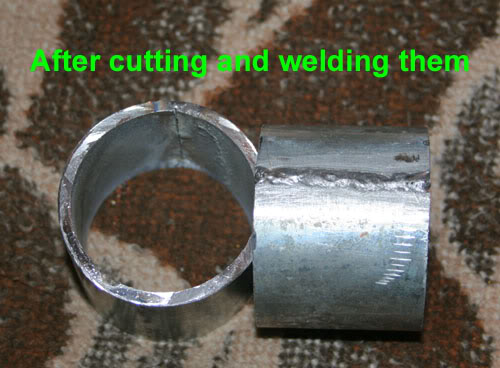
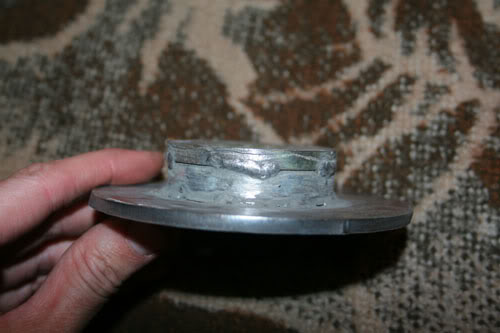
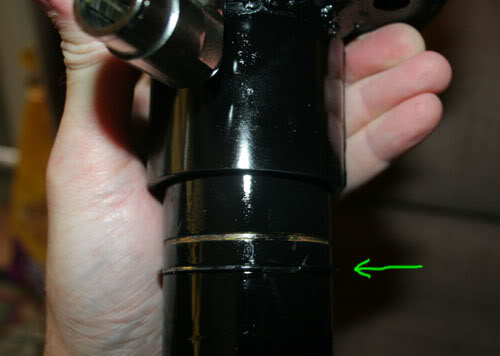
The silver pipe at the bottom is a 2" ID plumbing piece. Galvanized. This is what I made my extensions out of.
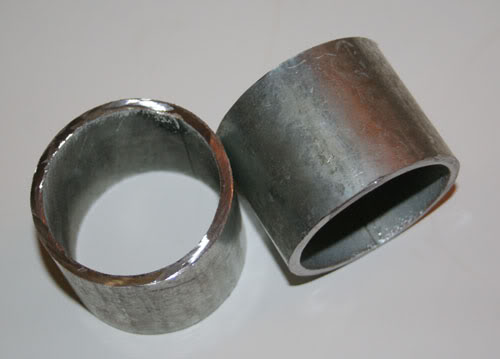
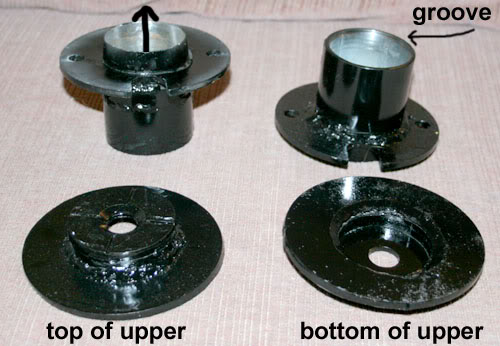
It turns out the fit was not tight enough.
So I sliced a section out and welded them back together.
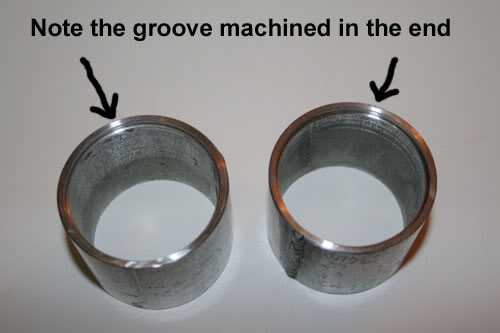
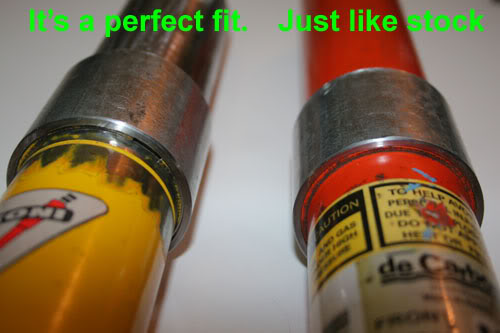
Then I took them over to a local machine shop and for 15 bucks they cut the groove in both pieces. They machined them for a very tight fit. Those clips aren't going anywhere.
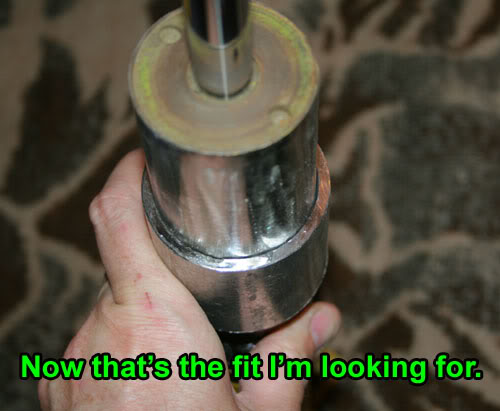
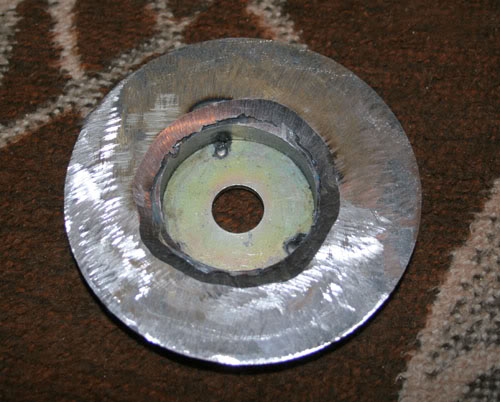
For the upper mounts I was thinking a simple 4.5" circle plate of 3/16" steel with a 5/8" hole in the center would do the job, but turns out that at full droop, the bag touched the upper arm. So I had to cut a big hole in the plates and then extend them down a little. The upper disc is the gold top from my DeCarbon shocks and the short extension is a slice from the pipe.
Here's the whole assembly:
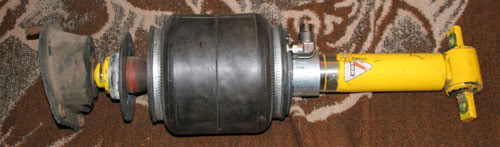
A close up of the top:
Close up of the bottom. Note that the clips are completely enclosed.

At full droop.
Full compresion.
The necessary clearance you get with the dropped upper plate. (The flat plate made the bag touch the arm)

I only finished one side today. I'll finish making the other mounts tomorrow and I think I should have the front riding on air by the evening. I need to repaint my shocks. My custom yellow is looking ratty. I may go with gloss black and then add the Koni stickers just like I did the last time I painted them. You'll note that I stripped them down to bare metal. Too many layers of paint will make the sleeves not slide on.
We all know the backs of these cars are pretty cheap to convert to air, but the fronts are the really expensive parts due to the factory coilover design. Bolt in replacements from Air Ride use Varishocks from Chris Alston's Chassisworks and cost about $950pr. Forget that. The Air Over Shock brand is a similar design, uses a Rancho made shock and is about $540pr, but cost aside, I don't like the shocks used on them either. I already have some nice Koni SA's and I want to keep them.
I decided to build my front mounts for my Koni SA's only. Screw the DeCarbons. So if your using Koni's then you can copy my design and dimensions. If your using a different shock, your mounts are going to be a different length. The pic below shows you why.:
What I have is a pair of:
Universal Air (UVAIR) Aero Sport Single Convoluted Air Bag
Designed to Slip Over Your Factory / Performance Strut
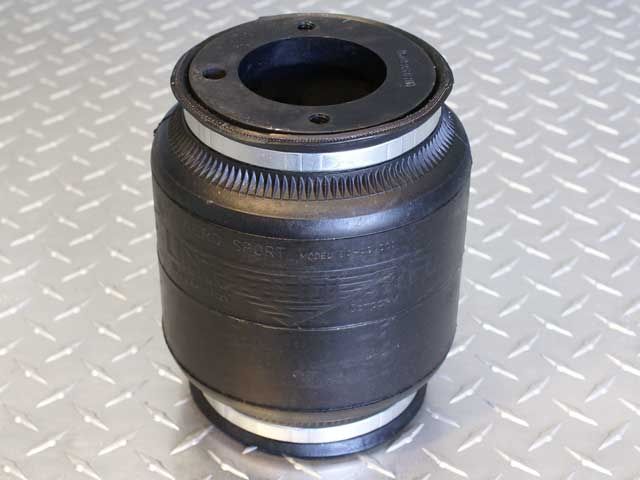
The UVAIR Aero Sport: Designed to slip over your Factory/Performance Struts or Shocks. (Pressure tube must be less then 2.14 in Diameter)
4.0" Compressed
9.25" Extended (The last inch or so is very difficult to use. So that's 4" of usable stroke. The shock only has 3.5" of stroke.)
5.875" Diameter
Designed to Slip Over Your Factory / Performance Strut
The UVAIR Aero Sport: Designed to slip over your Factory/Performance Struts or Shocks. (Pressure tube must be less then 2.14 in Diameter)
4.0" Compressed
9.25" Extended (The last inch or so is very difficult to use. So that's 4" of usable stroke. The shock only has 3.5" of stroke.)
5.875" Diameter
Air Ride Using YOUR Front Shocks for $350
How To Air Bag Your 4th Gen for $600.
My parts:
I got my lower mounts from the used bags I bought. I actually bought some Magnum shocks and bags and I cut the lower mounts off. These lower plates are just 4.5" diameter, 3/16" steel. They can be cut out with a torch.
The silver pipe at the bottom is a 2" ID plumbing piece. Galvanized. This is what I made my extensions out of.
It turns out the fit was not tight enough.
So I sliced a section out and welded them back together.
Then I took them over to a local machine shop and for 15 bucks they cut the groove in both pieces. They machined them for a very tight fit. Those clips aren't going anywhere.
For the upper mounts I was thinking a simple 4.5" circle plate of 3/16" steel with a 5/8" hole in the center would do the job, but turns out that at full droop, the bag touched the upper arm. So I had to cut a big hole in the plates and then extend them down a little. The upper disc is the gold top from my DeCarbon shocks and the short extension is a slice from the pipe.
Here's the whole assembly:
A close up of the top:
Close up of the bottom. Note that the clips are completely enclosed.
At full droop.
Full compresion.
The necessary clearance you get with the dropped upper plate. (The flat plate made the bag touch the arm)
I only finished one side today. I'll finish making the other mounts tomorrow and I think I should have the front riding on air by the evening. I need to repaint my shocks. My custom yellow is looking ratty. I may go with gloss black and then add the Koni stickers just like I did the last time I painted them. You'll note that I stripped them down to bare metal. Too many layers of paint will make the sleeves not slide on.
Last edited by JasonWW; 04-04-2011 at 12:59 AM.


Trending Topics
05-22-2009, 12:04 AM
#8
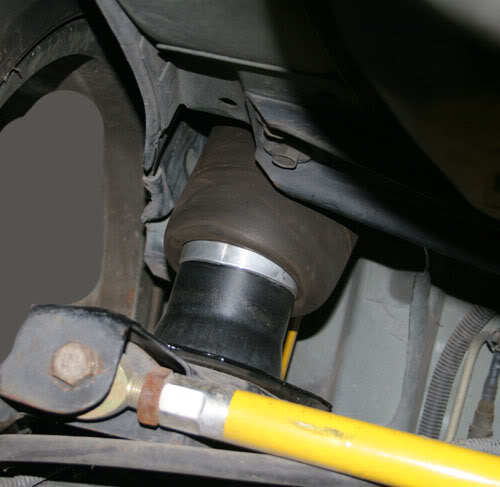
This is lower than a stock vehicle can go due to the modified bumpstops I have in back and the modded upper shock mounts I have up front.
https://ls1tech.com/forums/suspensio...ock-mount.html
As far as I know, my car will be the second one with these bags. The guys at Universal Air said they installed some on a camaro, but they didn't take pictures. I guess this is the first step by step install on one of these cars on the internet. It's all trial and error.

Last edited by JasonWW; 05-22-2009 at 12:39 AM.
 05-23-2009, 10:58 AM
#11
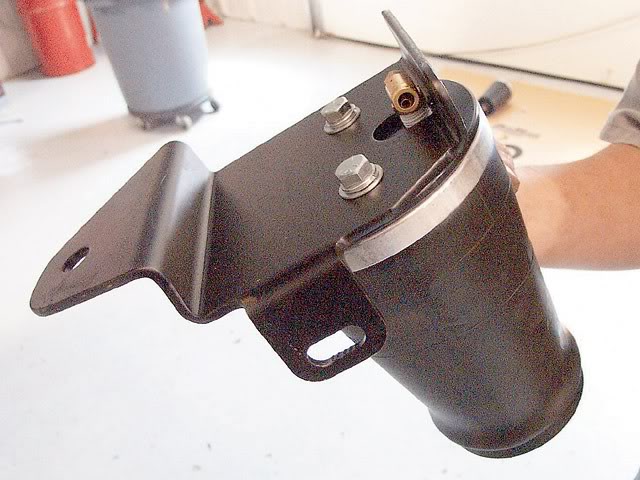
Here are the brackets for the front bags.
EDIT
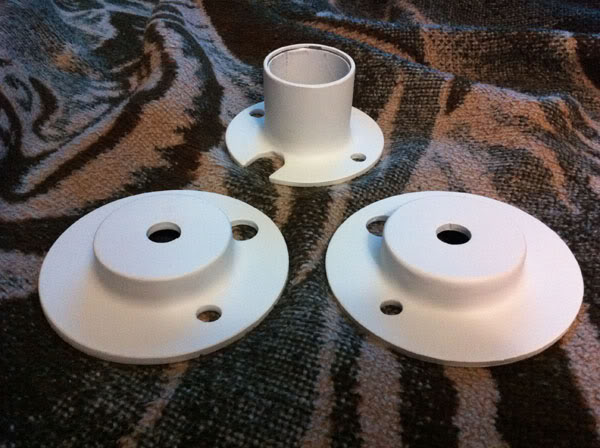
Just a quick update. I'm made some new bag mounts from laser cut steel to replace my craptacular, crooked, hacked together black ones.
Here's the new:
After bondo:
EDIT
Just a quick update. I'm made some new bag mounts from laser cut steel to replace my craptacular, crooked, hacked together black ones.
Here's the new:
After bondo:
Last edited by JasonWW; 04-04-2011 at 01:00 AM.
05-23-2009, 03:36 PM
#12
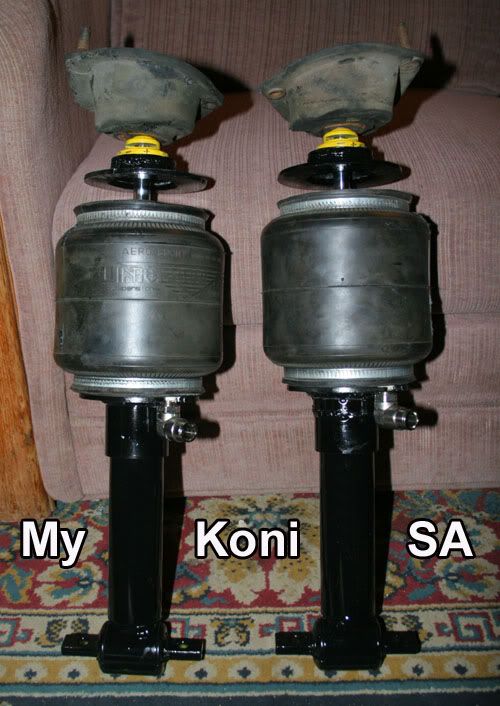
Here is the assembly of the shocks and bags.
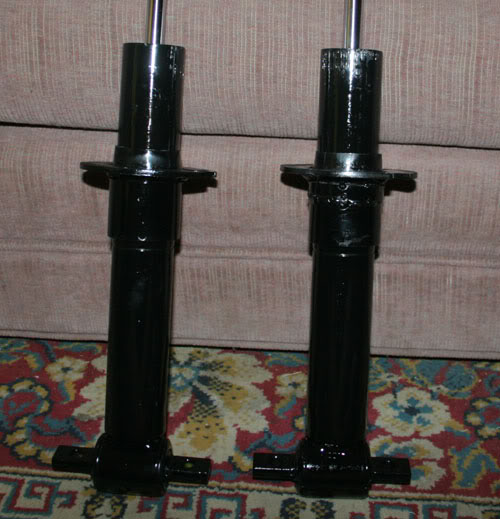
First are my now gloss black Koni SA shocks.
With the lower plates slid on.
Then the bags.
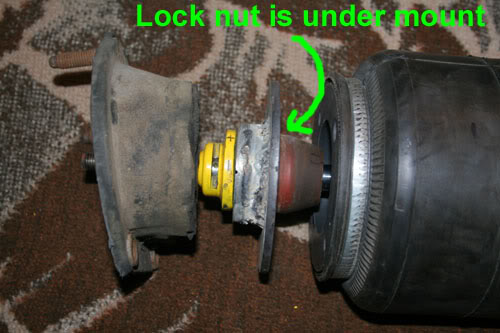
Don't forget your bumpstop, locknut and the rubber washer that goes around it.
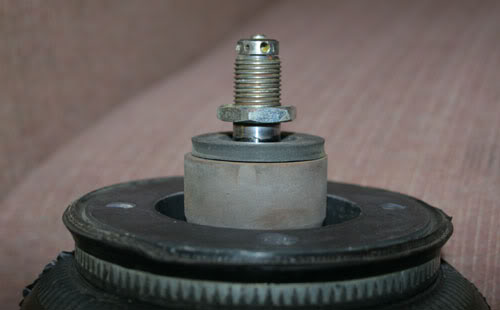
Drop on the upper plates.
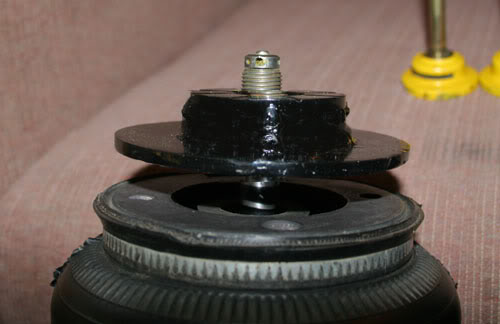
Then screw on the tophats and tighten them down. Make sure the adjustment window is lined up with the adjuster wheel.
I then took some measurements and decided I need to use the lower ring groove on the shock.
Now I have a tad over 7 1/2" between the upper and lower plates. So when the shock compresses all of it's 3 1/2", the bag will almost be bottomed out at it's 4" minimum height. The bag will also be able to extend the shock fully to help get the nose up for those steep driveways.
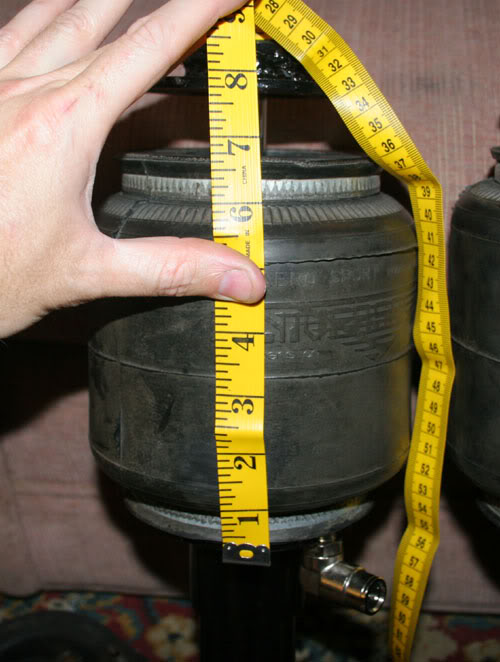
Somewhere between 7 1/2" and 7 3/4" is ideal. If you'd rather be safe than sorry, then go for 8". It will require more air pressure to get full extension, but will definetly allow full compression without the shock touching the inner edge of the top mount.
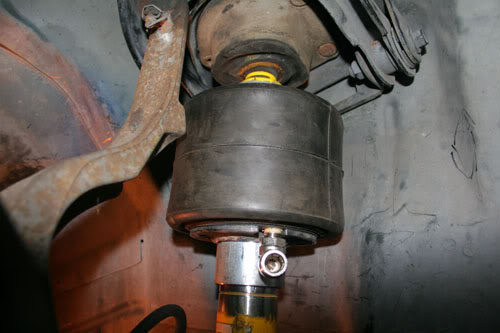
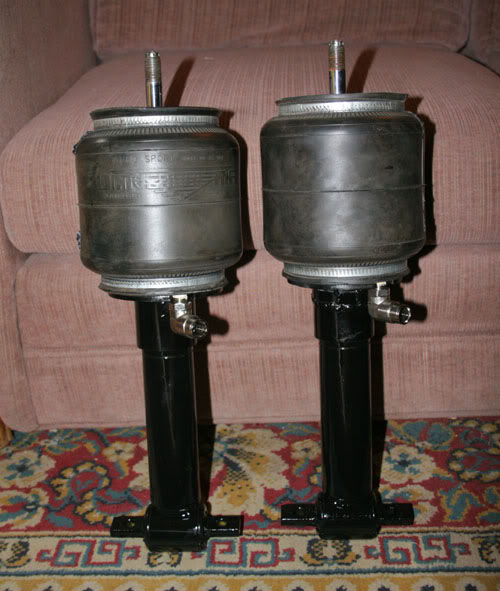
The complete units ready to go on the car. Make sure you index the adjuster window so it's facing out before you tighten the center nut on top.
You gotta love the easy access to the adjusters now.
The coilovers made it tough to adjust them.
First are my now gloss black Koni SA shocks.
With the lower plates slid on.
Then the bags.
Don't forget your bumpstop, locknut and the rubber washer that goes around it.
Drop on the upper plates.
Then screw on the tophats and tighten them down. Make sure the adjustment window is lined up with the adjuster wheel.
I then took some measurements and decided I need to use the lower ring groove on the shock.
Now I have a tad over 7 1/2" between the upper and lower plates. So when the shock compresses all of it's 3 1/2", the bag will almost be bottomed out at it's 4" minimum height. The bag will also be able to extend the shock fully to help get the nose up for those steep driveways.
Somewhere between 7 1/2" and 7 3/4" is ideal. If you'd rather be safe than sorry, then go for 8". It will require more air pressure to get full extension, but will definetly allow full compression without the shock touching the inner edge of the top mount.
The complete units ready to go on the car. Make sure you index the adjuster window so it's facing out before you tighten the center nut on top.
You gotta love the easy access to the adjusters now.
The coilovers made it tough to adjust them.
Last edited by JasonWW; 05-23-2009 at 06:39 PM.
05-23-2009, 03:50 PM
#13
I only have one thing left to do before I can install the bags and that is to beat in a little clearance on the frame rail. It's a little too tight a fit as far as I'm concerned and it's essential that the bag not touch or rub on ANYTHING.
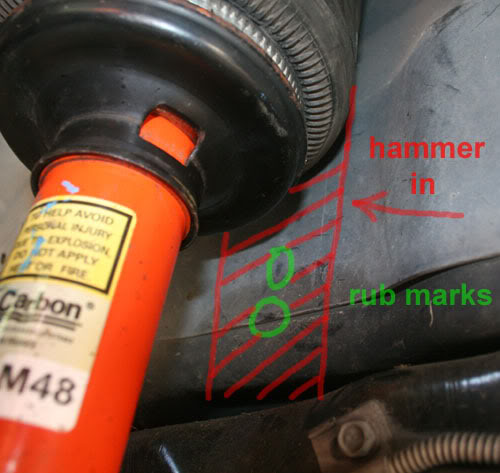
As you can see from this slice, it is massively thick.
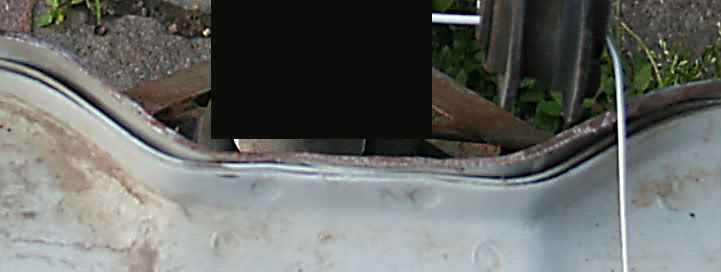
I think 2 layers of 16ga and then 1 real thick layer. I would say it's about the same as 4 layers of 16ga and I'm having a hell of a time hammering it in. Any suggestions?
I didn't want to heat it up, but I might have to.
As you can see from this slice, it is massively thick.
I think 2 layers of 16ga and then 1 real thick layer. I would say it's about the same as 4 layers of 16ga and I'm having a hell of a time hammering it in. Any suggestions?
I didn't want to heat it up, but I might have to.
Last edited by JasonWW; 05-23-2009 at 04:09 PM.
05-23-2009, 04:59 PM
#14

This is sick!! Im curious on how it will launch and handle.
What made you want to do all this to a trans am?
Its always cool to see your mods only reason i ask is a lot of you ideas dont really fit the whole cheap drag car domestic state of mind. Which is sweet by the way.
What made you want to do all this to a trans am?
Its always cool to see your mods only reason i ask is a lot of you ideas dont really fit the whole cheap drag car domestic state of mind. Which is sweet by the way.
05-23-2009, 05:25 PM
#15
This is sick!! Im curious on how it will launch and handle.
What made you want to do all this to a trans am?
Its always cool to see your mods only reason i ask is a lot of you ideas dont really fit the whole cheap drag car domestic state of mind. Which is sweet by the way.
What made you want to do all this to a trans am?
Its always cool to see your mods only reason i ask is a lot of you ideas dont really fit the whole cheap drag car domestic state of mind. Which is sweet by the way.
I considered an onboard air jack setup, but that only solves part of the problem. I knew I needed an adjustable ride height system. I first thought that airbags would be too soft for my tastes so I thought up a hydraulic upper mount system that moved the entire coilover up and down, but the weight, complexity and necessary maintenance made me take another look at an air system. Then I found these front Aero Sport bags and I found out that due to their small air volume, they will be nice and firm for handling purposes. Plus I can still add or subract low speed rebound on the shock to help dial it in. This looked like the best choice for me.
As far as why a Trans Am, they are the best looking car out there, period. I even prefer it's looks over the vette. You get the LS1, a 6 speed manual and the killer black paint. What else would you have me drive, a Geo?
Last edited by JasonWW; 05-23-2009 at 05:54 PM.
05-25-2009, 12:11 AM
#17

Take the T out of the rear air lines and put seperate valves on each bag. I really don't think you'll like how the car corners at all with air being allowed to travel from one bag to the other. I understand you've got swaybars...but it's a really inexpensive change and it will make it a lot better.
05-25-2009, 08:55 AM
#18
TECH Fanatic
iTrader: (1)
Join Date: Oct 2003
Location: Marrero/ New Orleans
Posts: 1,025
Likes: 0
Received 0 Likes
on
0 Posts

Take the T out of the rear air lines and put seperate valves on each bag. I really don't think you'll like how the car corners at all with air being allowed to travel from one bag to the other. I understand you've got swaybars...but it's a really inexpensive change and it will make it a lot better.
05-25-2009, 09:41 AM
#19
Take the T out of the rear air lines and put seperate valves on each bag. I really don't think you'll like how the car corners at all with air being allowed to travel from one bag to the other. I understand you've got swaybars...but it's a really inexpensive change and it will make it a lot better.
The T's are just temporary. I have something very trick in mind. A special circuit that connects the left and right bags only when the steering wheel is straight and isolates them when it's not.
The advantage will be a smoother ride in a straight line. I'm going to run some tests to see if it's worth the added complexity. That's all in the future, though.
05-25-2009, 10:30 AM
#20
And then if you hit a bump with one side of the car just before entering a corner, the bags on either side of the car will be pre-loaded differently and cornering will be unpredictable...I don't think that'd be worth the complexity. Seperate valves for each bag is the way to go.