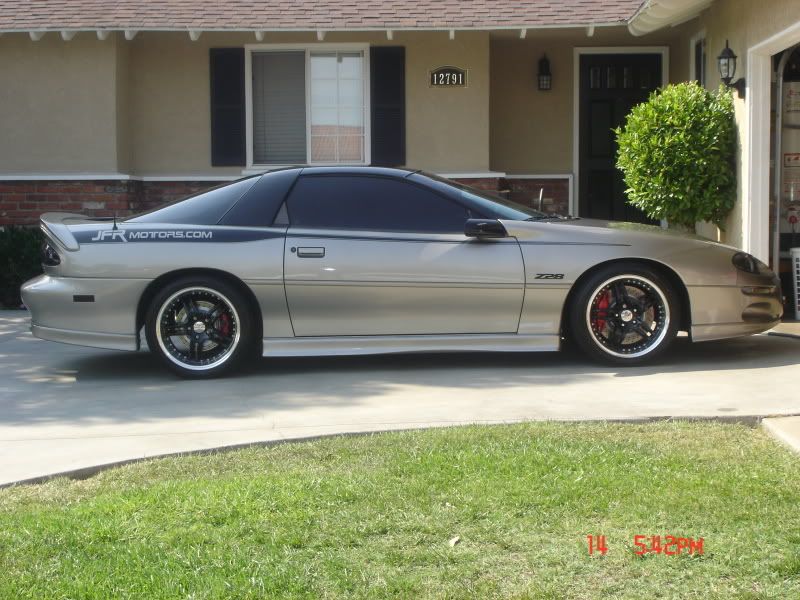
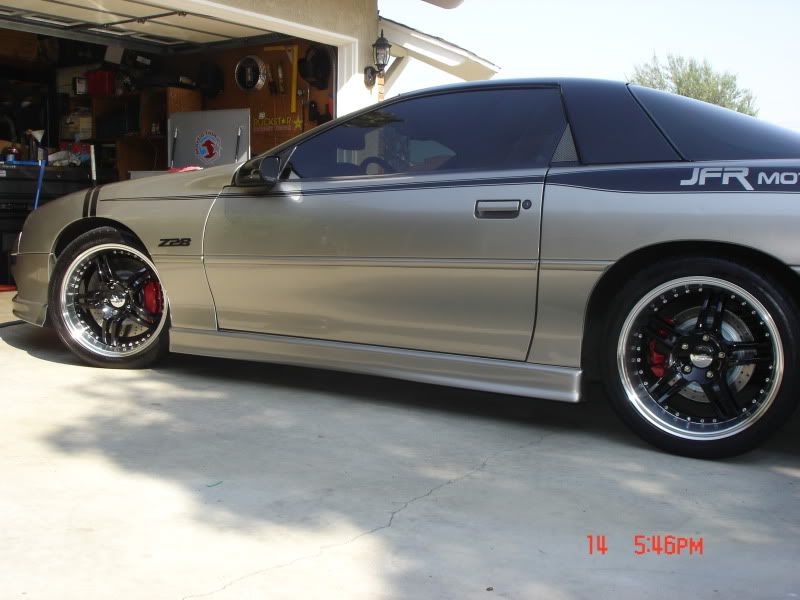
My new CTS-V brakes & edelbrock adjustable coilover write-up!! LOTS OF PICS!!
 08-15-2009, 07:17 PM
#1
So i got my car some goodies this week. 
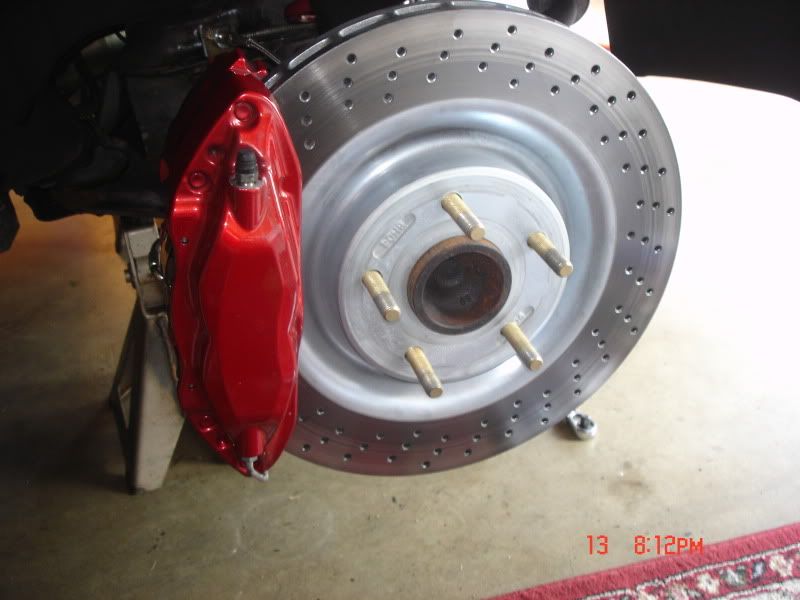
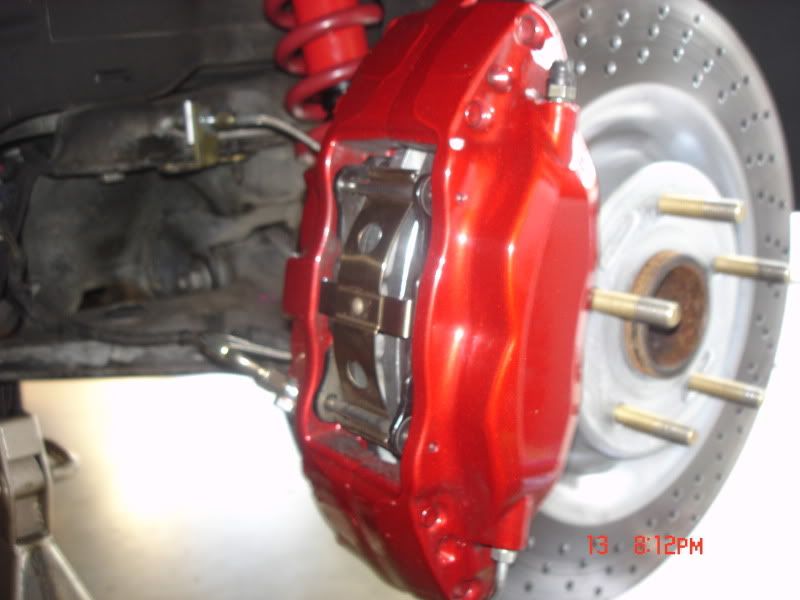
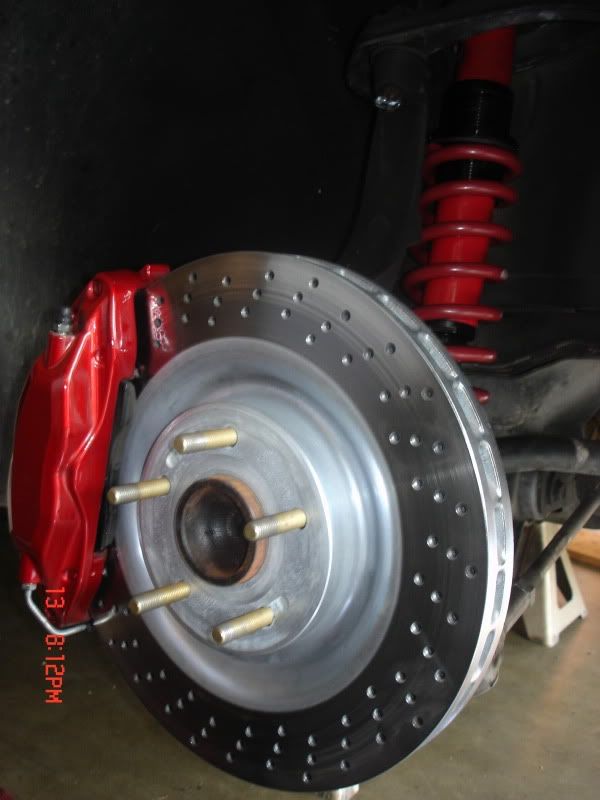
BRAKES:
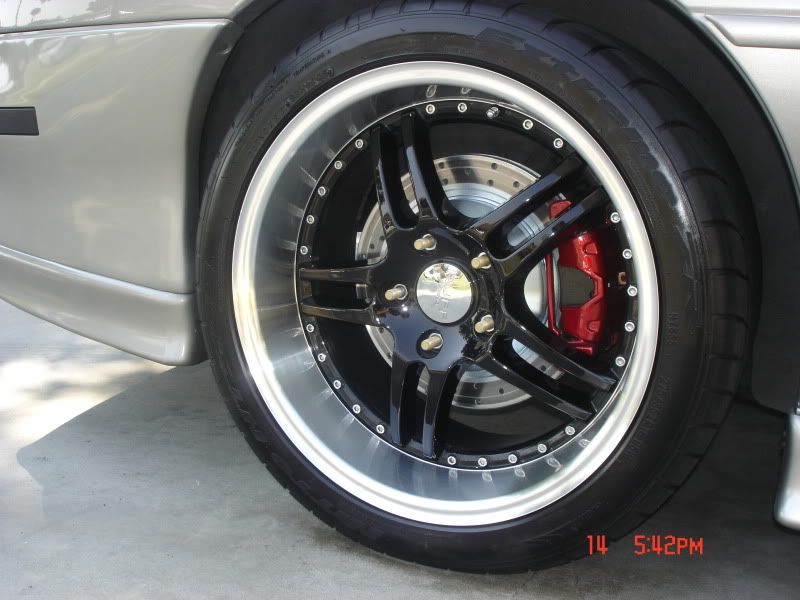
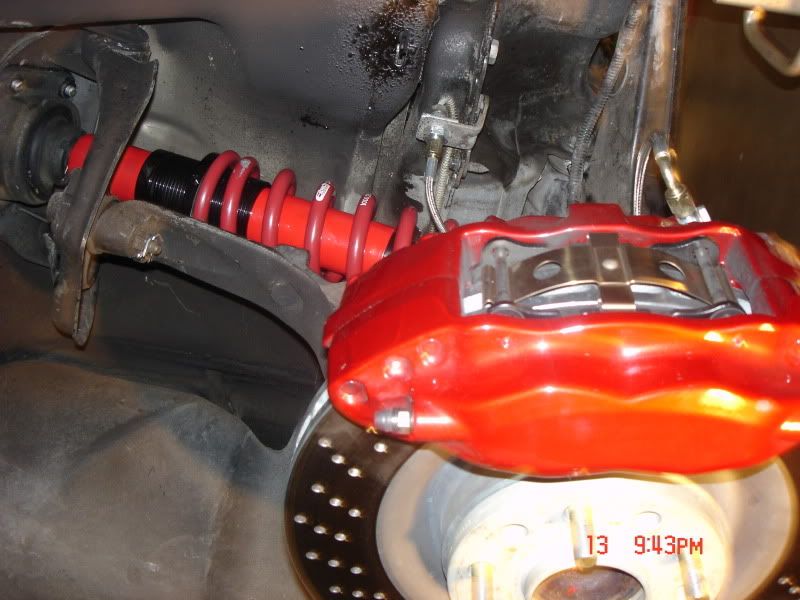
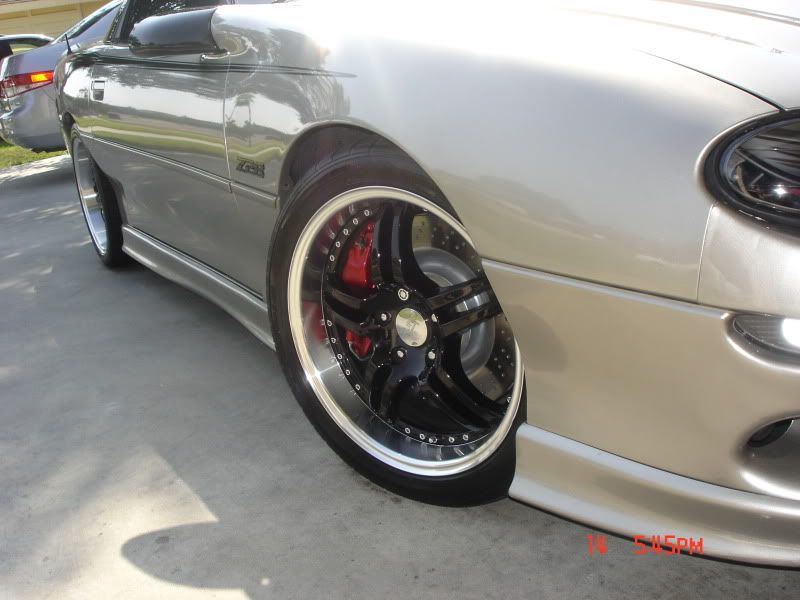
I did the CTS-V Brembo big brake upgrade with HAWK HPS pads, and zinc plated Z06 rotors, along with ARP hardened wheel studs on all 4 wheels, all 6 stainless braided brake lines, rear drilled and zinced rotors to match, new ebrake shoes & hardware, and front and rear calipers powdercoated a dark candy red with silver flake. Since there are a few writeups already, i dont need to do one for these.....
SUSPENSION:
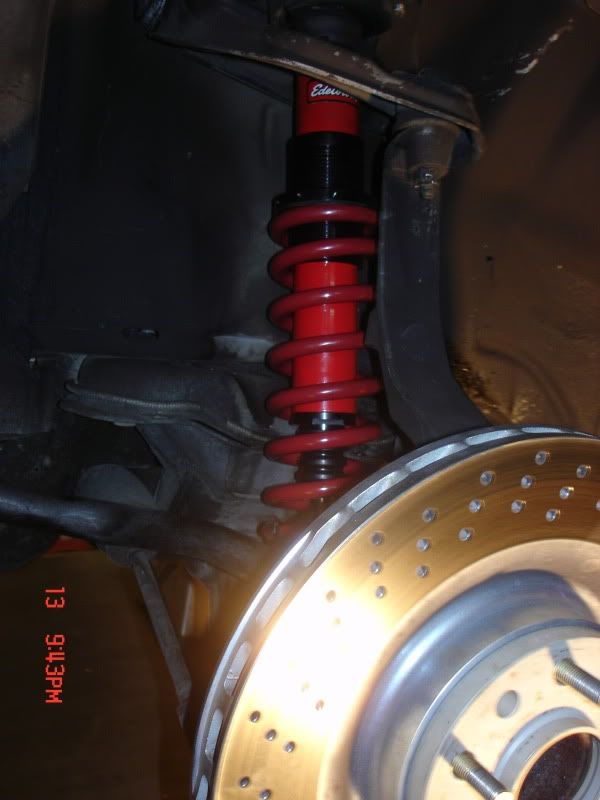
I decided to go with the edelbrock coilovers. before you guys ask why i didnt just go with konis, the answer is simple. I dont like having what everyone else has. and there is not enough people running these to show that konis are any better or worse. I did a lot of research and they seem like a great shock, the only thing people had bad to say about the edelbrock was that "it has small parts inside that might break". So i talked to the guys at edelbrock if they had many warranty returns because of that. he said they havent had a single problem with any of those parts going bad. Those guys over there are very helpful and can answer any questions about technical info... I also got them because they are made in the USA and i believe in supporting stuff made here and also because of the adjustability (DD, track, AX, and high speed runs). i also got the rear edelbrock shocks and have hotchkis rear springs. anyways here is the procedure on how to install these:

take the wheel off and take off the upper spindle nut & cotter pin and hit the side of the spindle with a BIG METAL HAMMER to separate the ball joint.
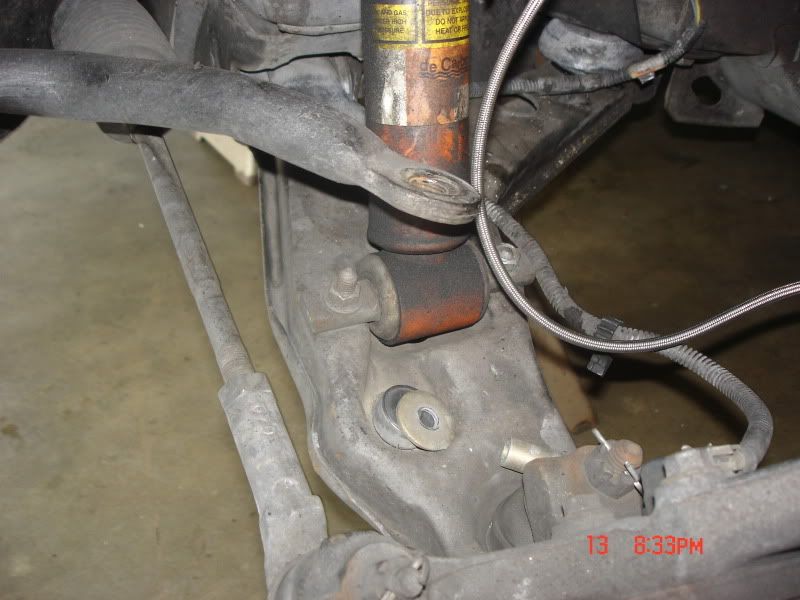
then remove the swaybar endlink and the two lower shock bolts. the whole shock/spring assembly will slide out with the upper a-arm.
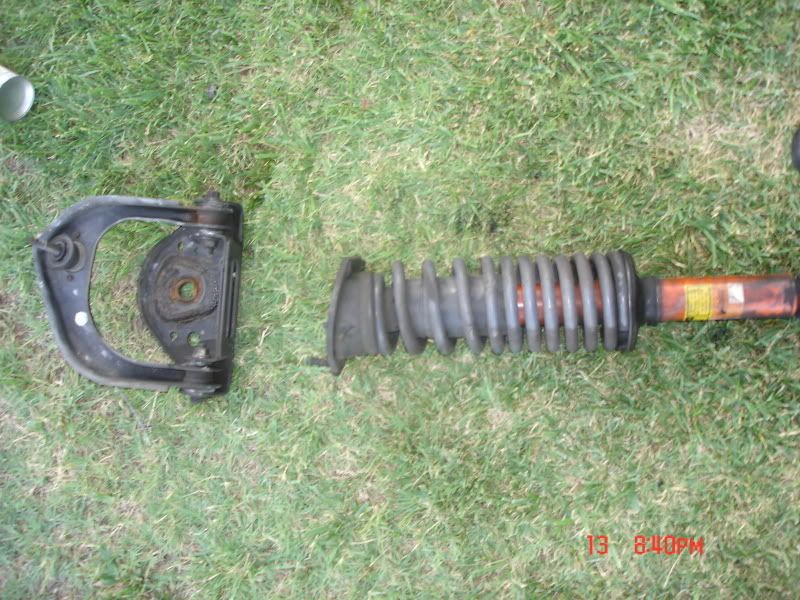
the a-arm slides off and you are left with just the spring/shock.
the nut for the shock will be VERY VERY VERY rusted at best. you might have to chisel or cut it off. ive had mine off before so it wasnt too bad, but i had to chisel it the first time. use a spring compressor to hold the spring, otherwise the spring can shoot out and hurt you once the nut is removed. (i just laid mine on the ground and stood on it without a compressor and let the shock shoot out behind me (dont try that at home haha)
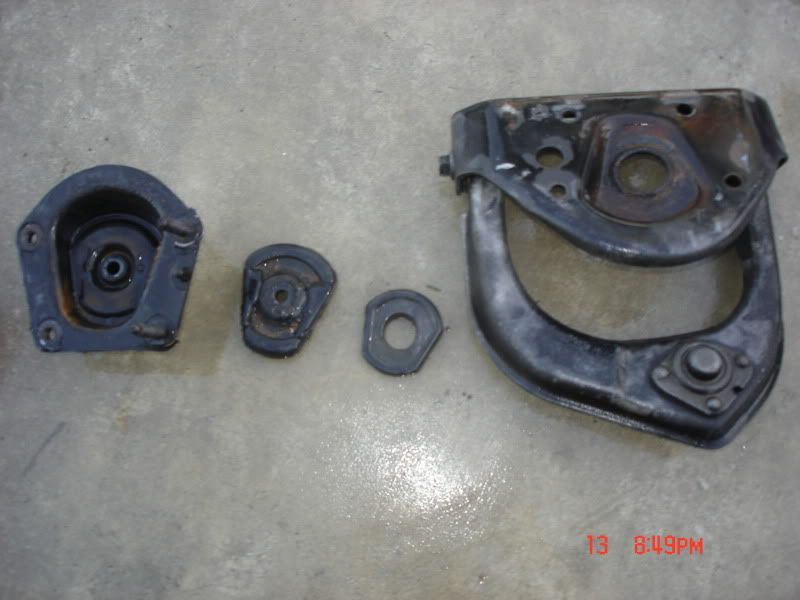
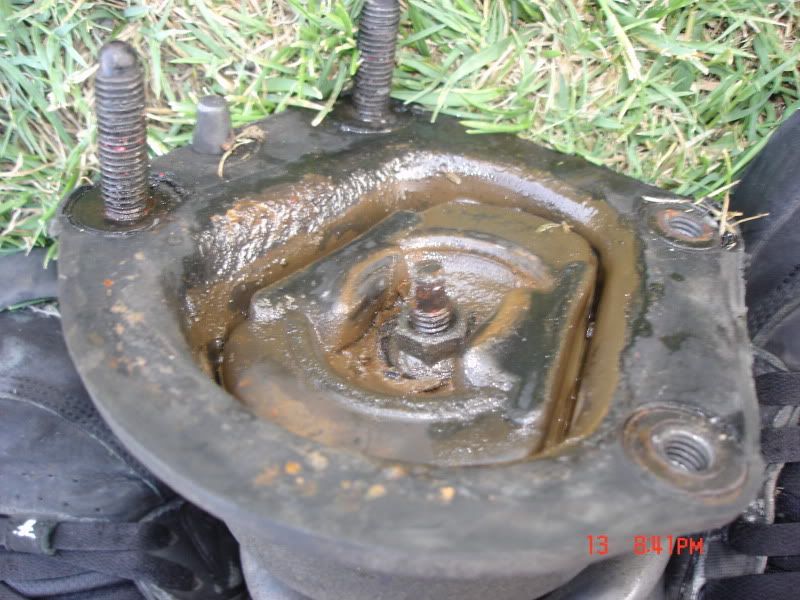
these are the parts you will need to reuse. you can see in the previous picture how the plate goes inside of the cup, and then the nut. the other piece is the rubber seal that goes on the a-arm bracket.
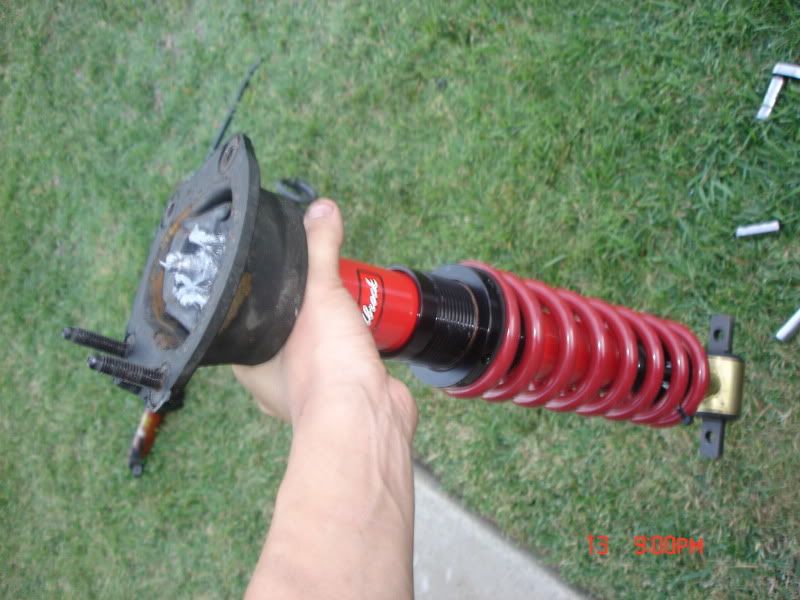
all you have to do is bolt up the the cup and plate and place the the a-arm back on top. (shocks come with new nuts) nut is torqued to 35 lb/ft. notice LOTS OF ANTISIEZE. this will help with corrosion in the future.
installation is reverse of removal, this will take an average person about an hour to do, i did it in less however. to adjust, just remove the set screw, and move the perch up to lower the car.
i still have a lot of room to adjust these. i could probably get it another 2 inches lower if that was even possible haha
THE VERDICT:
wow, it really feels like a different car. the brakes thew sunglasses off of my head, thats how incredibly it stops. i got the car from 140mph to 90mph in seconds with no warping or overheating. The suspension is amazing right now. I have driven a car with konis/ hotchkis springs and other similar parts and from what i remember, my car feels just as nimble as his. it takes turns soooo much faster than what was ever possible and is much more stable at high speed. I absolutely love these shocks. i got on the freeway and drove over the carpool-lane reflectors on purpose and the IAS valve really works great smoothing that stuff out. hopefully in the future i can get the other koni car and do some testing to really get some specs on these. Im tired of writing now but i am so excited driving my car with these parts now that i had to share with everyone. feel free to ask any questions!!!
BRAKES:
I did the CTS-V Brembo big brake upgrade with HAWK HPS pads, and zinc plated Z06 rotors, along with ARP hardened wheel studs on all 4 wheels, all 6 stainless braided brake lines, rear drilled and zinced rotors to match, new ebrake shoes & hardware, and front and rear calipers powdercoated a dark candy red with silver flake. Since there are a few writeups already, i dont need to do one for these.....
SUSPENSION:
I decided to go with the edelbrock coilovers. before you guys ask why i didnt just go with konis, the answer is simple. I dont like having what everyone else has. and there is not enough people running these to show that konis are any better or worse. I did a lot of research and they seem like a great shock, the only thing people had bad to say about the edelbrock was that "it has small parts inside that might break". So i talked to the guys at edelbrock if they had many warranty returns because of that. he said they havent had a single problem with any of those parts going bad. Those guys over there are very helpful and can answer any questions about technical info... I also got them because they are made in the USA and i believe in supporting stuff made here
and also because of the adjustability (DD, track, AX, and high speed runs). i also got the rear edelbrock shocks and have hotchkis rear springs. anyways here is the procedure on how to install these:take the wheel off and take off the upper spindle nut & cotter pin and hit the side of the spindle with a BIG METAL HAMMER to separate the ball joint.
then remove the swaybar endlink and the two lower shock bolts. the whole shock/spring assembly will slide out with the upper a-arm.
the a-arm slides off and you are left with just the spring/shock.
the nut for the shock will be VERY VERY VERY rusted at best. you might have to chisel or cut it off. ive had mine off before so it wasnt too bad, but i had to chisel it the first time. use a spring compressor to hold the spring, otherwise the spring can shoot out and hurt you once the nut is removed. (i just laid mine on the ground and stood on it without a compressor and let the shock shoot out behind me (dont try that at home haha)
these are the parts you will need to reuse. you can see in the previous picture how the plate goes inside of the cup, and then the nut. the other piece is the rubber seal that goes on the a-arm bracket.
all you have to do is bolt up the the cup and plate and place the the a-arm back on top. (shocks come with new nuts) nut is torqued to 35 lb/ft. notice LOTS OF ANTISIEZE. this will help with corrosion in the future.
installation is reverse of removal, this will take an average person about an hour to do, i did it in less however. to adjust, just remove the set screw, and move the perch up to lower the car.
i still have a lot of room to adjust these. i could probably get it another 2 inches lower if that was even possible haha
THE VERDICT:
wow, it really feels like a different car. the brakes thew sunglasses off of my head, thats how incredibly it stops. i got the car from 140mph to 90mph in seconds with no warping or overheating. The suspension is amazing right now. I have driven a car with konis/ hotchkis springs and other similar parts and from what i remember, my car feels just as nimble as his. it takes turns soooo much faster than what was ever possible and is much more stable at high speed. I absolutely love these shocks. i got on the freeway and drove over the carpool-lane reflectors on purpose and the IAS valve really works great smoothing that stuff out. hopefully in the future i can get the other koni car and do some testing to really get some specs on these. Im tired of writing now but i am so excited driving my car with these parts now that i had to share with everyone. feel free to ask any questions!!!
Last edited by KILLER-LS1; 08-19-2009 at 06:40 PM. Reason: Fixed pics


Trending Topics
08-16-2009, 12:20 AM
#8
Love those front brakes, and your ride height. And I know you'll enjoy your new IAS shocks and springs!
IMO, do the "Upper Mount Mod", and you won't lose any suspension travel going lower, and if you leave the ride height where it is you'll actually gain compression travel and have an even better ride quality. IMO, if you go any lower and you'll start encountering a lot more obstacles with your exhaust, and under the nose. My final ride height is about 25.63" with my IAS front shocks, which works great!
IMO, do the "Upper Mount Mod", and you won't lose any suspension travel going lower, and if you leave the ride height where it is you'll actually gain compression travel and have an even better ride quality. IMO, if you go any lower and you'll start encountering a lot more obstacles with your exhaust, and under the nose. My final ride height is about 25.63" with my IAS front shocks, which works great!
Last edited by 99Bluz28; 08-16-2009 at 12:28 AM.
08-16-2009, 03:21 AM
#9
99bluz28: yeah I've been anticipating these for a while! And I was going to do that and I totally forgot! Thanks for reminding me haha have you run into any problems with that mod?
08-16-2009, 11:22 AM
#11
TECH Resident
iTrader: (1)

Join Date: Jan 2004
Location: Patterson, CA
Posts: 858
Likes: 0
Received 0 Likes
on
0 Posts

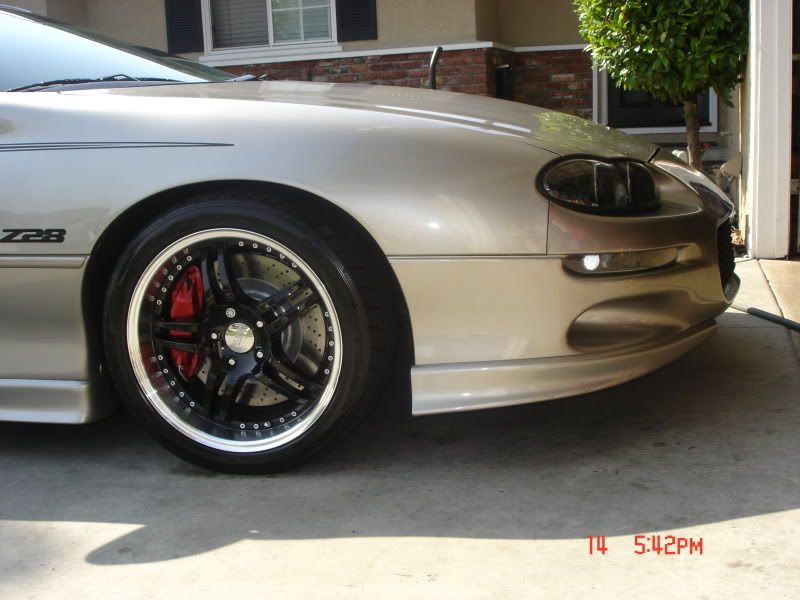
I can't remember off the top of my head the offset but they are the ruff 278's in a 8.5" in front and 9.5" wide in the rear. I used a 1/2" hubcentric spacer from eibach...
99bluz28: yeah I've been anticipating these for a while! And I was going to do that and I totally forgot! Thanks for reminding me haha have you run into any problems with that mod?
99bluz28: yeah I've been anticipating these for a while! And I was going to do that and I totally forgot! Thanks for reminding me haha have you run into any problems with that mod?
08-16-2009, 01:16 PM
#12
I can't remember off the top of my head the offset but they are the ruff 278's in a 8.5" in front and 9.5" wide in the rear. I used a 1/2" hubcentric spacer from eibach...
99bluz28: yeah I've been anticipating these for a while! And I was going to do that and I totally forgot! Thanks for reminding me haha have you run into any problems with that mod?
99bluz28: yeah I've been anticipating these for a while! And I was going to do that and I totally forgot! Thanks for reminding me haha have you run into any problems with that mod?

 08-16-2009, 10:32 PM
#15
ok so last night i got my car up to 120 and turnd the wheel like 45 degrees right for a sec and the car simply changed lanes with no hassle. it was so easy i decided to turn the wheel a fell 90degrees just for a split second and it handled it great. all i got was a tire wooshing noise (as if you were doing a slalom) and it was very predictable. im still on the stock swaybars btw. im just so excited about this setup. id be happy to take anyone in orange county for a drive just to show off!! thanks for all the compliments guys!
08-17-2009, 07:14 AM
#16
08-17-2009, 03:24 PM
#18
Teching In
iTrader: (2)

Join Date: Apr 2007
Location: Minnesota
Posts: 31
Likes: 0
Received 0 Likes
on
0 Posts
I can't remember off the top of my head the offset but they are the ruff 278's in a 8.5" in front and 9.5" wide in the rear. I used a 1/2" hubcentric spacer from eibach...
99bluz28: yeah I've been anticipating these for a while! And I was going to do that and I totally forgot! Thanks for reminding me haha have you run into any problems with that mod?
99bluz28: yeah I've been anticipating these for a while! And I was going to do that and I totally forgot! Thanks for reminding me haha have you run into any problems with that mod?
FYI they did make these wheels in a 20mm backspace with our bolt pattern for another application. They would work perfect without a spacer for this brake swap, but they quit making the 278 wheels
 I've called around everywhere trying to find two of them with no luck.
 Looks like I'll be buying new wheels when I do this brake swap as I have 18x9.5s on all four corners and they won't clear even with a 15mm spacer.