Camaro and Firebird: How to Install Steering Wheel with Radio Controls
Steering wheel radio controls allow you to choose the right tunes and volume without taking your hands off the wheel. Here's how to get that convenience in your ride.
This article applies to the Camaro and Firebird (1990-2015).
We've all been there – driving down a twisty road on a beautiful day, taking corners in an aggressive manner. Your favorite radio station is on point today, playing all of your favorite songs. But then, mid sweeping corner, on comes a commercial (or even worse, a Kenny G song). If you had steering wheel radio controls, you could simply sweep your thumb over and quickly rectify the situation. But you don't, so you face a difficult choice – take your hand off the wheel, or listen to that abomination coming out of your speakers. Here's how to install steering wheel radio controls and make sure you don't face that nightmare ever again.

Materials Needed
- Metric/standard socket set and ratchet
- Torx bit set
- Allen wrench set
- (2) Flat head screwdrivers
- Phillips head screwdriver
- Sharp metal pick
- Snap ring pliers
- Steering wheel removal tool
- Steering wheel with radio controls or entire column with wheel, air bag, and clock spring
- Airbag clock spring/SIR coil that is wired for steering wheel radio controls
Step 1 – Remove the air bag
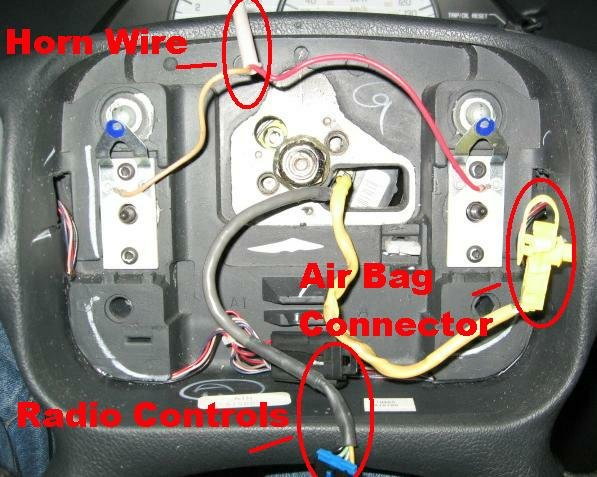
Disconnect the battery or pull the air bag fuse, then wait 10 minutes. This step is very important because the air bag system can hold power for up to 10 minutes. Loosen the two T-30 Torx bolts from the back of the steering wheel, and the air bag will come right out. Release the plastic safety retainer clip and pull the yellow connector out of the air bag.
Step 2 – Remove the steering wheel
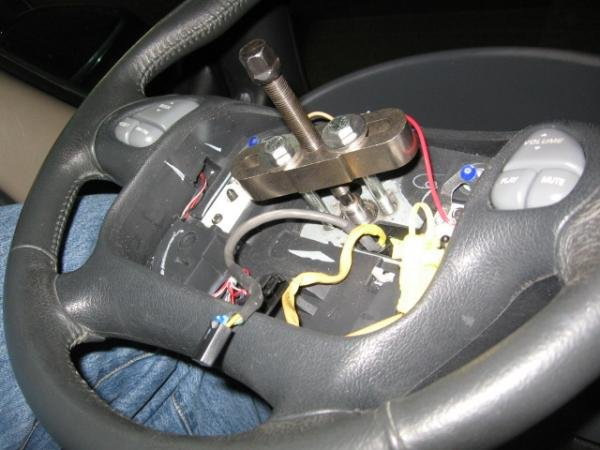
Make sure the steering wheel is at dead center and the wheel is locked, then loosen but don't remove the nut holding it in place. Turn the white plastic spring counter clockwise and pull it out. Use the steering wheel puller to remove the wheel and nut. Use a Phillips head screwdriver and 7mm socket to remove the knee panel underneath the steering wheel, disconnecting the electrical connection while doing so.
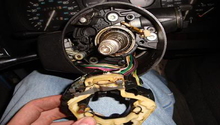
Step 3 – Remove the SIR coil
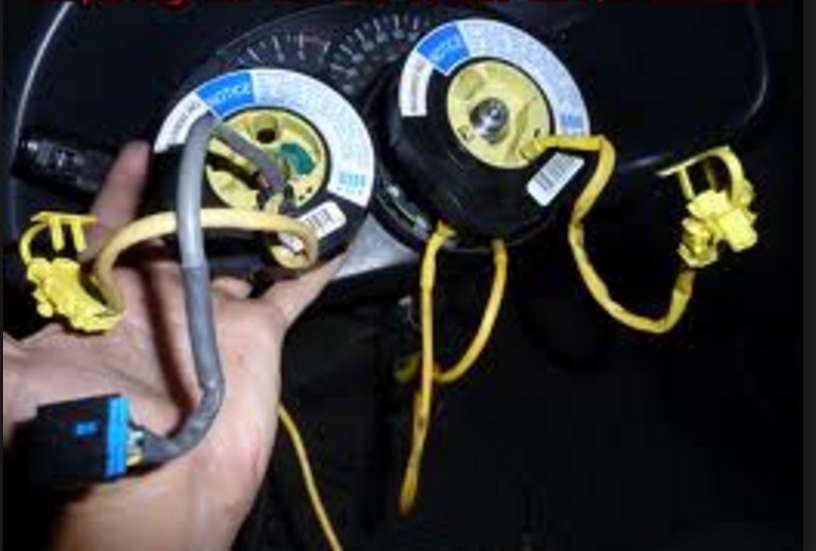
Disconnect the SIR electrical connection, which is the large yellow wire with the large yellow connector location behind the knee panel. You will need to remove the yellow plastic part of the plug with a metal pick so that it will slide through the column without having to take more interior components apart. Remove the clear plastic shield under the column which protects the wiring by squeezing the tabs closest to the car, then pull towards the front of the vehicle.
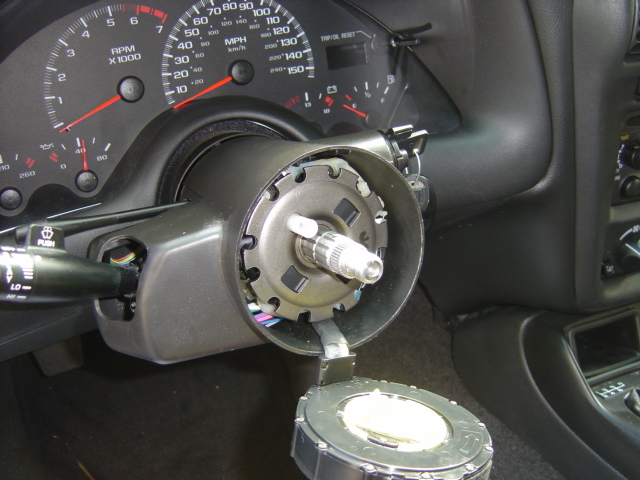
Push the SIR coil in and pull the retainer ring using your snap ring pliers. Pull the SIR coil out and carefully feed the wire through the column. Compress the steering wheel lock plate in the column and remove the retaining ring and metal shield ring. Remove the lock plate. Remove the Phillips head screw holding the turn signal stalk assembly, then remove the three Torx screws holding it in place. Remove the Phillips head screw holding the hazard light switch in place. Rotate the SIR coil counter clockwise and pull it out.
Step 4 – Install new SIR coil
Remove the plastic clip from the new SIR coil wiring and feed the wiring through the steering column. Plug in the wires. Reinstall the clear plastic electrical wire shield, then reinstall the turn signal assembly and lock plate. Install the new SIR coil, making sure that the arrows on the face of the coil are lined up. To center the clock spring, hold it with the back side facing up and press down on the service lock. Turn the coil in the direction the arrow is pointing until the coil stops. Turn the coil 2 1/2 times in the opposite direction, then engage the spring service lock.
Step 5 – Reinstall steering wheel
Reinstall the knee panel, making sure to reconnect the electrical connector. Install the new steering wheel, making sure it is dead center, then tighten the nut. Insert the white retaining clip into the new wheel and turn it clockwise to lock it into place. Connect the steering wheel radio control plug.
Reinstall the air bag. Reconnect your battery or put the air bag fuse back in, then test to make sure everything works!
Related Discussion
- How to Install Steering Wheel with Radio Controls - LS1Tech.com