


Mark's LS1 2nd Gen Camaro build
Thread Starter
11 Second Club
Joined: Mar 2008
Posts: 445
Likes: 1
From: New Westminster, B.C., Canada
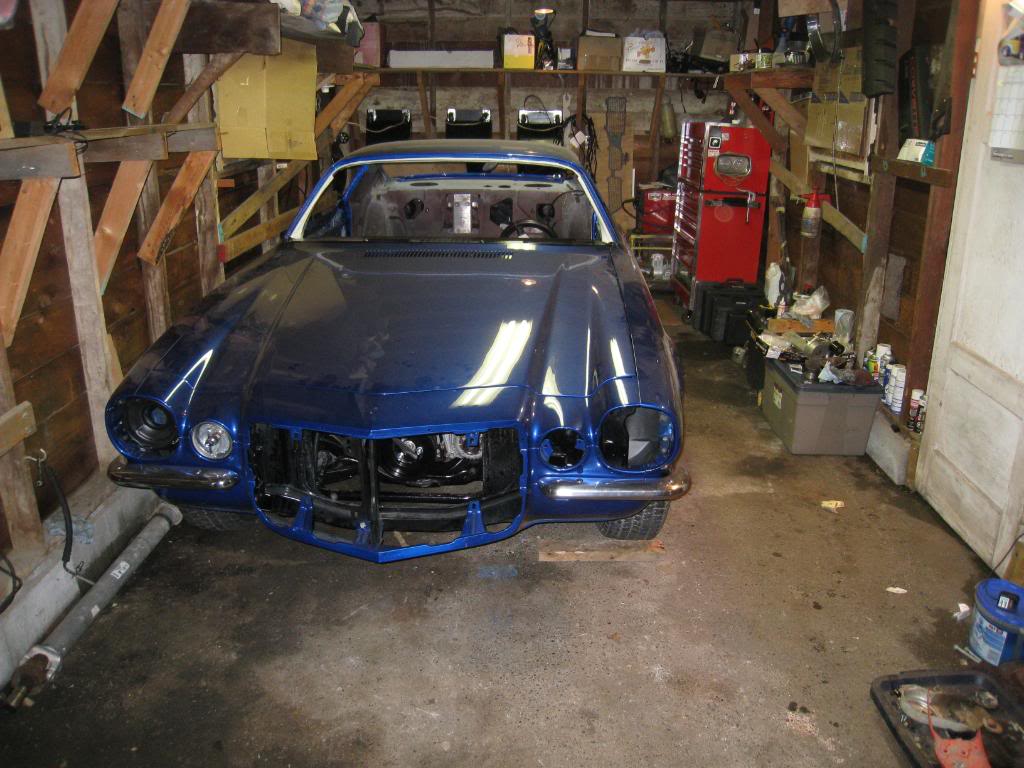
OK, so the LH8 pan was not ideal for my car. I posted it on craigslist and sold it the next day at only a $55 loss. The issue I had was steering interference. The LH8 pan may have worked if I jacked the motor up high enough, but the hood to throttle body clearance would have been limited. If you are following this thread then you know of my plans to pro-charge. This being said, I need all the space I can get to squeeze the charger under a stock hood.
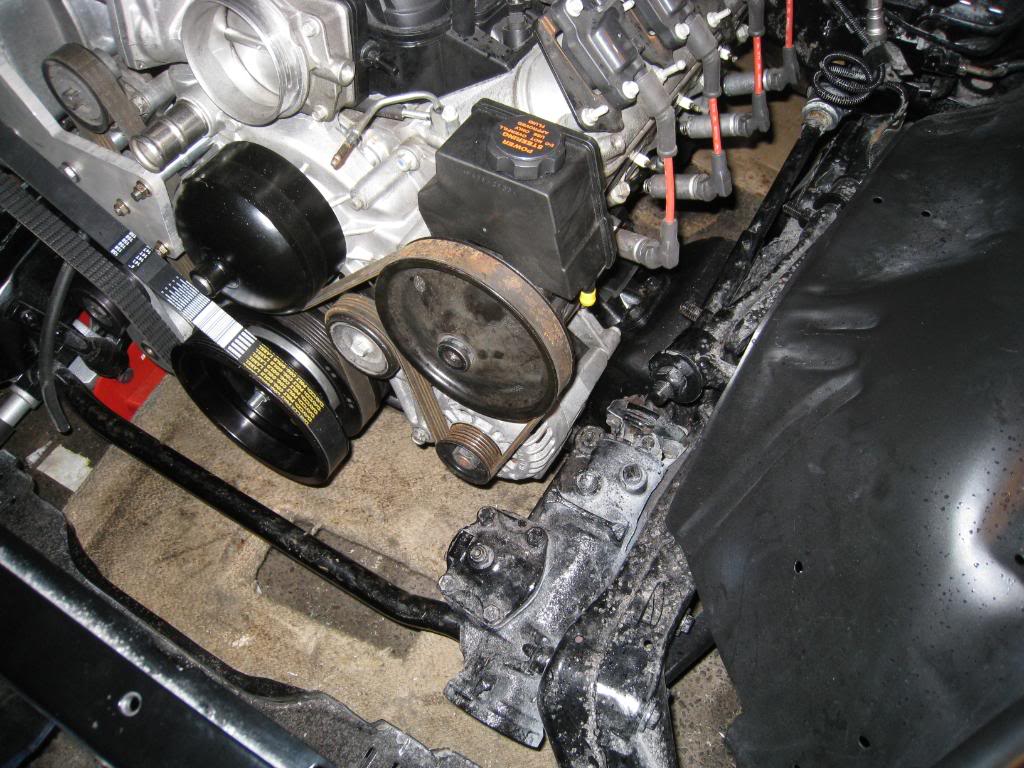
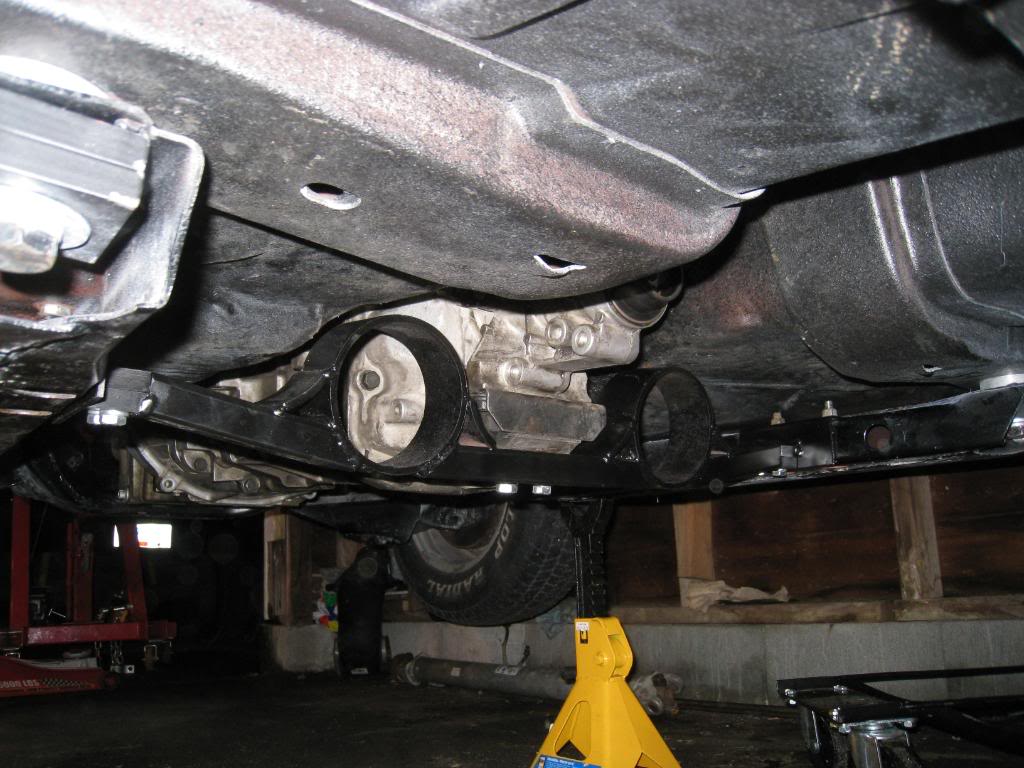
SO...the mount set-up that works for me. I am using the trans-dapt ls1/sbc adapter plates, with a 1/2 inch spacer placed under the factory crossmember to mount plate. I am re-drilling the crossmember and shifting the mount rearward 1/4 to 1/2 inch. This allows good clearance for my F-body oil pan, steering , and alternator.
The LH8 Pan was better at the rear of the crossmember, but the sump sat lower than the crossmember (as low as 2" before jacking up the motor) and the front of the pan was deeper than the Fbody pan and hit the steering before being jacked up, and at that point I decided to use the F body pan as ground clearance is a big issue for me.
In conclusion, I recommend the F body pan. ( mine is from a '99 trans am )
I just got my 6.0 LQ4 home! Ive got and 80' camaro and you probably saved me some money on the pan subject  . Im probably going to use the same stuff since it works well for you.
Thanks for the info...keep us posted!
. Im probably going to use the same stuff since it works well for you. Thanks for the info...keep us posted!
Last edited by MrCheap; May 19, 2008 at 08:06 PM.
Hi Mark. Nice looking project. I've got an LQ4 in my 81Z and used all fbody accessories and oil pan.
I'm in Cloverdale and if you need any help let me knowas my swap is done and running well.
Up untl now, I thought I was the only one with a LSX in a 2nd gen in the Lower Mainland of BC.
I'm in Cloverdale and if you need any help let me knowas my swap is done and running well.
Up untl now, I thought I was the only one with a LSX in a 2nd gen in the Lower Mainland of BC.
Thread Starter
11 Second Club
Joined: Mar 2008
Posts: 445
Likes: 1
From: New Westminster, B.C., Canada
Good to meet ya Z! I'd like to pick your brain a little just to see how you went about doing your swap! in fact, pm me yer number and I'll give you a call sometime to discuss a couple things... cheers!
Thread Starter
11 Second Club
Joined: Mar 2008
Posts: 445
Likes: 1
From: New Westminster, B.C., Canada
Well, I finally found someone to finish painting the car! Waiting for the flat deck right now to take it to his shop. After a bunch of research and emails, I got a hold of the guy who started the bodywork in the first place, and with a little begging, he decided to bench another project he was working on to complete mine! Yay.... continued....
Thread Starter
11 Second Club
Joined: Mar 2008
Posts: 445
Likes: 1
From: New Westminster, B.C., Canada
things are coming together ever so slowly.... anyway, here's a pic! built my own procharger mount kit, and as you can see the car is fully painted!
Last edited by Marktainium; Nov 21, 2010 at 01:44 PM.
Sweet project! I had envisioned this for my 70 but have now decided that it will be strait-line only so no T-56  . I had a quick question however about your mounts. You say you are redrilling the crossmember to move the mount back 1/4-1/2 inch, by redrilling are you saying that you just elongated the factory holes on the crossmember and if not can you post a pic as I am easily confused. Thank you!
. I had a quick question however about your mounts. You say you are redrilling the crossmember to move the mount back 1/4-1/2 inch, by redrilling are you saying that you just elongated the factory holes on the crossmember and if not can you post a pic as I am easily confused. Thank you! Thread Starter
11 Second Club
Joined: Mar 2008
Posts: 445
Likes: 1
From: New Westminster, B.C., Canada
Sweet project! I had envisioned this for my 70 but have now decided that it will be strait-line only so no T-56 . I had a quick question however about your mounts. You say you are redrilling the crossmember to move the mount back 1/4-1/2 inch, by redrilling are you saying that you just elongated the factory holes on the crossmember and if not can you post a pic as I am easily confused. Thank you!
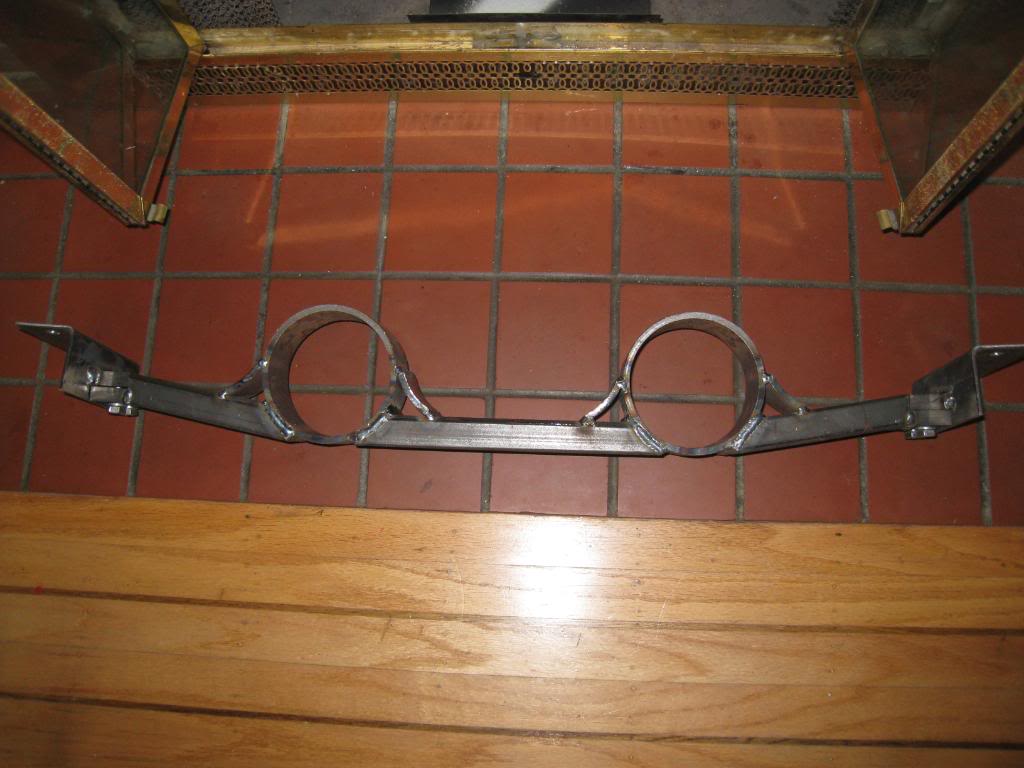
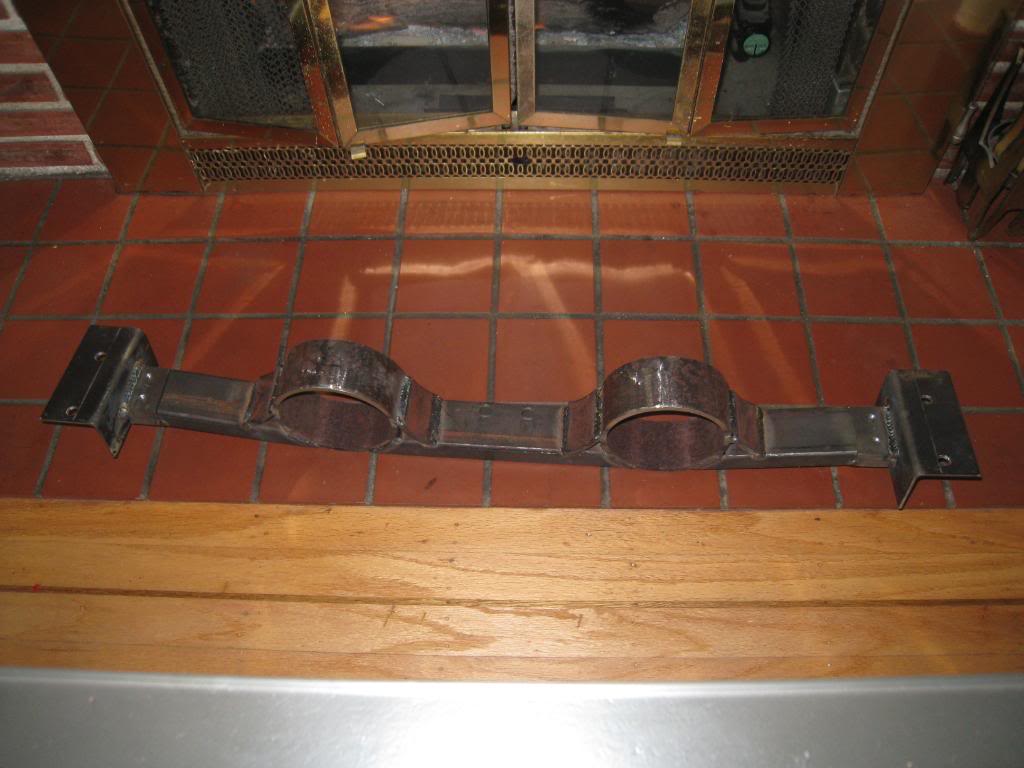
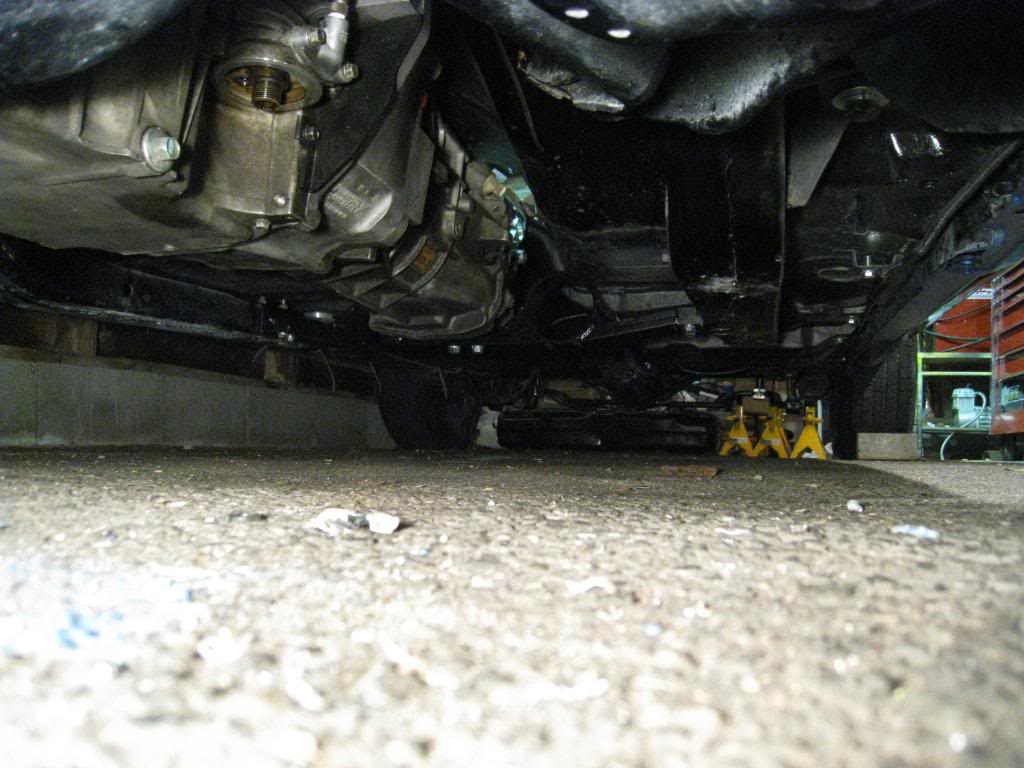
. I had a quick question however about your mounts. You say you are redrilling the crossmember to move the mount back 1/4-1/2 inch, by redrilling are you saying that you just elongated the factory holes on the crossmember and if not can you post a pic as I am easily confused. Thank you!Since then I have remounted the engine and built myself a transmission crossmember with provisions for exhaust clearance.
LS1 Tech Stories
The Best V8 Stories One Small Block at Time

Topdon ONE vs. Artidiag 800 BT2: Which is the Diagnostic Tablet For You?
Pouria Savadkouei
Gas Monkey Built a 6-Wheel Ferrari Testarossa With a Corvette LT4 Engine
Verdad Gallardo
7 Most Reliable High-Performance Engines GM Has Ever Built
Verdad Gallardo
Amazing '71 Camaro Restomod Is Modern Muscle Car Under the Skin
Verdad Gallardo
6 Common C5 Corvette Failures and What's Involved In Repairing Them
Pouria Savadkouei
Retro Modern Bandit Pontiac Trans AM Comes With Burt Reynolds' Autograph
Verdad Gallardo
Top 10 Greatest Cadillac V Series Performance Models Ever, Ranked
Pouria Savadkouei
Top 10 Most Powerful Chevy Trucks Ever Made!

Hennessey's New Supercharged Silverado ZR2 Has 700 HP
Verdad Gallardo
the lh8 pan wasnt working for me either... i was having problems getting my motor mount bolt holes to line up due to the pan hittin the subframe.. the motor would have had to be lifted waay too much and the trans tunnel would have had to be modified to make it work... i sold two lh8 pans with a loss of $80 each
Thread Starter
11 Second Club
Joined: Mar 2008
Posts: 445
Likes: 1
From: New Westminster, B.C., Canada
Here'e my transmission crossmember. it's a 3 piece deal, took way too long to build, but thats the fun part, right?
Last edited by Marktainium; Nov 21, 2010 at 01:46 PM.
Thread Starter
11 Second Club
Joined: Mar 2008
Posts: 445
Likes: 1
From: New Westminster, B.C., Canada
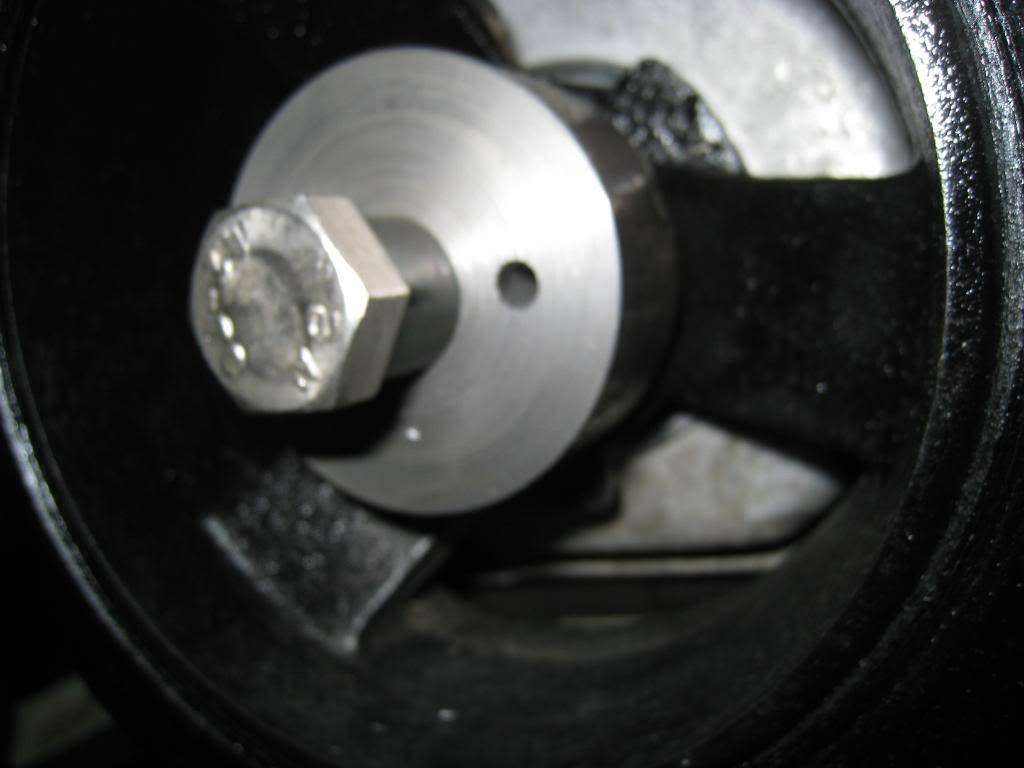
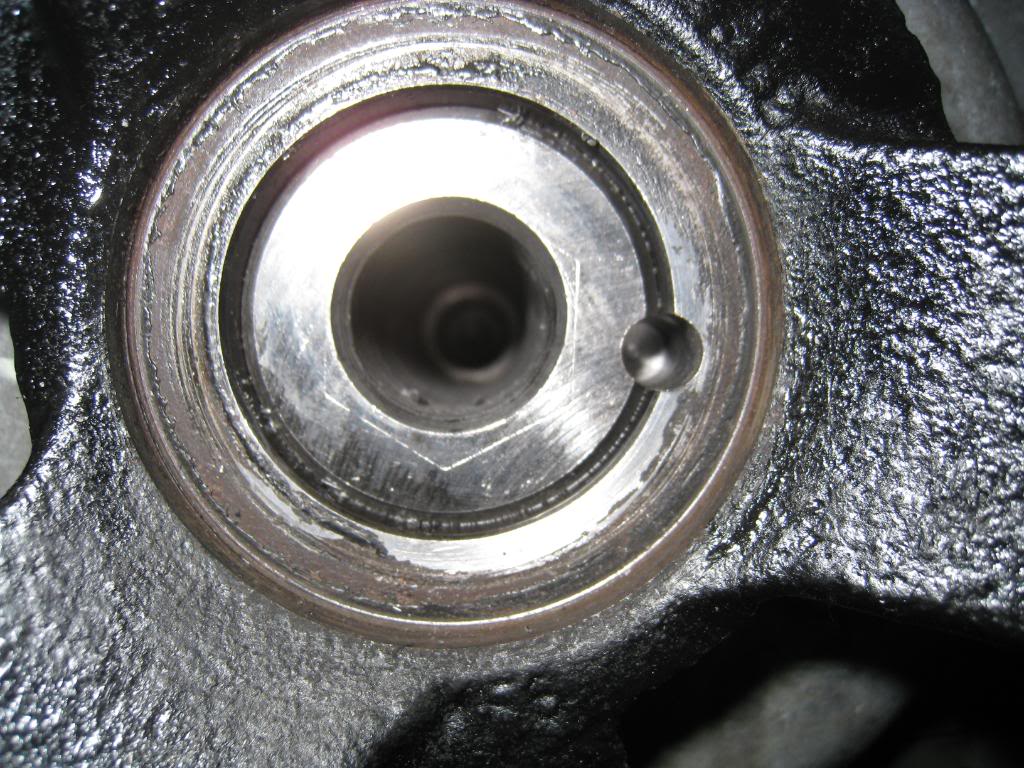
Since I am supercharging I had to 'pin' my harmonic balancer. Here's how that went.
1. Took a chunk of tool steel and 'spun up' a guide tool on a friends lathe.
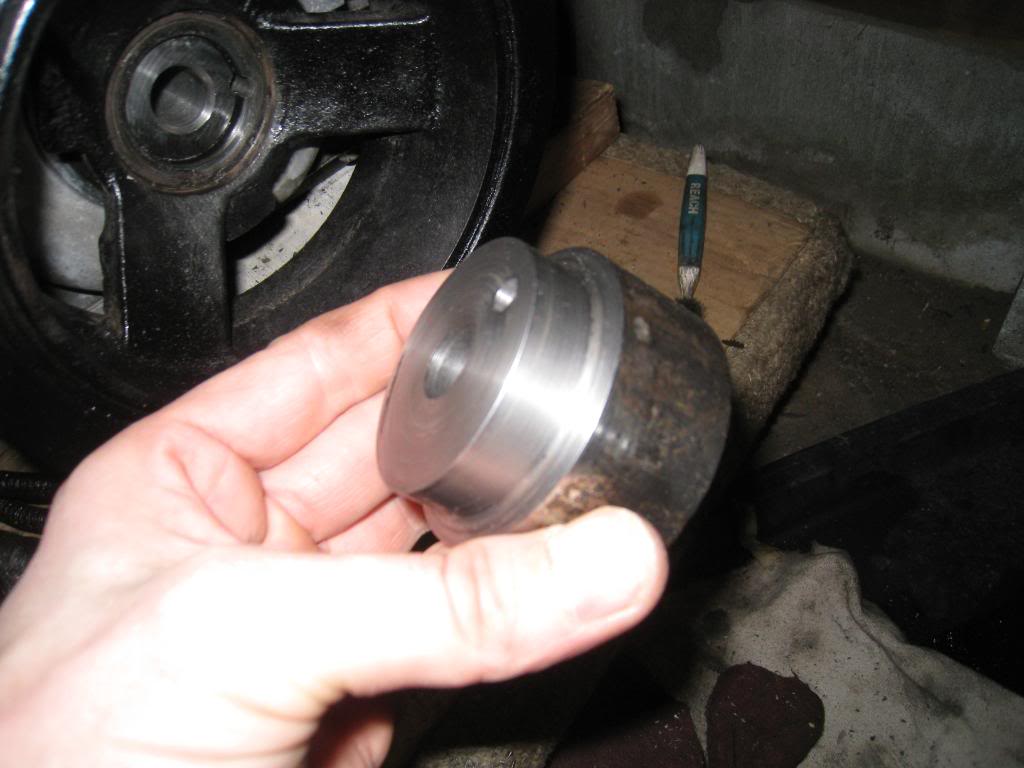
2. Bolted it to the balancer.
3. Took a brand new 1/4" drill bit and marked off with tape 5/8" depth.
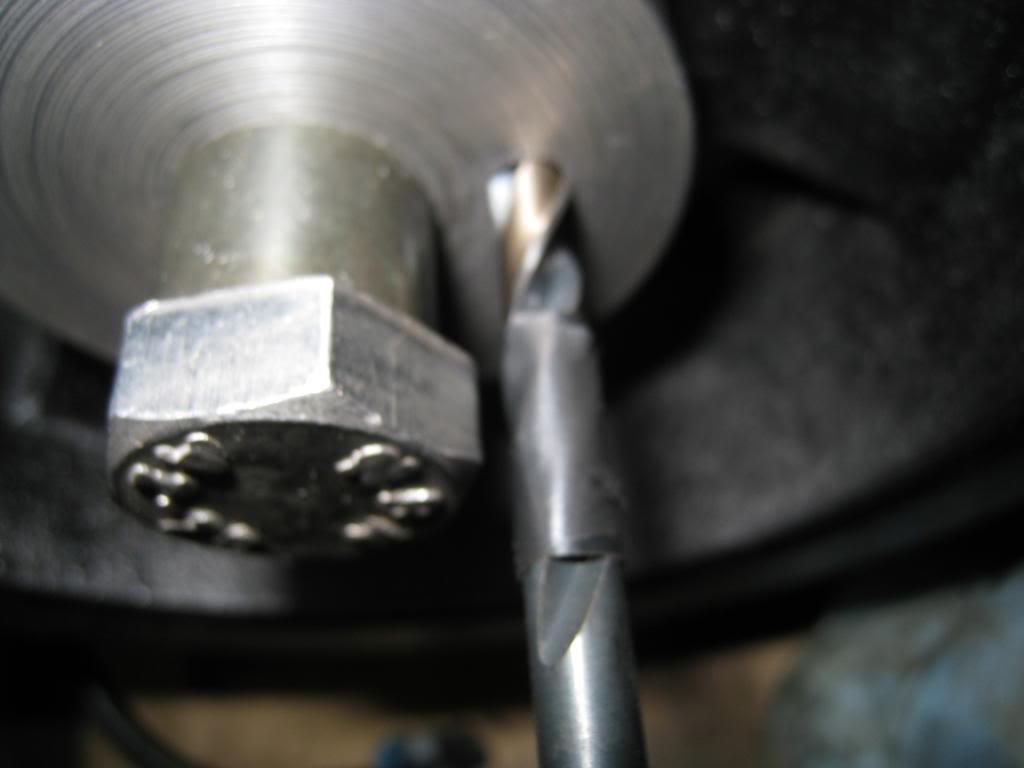
4. Drilled to depth, then removed Tool.
5. Cut 1/2" off of the chuck end of the 1/4" drill bit.
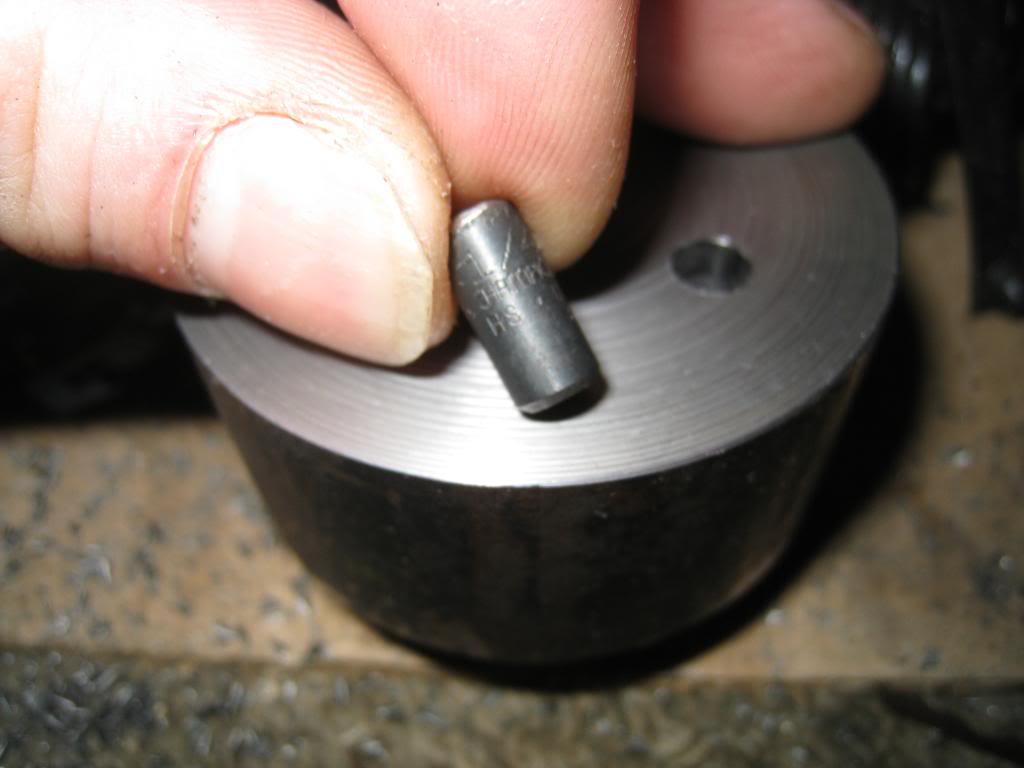
6. Inserted 1/2" drill bit piece into crank pin hole.
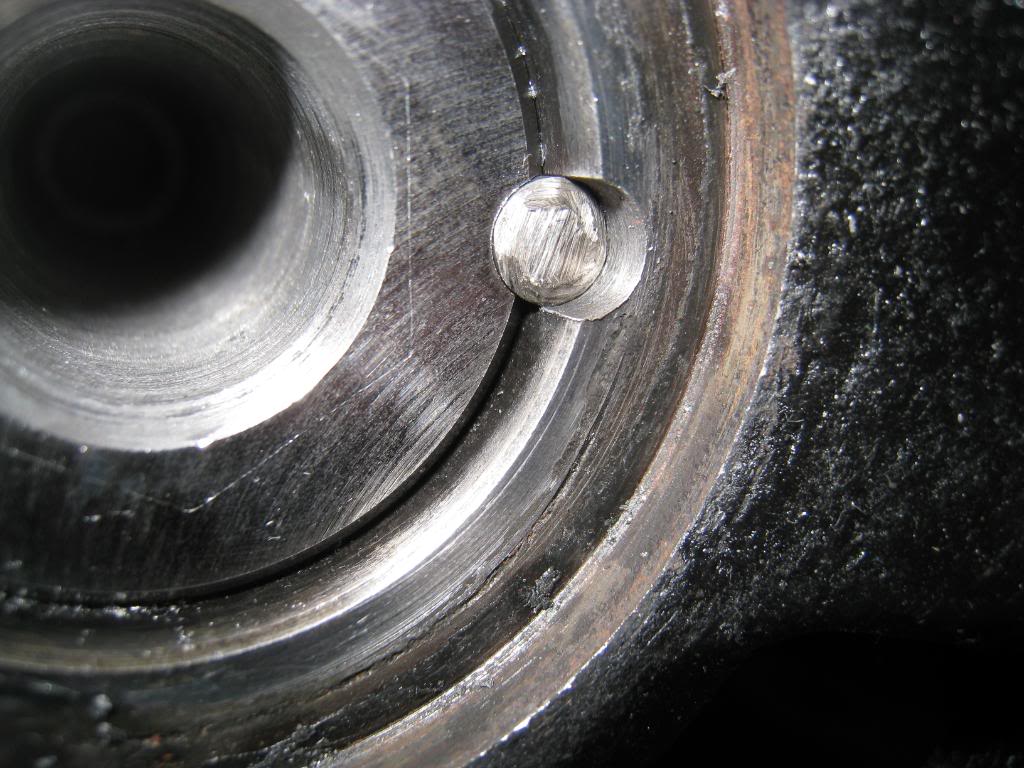
7. Re-assemble and enjoy!

1. Took a chunk of tool steel and 'spun up' a guide tool on a friends lathe.
2. Bolted it to the balancer.
3. Took a brand new 1/4" drill bit and marked off with tape 5/8" depth.
4. Drilled to depth, then removed Tool.
5. Cut 1/2" off of the chuck end of the 1/4" drill bit.
6. Inserted 1/2" drill bit piece into crank pin hole.
7. Re-assemble and enjoy!
Last edited by Marktainium; Nov 21, 2010 at 01:52 PM.
Thread Starter
11 Second Club
Joined: Mar 2008
Posts: 445
Likes: 1
From: New Westminster, B.C., Canada
The whole point of doing a project car is building it. I'm not rich either, so alot of it comes down to if I don't build it I can't buy it. Well, really, lets put it this way, if I could afford to buy the trick parts, I probably would. Until I win the Lotto, this is it. (Even if I was rich, I would still make my parts, only I wouldn't have a pesky day job to get in the way!)
Thread Starter
11 Second Club
Joined: Mar 2008
Posts: 445
Likes: 1
From: New Westminster, B.C., Canada
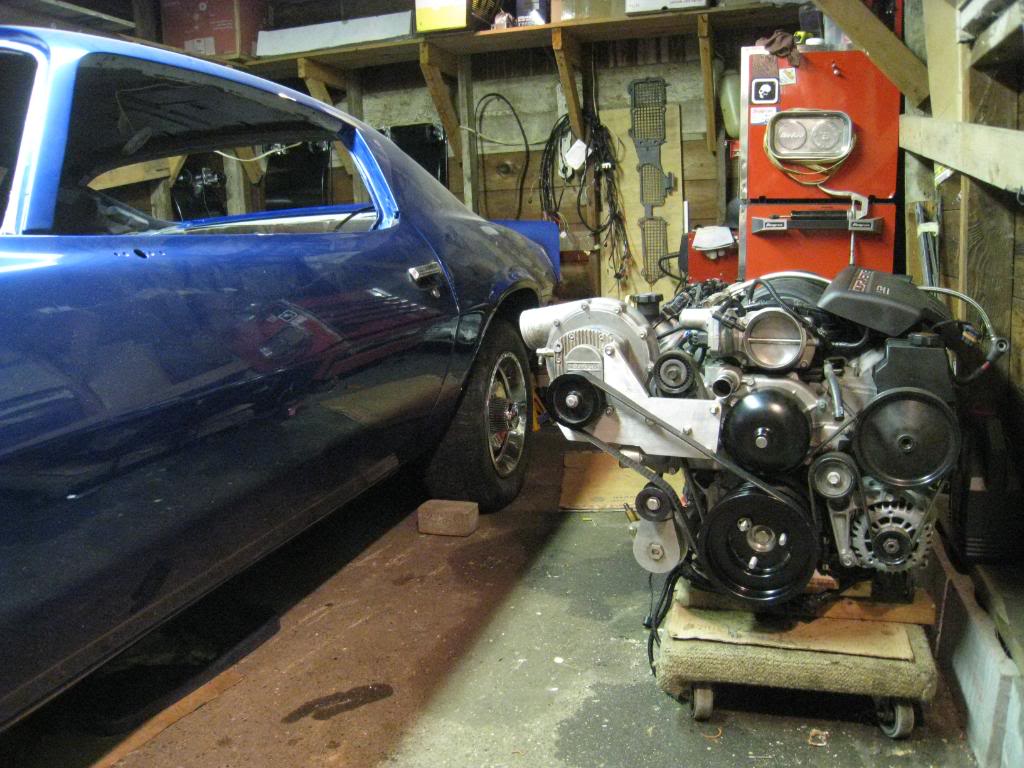
GOT IT IN!
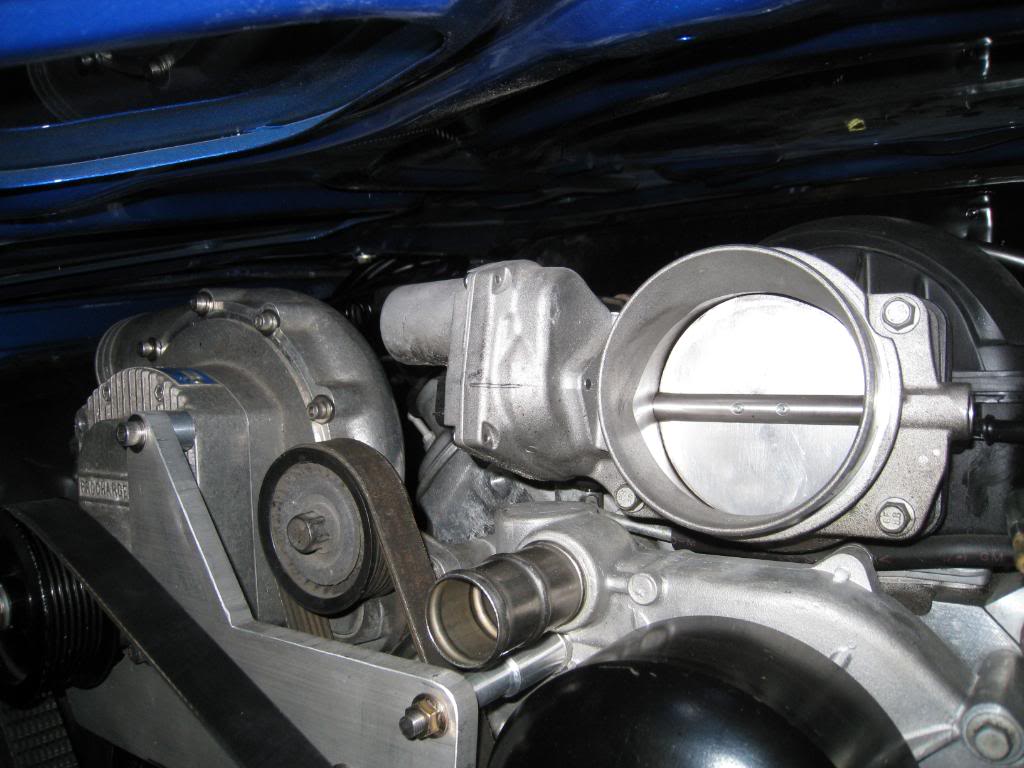
Hopefully this isn't another test fitting! Got the LS2 into it's mount and all bolted up. It's a tight fit, especially between the 'charger and the upper control arm. But there is space. Time to start the plumbing.
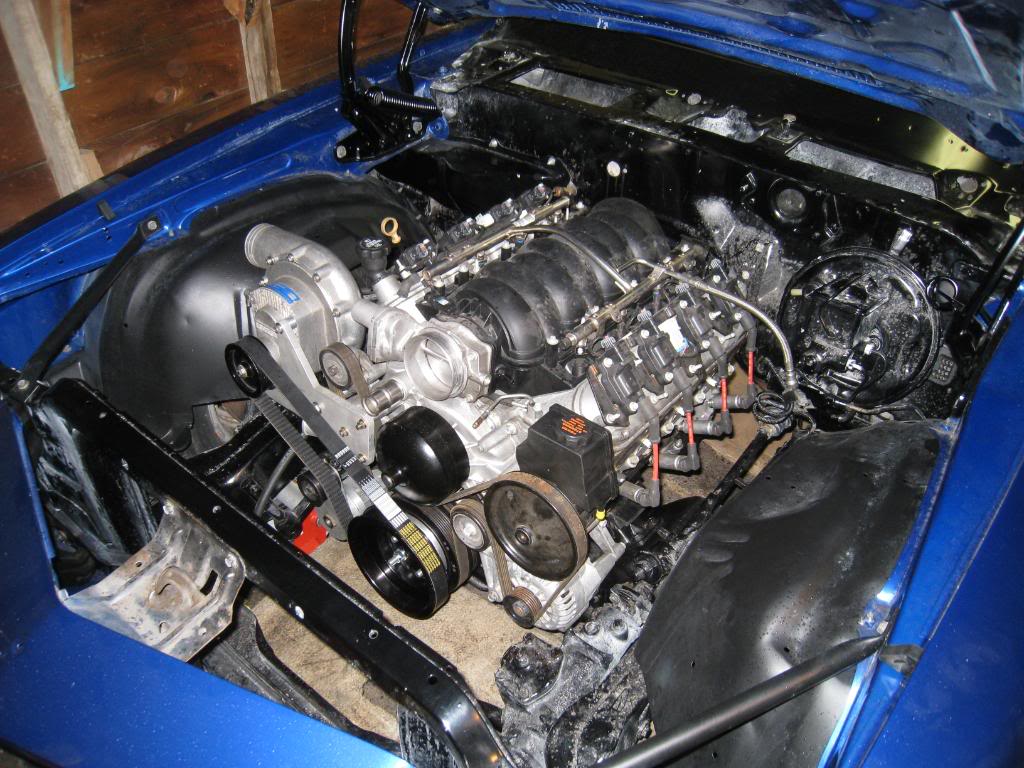
Hopefully this isn't another test fitting! Got the LS2 into it's mount and all bolted up. It's a tight fit, especially between the 'charger and the upper control arm. But there is space. Time to start the plumbing.
Last edited by Marktainium; Nov 21, 2010 at 01:55 PM.
Nice project man. It's always cool to see fellow LSx enthusiasts up here in Canada.
Awesome fab work, I'd love to have access to machines but right now it's just me and my MIG & anglegrinder And it's funny to see someone building in a garage smaller than mine, didn't think it was possible!!
Would love to see this one day when it's finished, maybe by that day my LQ4 conversion will be finished too!!!
Awesome fab work, I'd love to have access to machines but right now it's just me and my MIG & anglegrinder
And it's funny to see someone building in a garage smaller than mine, didn't think it was possible!!Would love to see this one day when it's finished, maybe by that day my LQ4 conversion will be finished too!!!


Thread Starter
11 Second Club
Joined: Mar 2008
Posts: 445
Likes: 1
From: New Westminster, B.C., Canada
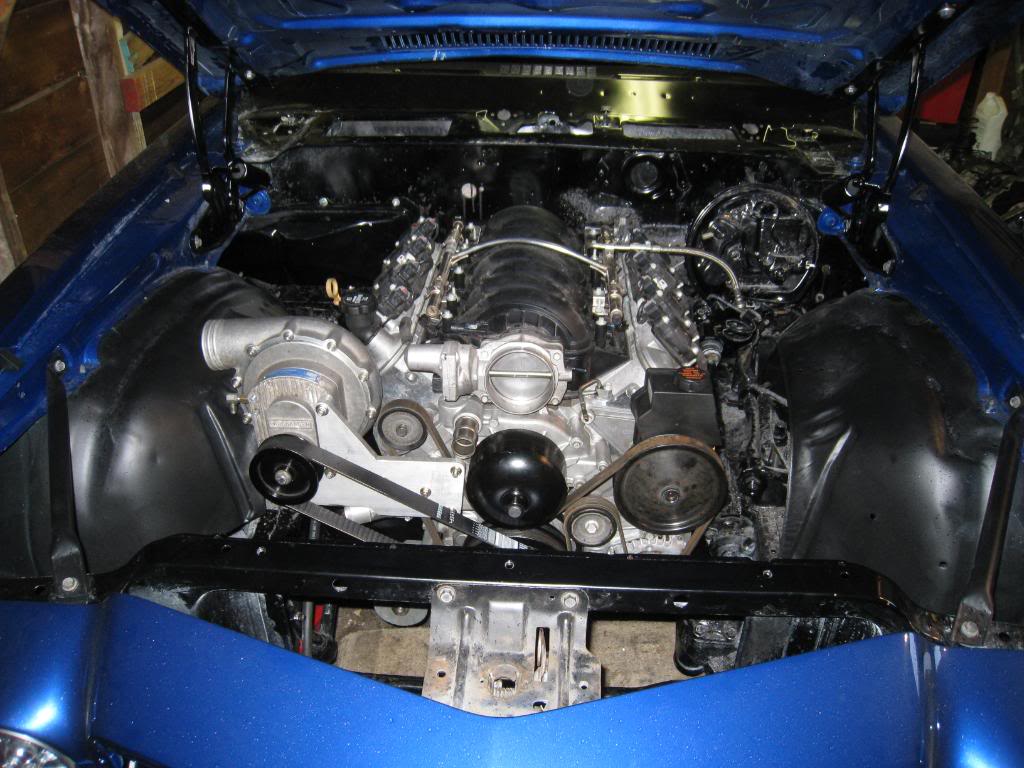
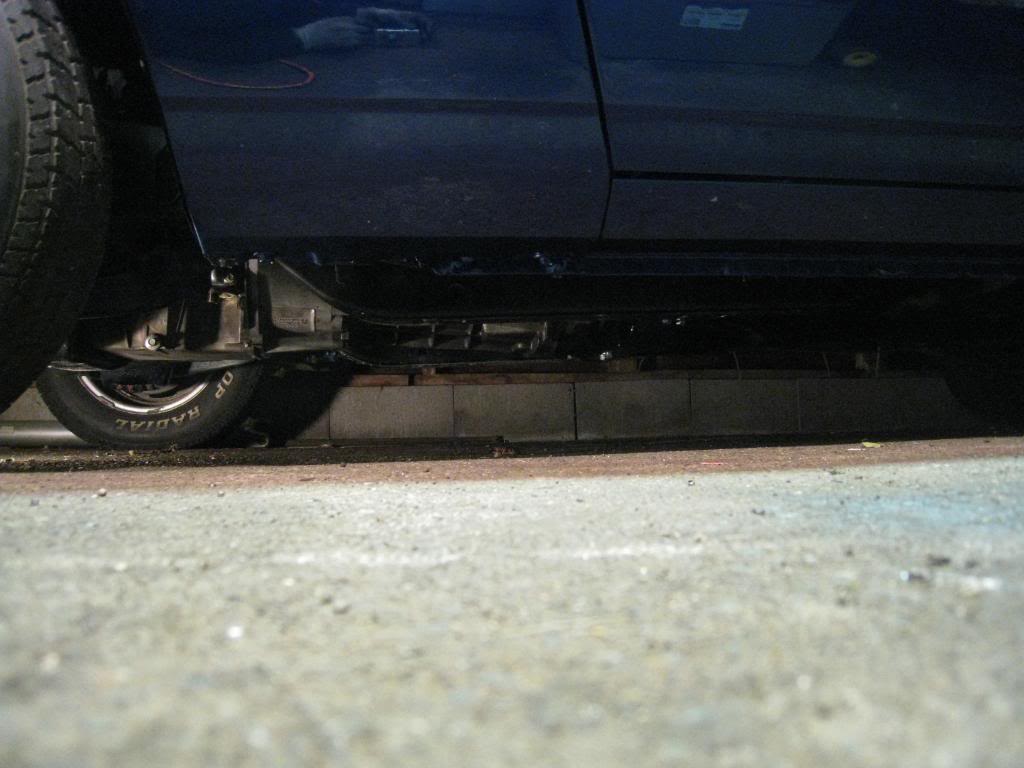
Cleaned up the tranny a bit and installed it tonight. The new crossmember worked perfectly, really happy about that! Here's a few pics. Note the clearance between the hood and intake, that shot is with the hood closed!
- all this is being done in a 10 x 20 garage too!!!
- all this is being done in a 10 x 20 garage too!!!
Last edited by Marktainium; Nov 21, 2010 at 01:57 PM.

TECH Resident


Joined: Apr 2008
Posts: 838
Likes: 12
From: Right here, right now!
Cleaned up the tranny a bit and installed it tonight. The new crossmember worked perfectly, really happy about that! Here's a few pics. Note the clearance between the hood and intake, that shot is with the hood closed!
- all this is being done in a 10 x 20 garage too!!!
- all this is being done in a 10 x 20 garage too!!!

Originally Posted by Marktainium
Here's my transmission crossmember. it's a 3 piece deal, took way too long to build, but that's the fun part, right?
Anyway, great job, I'm enjoying this build.
