


DIY - Anti-Sway Bar, Drag Race Sway Bar
Thread Starter
11 Second Club
iTrader: (37)
Joined: Mar 2004
Posts: 2,046
Likes: 3
From: Vancouver, WA
Has anyone ever thought of, or actually constructed their own anti-sway bar using an existing sway bar from another vehicle? I'm going to be building my own from a sway bar I got out of a recycling yard. It's measures 1.3" diameter and has roughly the same dimensions as our rear fbody sway bars. The only drawback is that it doesn't have the clearance hump for the pumpkin so I'll need to fabricate spacers so that it will ride behind that part of the rearend. It will need some modifications to the actual sway bar also so I'll post up some pics later tonight or tomorrow. If everything goes the way I plan, it should come in way less than 100.00 for all the parts needed.
Anyway, I was just curious if anyone had done this, or thought about it.... ?
Mike
Anyway, I was just curious if anyone had done this, or thought about it.... ?
Mike
Thread Starter
11 Second Club
iTrader: (37)
Joined: Mar 2004
Posts: 2,046
Likes: 3
From: Vancouver, WA
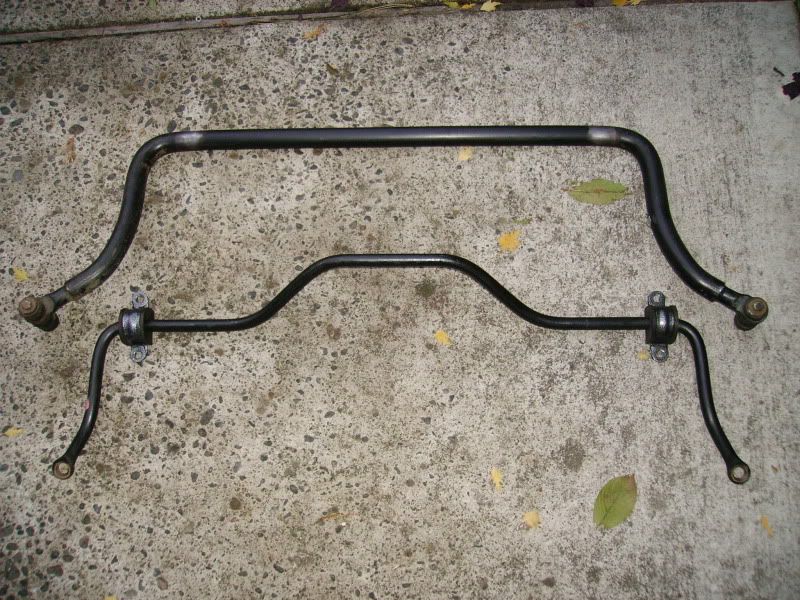
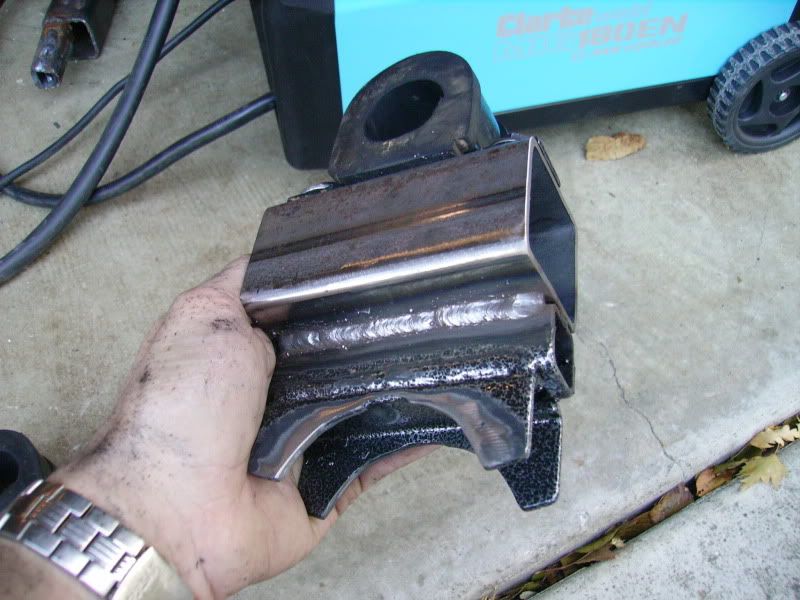
After doing some preliminary mock-up yesterday, this will easily clear a larger shock and have plenty of room for the adjustment **** as well. I had to cut off the stock ends from the new bar. I then welded on some 1/2" - 20 grade 8 bolts which will be the mounting points for the 1/2" spherical rod ends.
Here are a few pics of the larger anti-sway bar next to the stock bar. As you can tell, it dwarfs the stock bar. I'll have some better install pics tomorrow.

Mike
Here are a few pics of the larger anti-sway bar next to the stock bar. As you can tell, it dwarfs the stock bar. I'll have some better install pics tomorrow.
Mike
I think it looks good, but you might need to get some end-links and some other stuff to make it like a UMI or BMR drag bar. Maybe one of those sponsers can chime in and help you out.
thats gona hit the rear end, or you have to space it out as far as the offset is in a stock bar. Then you need the arms to be that long, if useing stock placement endlinks. That you dont have to use, so can move that point.
There is one problem I see is that no matter how thick it is, your not going to get that "Drag bar" ability until there is a solid Rod ended link there and the UMI peice I just installed makes sense. Spohn sells a stock style, thicker then stock bar which will help but will not be the cure car needs. Due to the weight, it needs something more solid. I think solving the connections from the bar to rear and bar to chassis to create the least amount of deflection is what is more important.
The UMI bar has the shackles and poly bushings for the bar to axle connection but its very thin and just enough to quiet the rear, so there is pretty much no deflection. The only other thing you can do is like a Wolfe bar and weld the bar to the rear with some tri angle gussets. but that requires the knowledge of where the bar needs to be before welding.
The UMI bar has the shackles and poly bushings for the bar to axle connection but its very thin and just enough to quiet the rear, so there is pretty much no deflection. The only other thing you can do is like a Wolfe bar and weld the bar to the rear with some tri angle gussets. but that requires the knowledge of where the bar needs to be before welding.
Trending Topics
Thread Starter
11 Second Club
iTrader: (37)
Joined: Mar 2004
Posts: 2,046
Likes: 3
From: Vancouver, WA
There is one problem I see is that no matter how thick it is, your not going to get that "Drag bar" ability until there is a solid Rod ended link there and the UMI peice I just installed makes sense. Spohn sells a stock style, thicker then stock bar which will help but will not be the cure car needs. Due to the weight, it needs something more solid. I think solving the connections from the bar to rear and bar to chassis to create the least amount of deflection is what is more important.
The UMI bar has the shackles and poly bushings for the bar to axle connection but its very thin and just enough to quiet the rear, so there is pretty much no deflection. The only other thing you can do is like a Wolfe bar and weld the bar to the rear with some tri angle gussets. but that requires the knowledge of where the bar needs to be before welding.
The UMI bar has the shackles and poly bushings for the bar to axle connection but its very thin and just enough to quiet the rear, so there is pretty much no deflection. The only other thing you can do is like a Wolfe bar and weld the bar to the rear with some tri angle gussets. but that requires the knowledge of where the bar needs to be before welding.
 What I had planned to do was weld two 3" long bolts together end-to-end (one RH thread, the other LH thread) like this ----][---- .
 For now I'll use the stock rubber bushing on the housing mount. Once I find out if this will work or not, I'll upgrade to a poly type bushing to minimize flex. Even with the flex though, the piece will still be "preloaded" which should remove 80% of the flex anyway. ?
Here is a parts list (and prices) with what I have so far:
-99' S10 4WD Blazer Front Sway Bar - 35.00
- (2) 1/2-20 RH Thread Female Spherical Rod Ends - 26.00
- (2) 1/2-20 LH Thread Female Spherical Rod Ends - 26.00 <- Haven't used yet
- (2) 1/2-20 x 5.5" RH Thread Bolt - 7.00
- (2) 1/2-20 x 1.5" RH Thread Bolt - 1.80
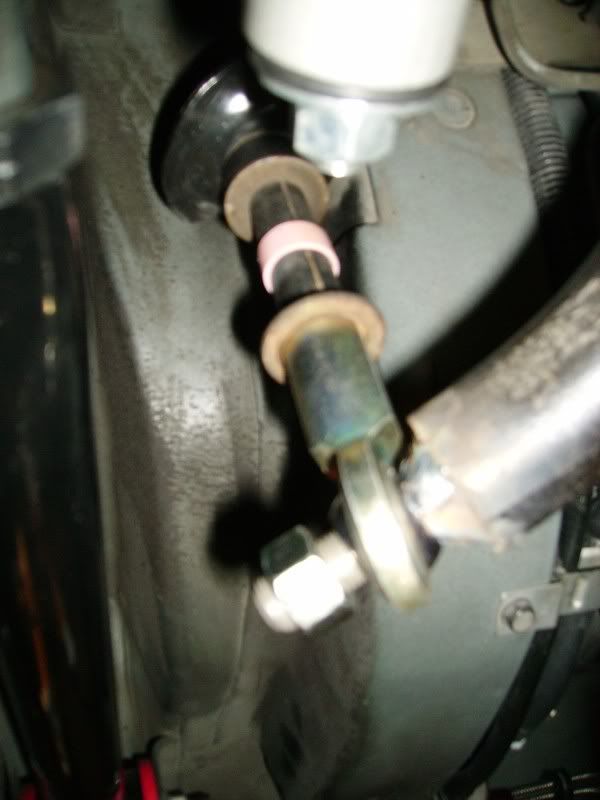
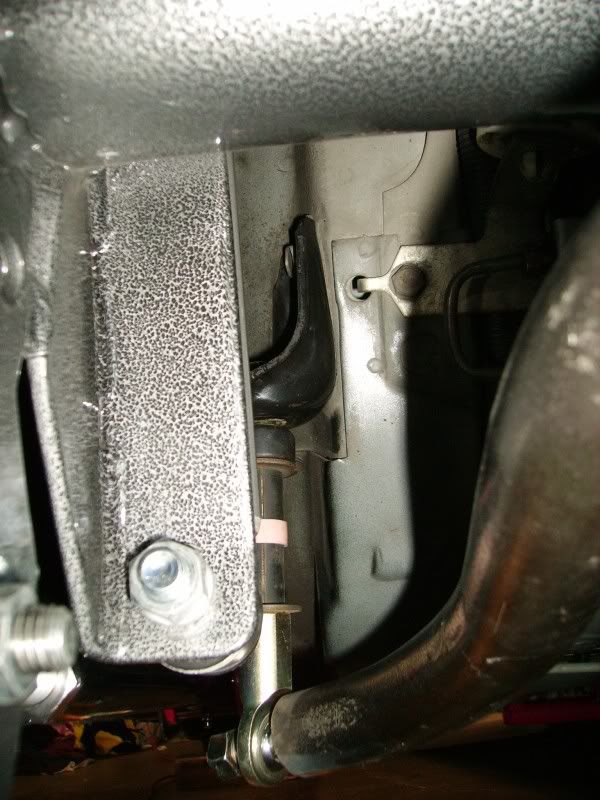
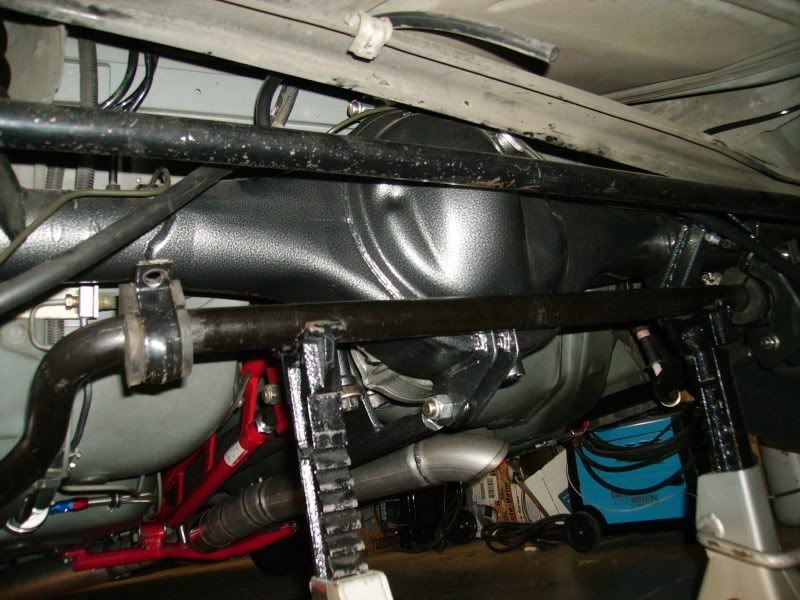
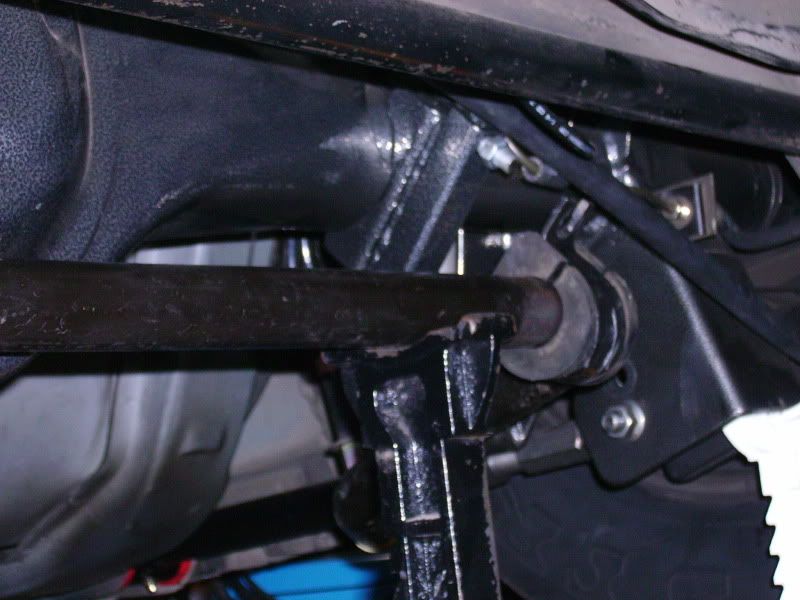
Here's a few more pics of the install/mock-up. I'll be working on this some more today. I need to finish up the rearend mounting points/spacers and try to figure out how to add another heim joint to the top of the end link mount.
Spherical Rod End (heim joint) and welded grade 8 bolt to the sway bar end.
Shock clearance.
Anti-sway bar location to rearend housing and spacer requirement.
Mike
LS1 Tech Stories
The Best V8 Stories One Small Block at Time

Topdon ONE vs. Artidiag 800 BT2: Which is the Diagnostic Tablet For You?
Pouria Savadkouei
Gas Monkey Built a 6-Wheel Ferrari Testarossa With a Corvette LT4 Engine
Verdad Gallardo
7 Most Reliable High-Performance Engines GM Has Ever Built
Verdad Gallardo
Amazing '71 Camaro Restomod Is Modern Muscle Car Under the Skin
Verdad Gallardo
6 Common C5 Corvette Failures and What's Involved In Repairing Them
Pouria Savadkouei
Retro Modern Bandit Pontiac Trans AM Comes With Burt Reynolds' Autograph
Verdad Gallardo
Top 10 Greatest Cadillac V Series Performance Models Ever, Ranked
Pouria Savadkouei
Top 10 Most Powerful Chevy Trucks Ever Made!

Hennessey's New Supercharged Silverado ZR2 Has 700 HP
Verdad Gallardo Thread Starter
11 Second Club
iTrader: (37)
Joined: Mar 2004
Posts: 2,046
Likes: 3
From: Vancouver, WA
Mike
I like the pics and I see what your saying. All I worry now is 2 things, until you get the proper joints for the top of the end link, you may end up bending the tabs, some gussets may be of help.
The other is the placement of the bar, my understanding that having the bar too forward or 2 far behind may not help either. But if anyone can chime in, that be helpful. I do not see enough meterial to give you the proper bend the clear the 9 " and I see you adding meterial.
Does the bar have to have bends or can it be cut, added to, and reinforced?
Thread Starter
11 Second Club
iTrader: (37)
Joined: Mar 2004
Posts: 2,046
Likes: 3
From: Vancouver, WA
I like the pics and I see what your saying. All I worry now is 2 things, until you get the proper joints for the top of the end link, you may end up bending the tabs, some gussets may be of help.
The other is the placement of the bar, my understanding that having the bar too forward or 2 far behind may not help either. But if anyone can chime in, that be helpful. I do not see enough meterial to give you the proper bend the clear the 9 " and I see you adding meterial.
Does the bar have to have bends or can it be cut, added to, and reinforced?
The other is the placement of the bar, my understanding that having the bar too forward or 2 far behind may not help either. But if anyone can chime in, that be helpful. I do not see enough meterial to give you the proper bend the clear the 9 " and I see you adding meterial.
Does the bar have to have bends or can it be cut, added to, and reinforced?
As for adding material to the stock tabs on the top, I'll probably end up fabbing up new ones for the top heim joint mount. But you're correct, I don't think the stock sway bar mounting tab would take much stress before it bent or broke. I'll get it figured out this week.

No there's not enough material to put bends in the center to clear the hump. Matter of fact, it's barely long enough to clear the center portion of the 9" housing before the axle tube welds. Also, the bar is made from very strong material and I doubt it would bend without breaking anyway. I burned up 5 drill bits trying to drill the end of this bar.
 I've used those same bits to drill mild steel and they go through that like butter.
 Mike


Thread Starter
11 Second Club
iTrader: (37)
Joined: Mar 2004
Posts: 2,046
Likes: 3
From: Vancouver, WA
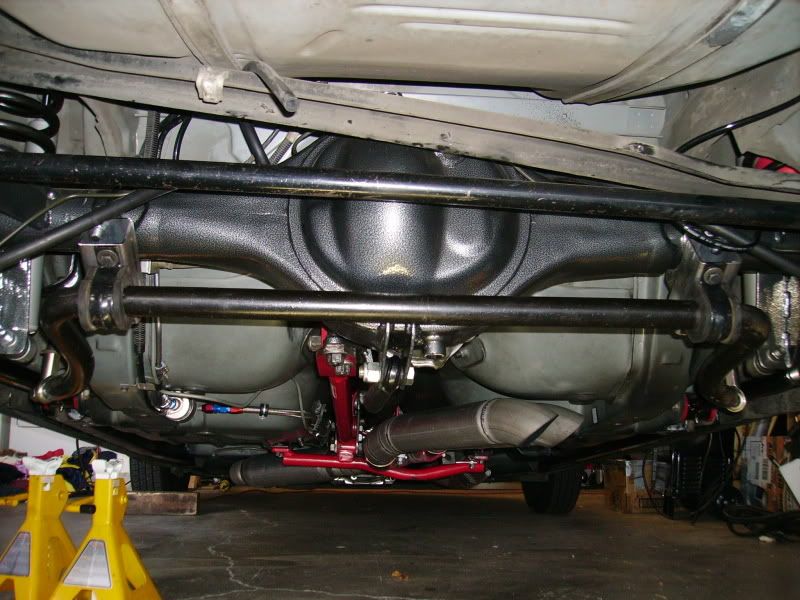
Well I made some more progress today. Got the spacers made for the bar but I still need to weld them to the rearend housing. I might just tack them in place for now. Still undecided how I'm going to get another heim joint for the top mount for the endlink. 
Here's some more pics of how it's coming along. Should be ready to test it out at the track this coming Friday.


Mike
Here's some more pics of how it's coming along. Should be ready to test it out at the track this coming Friday.
Mike
Thread Starter
11 Second Club
iTrader: (37)
Joined: Mar 2004
Posts: 2,046
Likes: 3
From: Vancouver, WA
Thank guys. This one is the front sway bar from a 99 4WD S10 Blazer, so they should be easy to find in wrecking/recycling yards.
I looked at a sway bar from a 95 Ford Explorer that looked promising also, but I think the arms were too wide and too long. It was 1.4" diameter.
Mike
I looked at a sway bar from a 95 Ford Explorer that looked promising also, but I think the arms were too wide and too long. It was 1.4" diameter.
Mike
Thread Starter
11 Second Club
iTrader: (37)
Joined: Mar 2004
Posts: 2,046
Likes: 3
From: Vancouver, WA
It shouldn't be an issue as long as the mounts don't spin/rotate on the housing. I'll find out for sure this coming weekend, weather permitting of course.
Thanks man. Do you ever make it down to the Portland/Vancouver area?
Mike
Thanks man. Do you ever make it down to the Portland/Vancouver area?
Mike